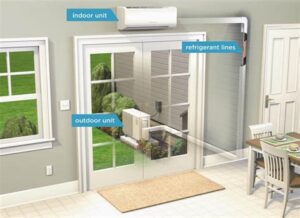
Discover the benefits of Pioneer Mini Splits, learn the installation process, choose the right location, and ensure efficient operation for optimal comfort.Are you considering upgrading your home’s heating and cooling system? The Pioneer mini split system might just be the perfect solution for your needs. With its versatile design, energy efficiency, and ability to provide both heating and cooling, the Pioneer mini split offers numerous benefits for homeowners. In this blog post, we’ll explore everything you need to know about installing a Pioneer mini split, from understanding its advantages to selecting the ideal location for installation. We’ll break down the installation process and provide you with step-by-step guidance to ensure proper setup and efficient operation. Whether you’re a seasoned DIY enthusiast or a beginner, our comprehensive guide will help you navigate through the entire process with confidence. Let’s dive in and discover how a Pioneer mini split can enhance your home comfort!
Benefits of Pioneer Mini Split
The Pioneer Mini Split system has gained significant popularity in modern heating and cooling solutions. One of the key benefits of this system is its energy efficiency. With advanced inverter technology, mini splits can adjust their power output based on the room’s temperature, leading to substantial energy savings compared to traditional HVAC systems.
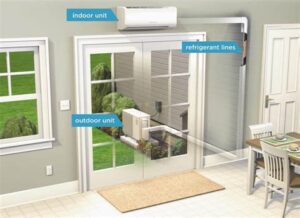
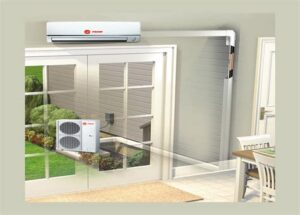
Another notable advantage is the flexibility in installation. Unlike conventional systems that require extensive ductwork, the Pioneer Mini Split only needs a small hole in the wall for the indoor and outdoor units. This means it can be installed in various settings, including apartments, homes, and commercial spaces, without the need for complex renovations.
The quiet operation of the Pioneer Mini Split is another compelling benefit. The noise levels produced by mini splits are significantly lower than those of traditional HVAC units, making them an excellent choice for bedrooms, offices, and other quiet environments. Additionally, mini splits provide zoned heating and cooling, allowing homeowners to control the temperature in multiple areas independently, thus enhancing comfort and convenience.
Installation Process Overview
Installing a Pioneer mini split system can substantially enhance your home’s comfort and energy efficiency. However, successful installation requires proper planning and understanding of the process. Below, we provide an overview of the essential steps involved in the Pioneer mini split installation.
1. Gather Necessary Tools and Materials
Before starting the installation, ensure you have all the required tools and materials. Some of the essential items include:
- Drill
- Level
- Measuring tape
- Wire cutters
- Refrigerant lines
- Mounting brackets
2. Choose the Right Location
Identify an optimal spot for placing the Pioneer mini split indoor unit. It should be free from obstructions and ideally located near the outdoor unit for better efficiency in cooling or heating. Make sure the location can support the weight of the unit.
3. Install the Mounting Bracket
Once you have selected the location, install the mounting bracket securely to ensure that the unit is stable and level. Use a level to double-check the alignment before proceeding.
4. Connect Refrigerant Lines
Carefully connect the refrigerant lines between the outdoor and indoor units. Ensure all connections are secure and follow the manufacturer’s guidelines to prevent leaks and ensure optimal performance.
5. Complete Electrical Connections
Electrical connections are crucial for the unit’s operation. Connect the power supply cables to the indoor unit, following the installation manual precisely. It is advisable to consult a licensed electrician if you are unsure about handling electrical components.
6. Test the System
After completing all connections, turn on the system and test its functionality. Ensure that the Pioneer mini split operates correctly and check for any unusual sounds or issues.
By following this installation process overview, you can lay the groundwork for a successful and efficient installation of your Pioneer mini split system. Whether you are a DIY enthusiast or hiring a professional, understanding these steps will help you to achieve superior performance and comfort in your space.
Your approach to installing the Pioneer mini split system ultimately affects its efficiency and longevity. Therefore, take the time to understand each step fully and don’t hesitate to seek help or guidance where needed.
With a well-installed Pioneer mini split, you can enjoy a cooler home during summer and sufficient heat
Selecting the Right Location
When it comes to the Pioneer Mini Split installation, selecting the right location is crucial for optimal performance and efficiency. The location of your mini split system can significantly impact its effectiveness in heating or cooling your space. Here are some essential factors to consider when choosing the right spot:
- Wall Space: Ensure there is enough wall space for the indoor unit. The unit should be mounted high on the wall and unobstructed by furniture or other items.
- Airflow: Select a location where the airflow is unobstructed. This includes keeping away from corners and avoiding any obstructions that may block the air intake or output.
- Distance from Outdoor Unit: The indoor unit should be positioned at a reasonable distance from the outdoor condenser unit to minimize the length of the refrigerant lines.
- Access to Power Supply: Ensure the chosen location is near an electrical outlet or can easily accommodate additional wiring if necessary.
- Insulation and Structure: The surrounding walls should be well insulated to maintain the desired temperature and improve energy efficiency.
In addition to these factors, consider the overall layout of your space. For instance, if the goal is to create an evenly distributed temperature throughout a larger area, multiple units may be required. It’s also essential to ensure that the area selected allows for easy maintenance access to the unit over time.
Finally, always consult with a professional installer or HVAC technician when determining the best location for your Pioneer Mini Split. They can provide invaluable insights based on your specific environment and needs, ensurin
Steps for Proper Installation
Installing a Pioneer Mini Split system requires careful planning and execution to ensure optimal performance and longevity. Here are the essential steps for a proper installation:
1. Select the Appropriate Location: Choose a location for both the indoor and outdoor units that promotes efficient airflow and access for maintenance. Ensure that the indoor unit is placed high on a wall to maximize air distribution.
2. Measure and Mark: Before drilling, measure the distance between the indoor and outdoor units. Mark the location of mounting brackets and the line set that will connect the two units. Use a level to ensure everything is straight.
3. Install the Mounting Bracket: Secure the mounting bracket for the indoor unit to the wall. Make sure it is level and tightly fastened to support the weight of the unit.
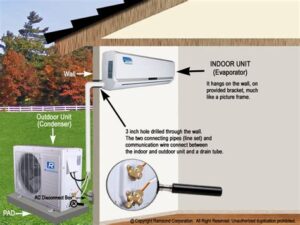
4. Drill the Hole: Drill a hole through the wall for the refrigerant line and electrical cables. Be cautious to avoid any electrical wires or plumbing lines inside the walls.
5. Connect the Line Set: Route the refrigerant line and electrical cable through the hole to the outdoor unit. Make sure to properly insulate the line set to prevent energy loss.
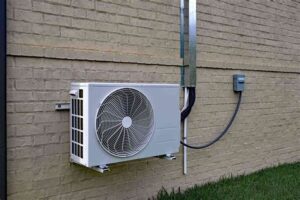
6. Mount the Outdoor Unit: Install the outdoor unit on a solid surface, ensuring it is level and secure. Use rubber pads or vibration isolators to reduce noise and vibrations.
7. Connect the Units: Follow the manufacturer’s instructions to connect the refrigerant lines and wiring between the indoor and outdoor units. Use a torque wrench to ensure all connections are secure.
8. Vacuum and Test: Before starting the unit, use a vacuum pump to remove any air from the refrigerant lines. This step is crucial for the efficient operation of the Pioneer Mini Split.
9. Power Up: Once everything is connected and vacuumed, turn on the power to the outdoor unit and test the system to ensure that both the indoor and outdoor units are functioning correctly.
10. Final Checks: Inspect all connections for leaks, ensure the drainage is clear, and double-check that the units are level and securely mounted.
Following these steps will ensure a successful installation of your Pioneer Mini Split system, leading to efficient operation and lasting comfort in your home.
Ensuring Efficient Operation
Ensuring the efficient operation of your Pioneer mini split system is essential for maximizing comfort and minimizing energy costs. Here are several key factors to consider:
- Regular Maintenance: Schedule periodic checks to clean the filters and coils. This helps maintain airflow and efficiency.
- Thermostat Settings: Keep your thermostat at a moderate temperature. Setting it too low or too high can cause the system to work harder than necessary.
- Sealing Ducts and Doors: Ensure that your ducts, windows, and doors are properly sealed to avoid energy loss.
- Professional Checks: Have a technician inspect your system yearly to identify and rectify any potential issues.
Furthermore, it’s important to monitor the system’s performance. Look for signs of inefficiency such as uneven temperatures in different rooms or increased energy bills. If you notice these issues, consult an HVAC professional to address them.
Finally, ensuring your Pioneer mini split system runs efficiently will not only enhance your comfort but also extend the lifespan of the unit. By being proactive in your approach, you can enjoy reliable performance and significant savings.
Frequently Asked Questions
What is a pioneer mini split system?
A pioneer mini split system is a type of ductless air conditioning and heating system that allows for individual temperature control in different rooms or zones of your home.
What are the advantages of installing a mini split system?
The advantages include energy efficiency, easy installation, flexibility in zoning, improved indoor air quality, and quiet operation.
What tools do I need to install a pioneer mini split system?
You will need basic hand tools such as a drill, level, measuring tape, refrigerant gauge set, line wrenches, and a vacuum pump.
Can I install a pioneer mini split system myself?
Yes, but it is recommended to hire a professional for the installation to ensure safety and compliance with local codes, especially when handling refrigerants.
How do I determine the right size of a mini split system for my space?
The right size can be determined through a calculation called Manual J, which takes into account the room size, insulation, number of windows, and climate conditions.
Are there any maintenance requirements for a mini split system?
Yes, regular maintenance includes cleaning the filters, checking the refrigerant levels, and ensuring the outdoor unit is free from debris to maintain efficiency.
What is the general cost of a pioneer mini split installation?
The installation cost can vary widely based on the unit’s size, installation complexity, and local labor rates, but typically ranges from $1,500 to $5,000.

