Explore the essentials of multi-zone mini split systems, from installation diagrams to troubleshooting tips, ensuring optimal performance for your HVAC needs.When it comes to effective heating and cooling solutions for your home, multi zone mini split systems stand out for their versatility and efficiency. These systems allow you to control the temperature in different areas with remarkable precision, making them perfect for both residential and commercial spaces. In this blog post, we will explore the essential components of a mini split installation diagram, enabling you to grasp the intricacies of setting up your system. We will guide you through designing the ideal installation layout, connecting indoor and outdoor units, and finally, testing and troubleshooting the system to ensure optimal performance. Whether you’re a seasoned DIY enthusiast or a novice looking to enhance your knowledge, our comprehensive overview will provide the insights you need to master multi zone mini split installations. Let’s dive in!
Understanding Multi Zone Mini Split Systems
Multi zone mini split systems are a popular choice for heating and cooling residential and commercial spaces, allowing for individualized climate control in multiple zones. These systems consist of one outdoor unit paired with multiple indoor units, enabling users to set different temperatures in different rooms. This not only enhances comfort but also promotes energy efficiency, as you can adjust the temperature based on the specific needs of each area.
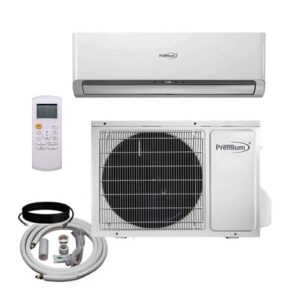
The key components of a multi zone mini split system include the compressor, evaporator units, and the refrigerant lines. The compressor, located in the outdoor unit, compresses the refrigerant and pumps it through insulated lines to the indoor evaporators, where it releases or absorbs heat. Each indoor unit is equipped with its own thermostat, allowing for centralized control over temperature settings in each zone.
Installation typically requires meticulous planning to ensure that the indoor and outdoor units are effectively connected, often represented in detailed installation diagrams. These diagrams illustrate how refrigerant lines and electrical connections are routed, highlighting the importance o
Components of Mini Split Installation Diagram
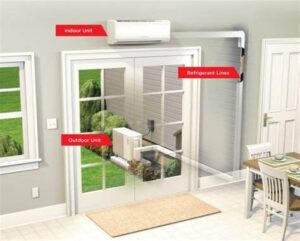
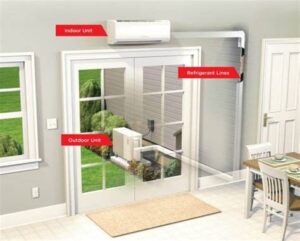
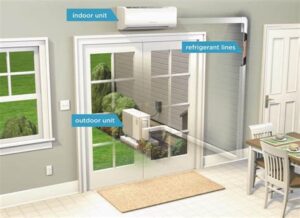
Understanding the components of a mini split installation diagram is vital for anyone considering or working on a multi-zone mini split system. At the core, these diagrams illustrate how various units connect and function together, ensuring efficient heating and cooling throughout your space.
A typical mini split installation diagram includes several key elements:
| Component | Description |
|---|---|
| Indoor Units | These are the components that distribute conditioned air into the designated areas of your home or office. |
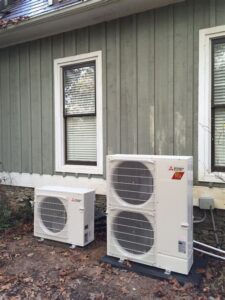
| Outdoor Unit | This component is responsible for heat exchange and is typically located outside the building. |
| Refrigerant Lines | These lines carry refrigerant between the indoor and outdoor units, facilitating the cooling and heating process. |
| Drainage Line | This line expels condensation away from the indoor units, preventing water damage and maintaining system efficiency. |
| Electrical Connections | These connections allow the indoor and outdoor units to communicate and function harmoniously. |
Having a well-structured mini split installation diagram helps ensure that each component is correctly installed and functions as intended. Proper installation is crucial for maximizing the system’s efficiency and longevity, making it essential to understand every part involved.
In summary, familiarity with these components allows for better planning and execution of the installation process, reducing the possibility of mistakes that could lead to inefficiencies or system failures. For heating and cooling systems to perform at their best, every element mu
Designing the Ideal Installation Layout
When it comes to designing the ideal installation layout for a multi-zone mini-split system, several factors must be considered. The aim is to ensure efficiency, effectiveness, and a seamless operation of the system throughout the various zones in your space.
First and foremost, assess your space requirements. Calculate the square footage of each zone that you wish to heat or cool. This will help you determine the heating and cooling capacity required for each indoor unit. Proper allocation of capacity is crucial to achieving a balanced climate in every room.
Moreover, take into account ductless unit placement. Indoor units should be positioned to maximize air circulation. Consider areas free from obstructions and avoid placing them directly above furniture. Outdoor units must also be strategically located, with adequate clearance for maintenance and optimal airflow. Planning an installation with these elements in mind will enhance the overall performance and longevity of your system.
| Consideration | Details |
|---|---|
| Space Requirements | Calculate the square footage of each zone. |
| Heating/Cooling Capacity | Allocate appropriate capacity for each indoor unit. |
| Unit Placement | Maximize air circulation; avoid obstructions. |
| Outdoor Unit Location | Ensure accessibility and airflow. |
Planning your installation layout meticulously can lead to significant energy savings and prevent future issues. A well-thought-out design not only ensures a comfortable environment but also enhances the system’s reliability and efficiency. Thus, whether you are undertaking this project yourself or hiring a professional, focusing on these crucial aspects will prove beneficial.
Connecting Indoor and Outdoor Units
When it comes to installing a multi-zone mini split system, one of the crucial steps is connecting the indoor and outdoor units. This process ensures that the entire system operates efficiently and effectively. Understanding the connections involved can help in achieving optimal performance.
The connection between the indoor and outdoor units typically involves refrigerant lines, electrical wiring, and a condensate drain. Here’s a quick breakdown of these components:
- Refrigerant Lines: These are essential for transporting refrigerant between the indoor and outdoor units. It’s vital to ensure that these lines are properly insulated to prevent energy losses.
- Electrical Wiring: Adequate electrical connections must be made to power both units. Refer to the manufacturer’s installation manual for the correct wiring configurations.
- Condensate Drain: This line is used to drain any excess moisture from the indoor unit, preventing water damage and mold growth.
In many cases, a proper installation diagram can greatly assist in visualizing how these connections should be established. It’s advisable to follow the installation diagrams meticulously to avoid potential pitfalls and ensure a successful setup.
By carefully connecting the indoor and outdoor units and double-checking all connections, you contribute to the reliability and longevity of your mini-split system. This attention to detail during insta
Testing and Troubleshooting the System
After the multi-zone mini split installation is complete, it’s crucial to ensure that the system is operating efficiently and effectively. Testing the system involves several steps to verify that every component is functioning correctly. Start by checking the thermostat settings to ensure they are correctly set for the desired comfort level.
Next, examine the indoor units. Turn each unit on one at a time and listen for any unusual sounds, such as rattling or squeaking, which may indicate loose parts or improper installation. Make sure that the airflow is unobstructed and that the filters are clean. A clogged filter can hinder performance significantly.
For the outdoor unit, monitor during operation for any signs of blockage or damage. Ensure that the refrigerant lines are properly insulated and free from kinks. If you detect any fluctuations in temperature or inconsistency in performance, it may require a more in-depth examination, such as checking the refrigerant levels or addressing any potential electrical issues. Keep an eye out for error codes on the display, as they often point to specific problems needing attention.
Frequently Asked Questions
What is a multi-zone mini split system?
A multi-zone mini split system is a type of heating and cooling system that allows you to control the temperature in multiple rooms or zones from a single outdoor compressor unit.
What are the main components of a multi-zone mini split installation?
The main components include an outdoor condenser unit, multiple indoor air handlers or units, refrigerant lines, and electrical connections.
How does the installation process for a multi-zone mini split work?
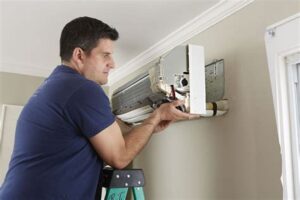
The installation process typically involves mounting indoor units, connecting refrigerant lines and electrical wiring, properly sealing and insulating the lines, and installing the outdoor unit.
What are the advantages of installing a multi-zone mini split system?
Advantages include energy efficiency, individual temperature control for each zone, and the ability to heat or cool spaces that lack ductwork.
What should be considered when planning a multi-zone mini split installation?
Considerations include the size and layout of your space, the number of zones needed, local climate, energy efficiency ratings, and the location of indoor and outdoor units.
Are there any common mistakes to avoid during installation?
Common mistakes include incorrect sizing of the units, improper refrigerant line installation, poor electrical connections, and inadequate sealing of penetrations into the building.
How can I find a professional for my multi-zone mini split installation?
To find a professional installer, look for licensed HVAC contractors in your area, read reviews, ask for referrals, and check if they have experience with multi-zone mini split systems.
