Learn how to choose, install, and test your mini split system with our comprehensive guide on preparation, mounting, and commissioning.Are you considering upgrading your home’s heating and cooling with a Mitsubishi mini split system? Whether it’s for better efficiency, comfort, or flexibility in temperature control, understanding the installation process is crucial. In this comprehensive guide, we’ll walk you through each step of installing a Mitsubishi mini split system, from choosing the right model to testing and commissioning the entire setup. We’ll start by helping you make an informed choice when selecting your mini split system and move on to essential preparations for a successful installation. You’ll learn about mounting both the indoor and outdoor units for optimal performance, along with the final checks necessary to ensure everything is running smoothly. Let’s dive into the world of mini splits and transform your living space into a comfortable haven.
Choosing the Right Mini Split System
When it comes to home heating and cooling, many homeowners are turning to mini split systems for their efficiency and versatility. However, with so many options available, selecting the right mini split system can be daunting. Below are key factors to consider:
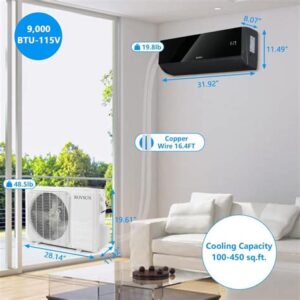
- Capacity: Determine the required capacity for your space, typically measured in BTUs. A system that is too small will struggle to heat or cool effectively, while one that is too large may cycle on and off too frequently, wasting energy.
- Energy Efficiency: Look for systems with a high SEER (Seasonal Energy Efficiency Ratio) rating. The higher the SEER rating, the more efficient the system will be, leading to lower energy bills.
- Noise Level: Consider the noise levels produced by the indoor and outdoor units. Many manufacturers provide decibel ratings to help you choose a quieter model, which is especially important for sleeping areas and home offices.
- Installation Type: Decide whether you want a single-zone system for one room or a multi-zone system that can provide climate control for several rooms or areas.
- Brand Reputation: Research brands known for quality and reliability, such as Mitsubishi, Daikin, and LG. Read reviews and consult with HVAC professionals for recommendations.
Choosing the right mini split system involves careful consideration of your specific needs, preferences, and budget. Assess your space thoroughly and consider future needs when making your decision.
Investing the time to choose the appropriate system will ensure a comfortable environment for years to come, optimizing both heating and cooling performance. Always consult with professionals if you’re unsure about compatibility or installation aspects.
Remember, the right choice can lead to significant
Preparing for Installation
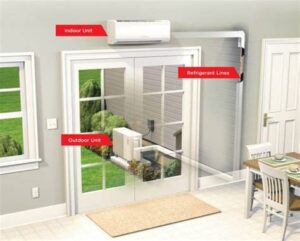
When it comes to installing a Mitsubishi mini split system, proper preparation is key to ensure a smooth and efficient setup. To begin, it’s essential to assess your space and determine the best locations for both the indoor and outdoor units. This will involve considering factors such as the layout of your rooms, the location of windows, and even any obstructions that could hinder air circulation.
Before installation day arrives, make sure you have all the necessary tools and materials on hand. Here’s a simple checklist:
- Drill and drill bits
- Level
- Stud finder
- Pipe insulation
- Electrical wiring
- Mounting brackets
- Refrigerant lines
It’s also a good idea to review local building codes and regulations, ensuring that you comply with all necessary standards. This includes checking if any permits are required for the installation of your mini split system. By taking these preparatory steps, you set the stage for a successful installation, ultimately optimizing the performance of your Mitsubishi mini split system.
Mounting the Indoor Unit
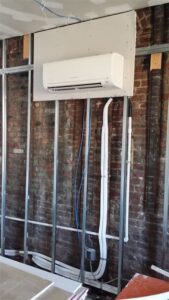
Mounting the indoor unit of your Mitsubishi mini split system is a crucial step in the installation process. Proper installation ensures optimal performance and efficiency of your heating and cooling system. Here’s a guide to help you get it right.
Before you start, it’s essential to choose the right location for mounting the indoor unit. Here are some key considerations:
- Height: Mount the unit approximately 7 to 8 feet from the floor for efficient air distribution.
- Accessibility: Ensure easy access for maintenance and cleaning.
- Clearance: Maintain sufficient space around the unit (at least 6 inches) for air intake and discharge.
Once you’ve selected the right spot, follow these steps to mount the indoor unit:
- Mark the Mounting Bracket: Use a level to mark where the brackets will attach to the wall.
- Drill Holes: Drill holes into the wall at the marked locations and insert wall anchors if necessary.
- Attach the Bracket: Secure the mounting bracket to the wall using screws. Ensure it’s level and firmly attached.
- Hang the Unit: Carefully lift the indoor unit and hang it on the mounted bracket. Double-check that it’s securely in place before proceeding.
With the unit securely mounted, you can now connect the refrigerant lines and electrical wiring, which will be detailed in subsequent sections. Remember, proper installation at this stage is key to the overall
Installing the Outdoor Unit
Installing the outdoor unit of your Mitsubishi mini split system is a crucial step that requires careful planning and execution. The placement of the outdoor unit can significantly impact the system’s efficiency and longevity. Before you begin, ensure you select a location that is both accessible and offers good airflow. Keeping the unit at least 12 inches above the ground allows for better air circulation and avoids any potential damage from debris or snow.
Follow these essential steps to correctly install the outdoor unit:
- Select the Location: Choose a spot that’s free from obstructions and has adequate drainage.
- Prepare the Mounting Pad: Use a concrete pad or a set of brackets to keep the unit stable and level.
- Level the Unit: Use a level to ensure that the outdoor unit is even; this will prevent operational issues.
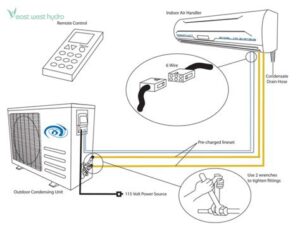
- Connecting the Refrigerant Lines: Carefully connect the refrigerant lines to the outdoor unit, ensuring no leaks.
While performing these installations, always refer to the manufacturer’s guidelines. It’s essential to comply with local building codes and safety regulations to ensure proper function and safety of the mini split system.
Be sure to check all electrical connections and refrigerant lines for any visible signs of wear or damage. This proactive approach can save time and repair costs in the long run.
Testing and Commissioning the System
Once the Mitsubishi mini split system has been installed, the next crucial step is testing and commissioning the system. This process ensures that everything is functioning as intended and that the system is ready for use. During this phase, several checks need to be performed to verify the efficiency and effectiveness of the installation.
First, check the electrical connections to ensure they are secure. This includes verifying that the power supply matches the requirements specified in the manual. Use a multimeter to check voltages at various points and ensure there are no electrical shorts. Additionally, inspect the refrigerant lines and check for any leaks, as this will affect the performance of the mini split system.
After confirming the electrical setup, it’s time to test the operation of the indoor and outdoor units. Turn on the system and run both heating and cooling modes to verify that the temperature settings are achieved promptly. Monitor the airflow from the indoor unit and evaluate its noise level. Document
Frequently Asked Questions
What are the primary tools needed for Mitsubishi mini split installation?
The primary tools include a drill, level, measuring tape, wrenches, screwdriver, vacuum pump, and refrigerant gauge set.
What is the first step in the installation process of a Mitsubishi mini split system?
The first step is to select the appropriate indoor and outdoor unit locations, ensuring proper clearance and access for maintenance.
Do I need a permit to install a Mitsubishi mini split system?
Yes, depending on local regulations, you may need to obtain a permit before installation, especially if it involves electrical work.
How long does it typically take to install a Mitsubishi mini split system?
Installation usually takes between 4 to 8 hours, depending on the complexity of the installation and the number of units being installed.
What are the common mistakes to avoid during Mitsubishi mini split installation?
Common mistakes include improper sizing of the units, incorrect placement of indoor and outdoor units, and neglecting to adequately seal the refrigerant lines.
How do I ensure proper airflow for my Mitsubishi mini split system?
Make sure that there is no obstruction around the indoor unit and that it is mounted at least 6-8 inches below the ceiling to allow for optimal airflow.
What maintenance is required after installing a Mitsubishi mini split system?
Regular maintenance includes cleaning or replacing air filters, checking refrigerant levels, and scheduling annual professional inspections for optimal performance.


