Learn essential tips for effectively installing your system, from selecting the right location and tools to troubleshooting and following manufacturer guidelines.Installing a Mitsubishi mini split system can greatly enhance your home’s comfort and energy efficiency, making it an excellent investment for year-round climate control. However, the installation process requires careful planning and preparation to ensure optimal performance and longevity of the system. In this blog post, we will guide you through the essential steps of Mitsubishi mini split installation, starting with choosing the right location for your units. From assessing the ideal installation site to selecting the proper tools and equipment, and adhering to the manufacturer’s guidelines, each step plays a crucial role in the success of your project. Finally, we will cover testing and troubleshooting techniques to help you ensure everything runs smoothly. Whether you’re a DIY enthusiast or hiring a professional, this comprehensive guide will help you achieve a seamless installation.
Choosing the Right Location
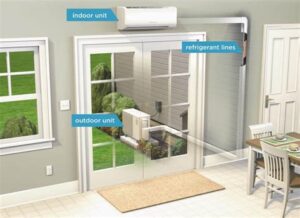
When it comes to installing a Mitsubishi mini split system, the initial step is to carefully consider the location of both the indoor and outdoor units. Selecting the right location can enhance the efficiency and effectiveness of your heating and cooling system.
Here are some key factors to keep in mind when choosing the location for your mini split units:
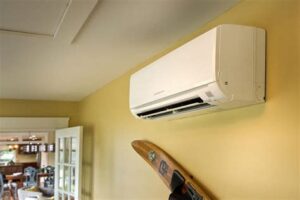
- Indoor Unit: Place the indoor unit in a central location to allow for optimal air distribution throughout the room. Avoid placing it near heat sources like windows, ovens, or heaters, which can trigger temperature inaccuracies.
- Outdoor Unit: The outdoor unit should be installed on a solid, level base, away from direct sunlight and potential obstructions like trees or fences that can block airflow. Ideally, it should be at least a few feet above the ground to allow easy drainage.
- Accessibility: Ensure that both units are easily accessible for maintenance. An area that is too cramped can make repairs and servicing cumbersome, potentially leading to more significant issues in the future.
By strategically choosing the right location for your Mitsubishi mini split system, you can maximize its performance and longevity. This careful planning not only improves efficiency but also c
Preparing the Installation Site
When it comes to Mitsubishi mini split installation, the preparation of the installation site is critical for a successful setup. Proper site preparation not only ensures efficiency but also enhances the longevity of your HVAC system. Before diving into the installation process, here are some essential steps to consider:
- Assess the Location: Choose a location that provides easy access for maintenance and service.
- Check Clearances: Ensure there’s adequate space around the unit for airflow and maintenance.
- Evaluate the Surface: The surface should be level, stable, and capable of supporting the weight of the mini split unit.
Additionally, if the installation site is outdoors, ensure that it is away from any obstructive elements such as trees, walls, or fences that could impede airflow. This is essential for maintaining optimal performance throughout the year.
For indoor installations, select walls that can support the indoor unit’s weight. Avoid areas with excessive humidity, which could affect the unit’s efficiency. Make sure that the space is conducive for proper ductless heat pump operation.
Also, consider the accessibility of electrical connections and drainage systems; proper planning here will facilitate a smooth installation process and aid in effective troubleshooting down the line.
Selecting the Proper Tools and Equipment
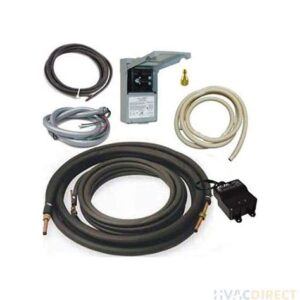
When it comes to Mitsubishi mini split installation, having the right tools and equipment is crucial for a successful and efficient setup. Using the appropriate tools not only speeds up the installation process but also ensures that the system operates correctly and safely. Below is a list of essential tools and equipment you will need:
- Drill – A good quality drill is necessary for making holes in the wall and securing brackets.
- Refrigerant Gauges – These are vital for checking the refrigerant levels and pressure in the system.
- Pipe Wrenches – Used for connecting refrigerant lines securely.
- Level – Ensures that the indoor and outdoor units are perfectly aligned.
- Vacuum Pump – Important for evacuating air and moisture from the refrigerant lines before charging.
- Tube Cutter – For cutting copper lines to the required lengths without damaging them.
- Thermometer – To measure the temperature of the refrigerant and air.
- Screwdrivers – Both Phillips and flathead types are essential for various connections.
Having these tools prepared in advance helps streamline the installation process. It minimizes the risk of needing to stop halfway through to find a forgotten tool, allowing for a smoother, more efficient operation. Additionally, always remember to have personal protective equipment, such as gloves and safety glasses, to ensure safety while handling tools and working on electrical components.
In some cases, it may also be necessary to have specialized tools, depending on the specific model of the Mitsubishi mini split system you are installing. For instance, if you are working with a complex installation, consider using a manifold gauge set to assist in the refrigerant charging process. Understand your equipment well so you can dictate what may be essential for your particular setup.
Finally, it’s wise to check your local regulations regarding HVAC installations. Some areas might require specific tools or certifications to ensure that installations are compliant with safety standards. By ensuring you have the proper tools and equipment, you’re setting yourself up for a successful and compliant mini-split installation.
Following Manufacturer’s Guidelines
When it comes to Mitsubishi mini split installation, adhering to the manufacturer’s guidelines is crucial for ensuring optimal performance and long-term reliability of the system. Each model has its specific requirements that must be thoroughly reviewed before proceeding with the installation process.
One of the first steps is to carefully read the installation manual provided by Mitsubishi. This document includes vital information such as the recommended clearance requirements, electrical specifications, and the correct refrigerant levels. Ignoring these guidelines can lead to improper installation, which may void warranties and result in inefficient operation.
Here are some key points to consider when following the manufacturer’s guidelines:
- Mounting Instructions: Ensure that the indoor and outdoor units are installed according to the recommended wall or ground specifications.
- Electrical Connections: Follow the electrical wiring requirements detailed in the manual to prevent electrical issues and ensure safety.
- Refrigerant Charging: Use the right type and amount of refrigerant as specified to maximize system efficiency.
In summary, following the manufacturer’s guidelines not only enhances the efficiency of your Mitsubishi mini split installation, but it also safeguards you from potential mishaps during operation. Always reference the manual as your primary resource throughout the installation process.
Testing and Troubleshooting the System
Once you’ve completed the installation of your Mitsubishi mini split system, it’s crucial to perform thorough testing and troubleshooting to ensure optimal performance. This phase not only validates that everything was set up correctly but also helps identify any issues that may arise.
To conduct proper testing, start by checking the functionality of the unit using the remote control. Ensure that it responds to commands like power on/off, temperature adjustment, and air flow settings. Monitor the airflow to confirm that it is adequate and no obstructions are present.
If you run into issues, refer to the manufacturer’s guidelines first. Common troubleshooting steps might include checking the power supply, inspecting the connection lines for leaks, or verifying that the air filters are clean and properly installed. Keep an eye on the error codes that may appear on the display, as these can quickly lead you to the source of the problem.
Frequently Asked Questions
What is a Mitsubishi mini split system?
A Mitsubishi mini split system is a type of heating and cooling system that provides climate control for individual rooms or spaces without requiring ductwork.
What are the benefits of installing a Mitsubishi mini split?
The benefits include energy efficiency, flexibility in temperature control for different rooms, a lower carbon footprint, and a more straightforward installation process compared to traditional HVAC systems.
Can I install a Mitsubishi mini split myself?
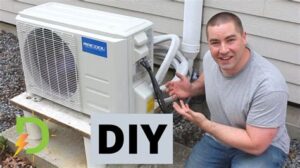
While some homeowners may attempt DIY installation, it is recommended to hire a professional for optimal performance and to comply with local building codes.
How does the installation process of a Mitsubishi mini split work?
The installation process typically involves mounting the indoor unit, connecting refrigerant lines, installing an outdoor condenser, and connecting electrical power.
What tools are needed for installation?
Useful tools include a drill, level, refrigeration gauge set, torque wrench, and various hand tools to secure mounting brackets and connections.
How long does it take to install a Mitsubishi mini split?
The installation time can vary, but it typically takes a professional between 4 to 8 hours depending on the complexity of the setup.
What maintenance is required after installation?
Regular maintenance includes cleaning the filters, checking the refrigerant levels, inspecting the outdoor unit, and scheduling annual professional servicing to ensure efficiency.


