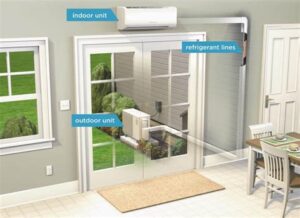
Learn how to choose, prepare, and install your mini split system with our step-by-step guide for optimal performance and efficiency.Are you considering a Mitsubishi mini split installation to enhance your home’s comfort and energy efficiency? Whether you’re tackling the job yourself or hiring a professional, understanding the ins and outs of the installation process is crucial. This guide will take you through the key steps involved—from selecting the right mini split system for your space to preparing the installation area, mounting the indoor and outdoor units, and finally testing the system to ensure optimal performance. With careful planning and attention to detail, you can enjoy the benefits of a well-installed mini split system that cools and heats your home with ease. Let’s dive into the essentials of a successful Mitsubishi mini split install and get started on your journey to year-round comfort!
Choosing the Right Mini Split System
When it comes to heating and cooling your home efficiently, selecting the right mini split system is essential. With various options available in the market, understanding your requirements will help you make an informed decision. Below are some key factors to consider when choosing the right system for your space.
- BTU Capacity: The first step is to assess the size of the area you intend to cool or heat. The capacity of mini split systems is measured in BTUs (British Thermal Units). Ensure you select a system with the appropriate BTUs to meet the needs of your space.
- Energy Efficiency: Look for systems with a high SEER (Seasonal Energy Efficiency Ratio) rating for cooling and HSPF (Heating Seasonal Performance Factor) for heating. These ratings indicate how efficiently the unit operates.
- Design and Aesthetics: The design of mini split systems varies. Choose a model that complements your interior decor. Additionally, consider whether you want a wall-mounted unit, a ceiling cassette, or a floor-mounted option.
- Number of Zones: Determine if you need a single-zone or multi-zone system based on how many spaces you want to condition. Multi-zone systems allow you to control temperatures independently in different rooms.
- Brand Reputation: Consider reputable brands like Mitsubishi for their reliability and customer support. Reviews and service history can significantly influence your choice.
Ultimately, selecting the right mini split system requires evaluating your specific heating and cooling needs, as well as your budget. Keeping these factors in mind will ensure you find a solution that suits your home the best.
Additionally, consulting with a professional HVAC technician can provide valuable insights. They can help perform calculations to determine the right capacity for your space and recommend systems that fit your requirements.
In summary, being informed about the options available helps you make the right choice for your heating and cooling needs, which ca
Preparing the Installation Space
When it comes to installing a Mitsubishi mini split system, proper preparation of the installation space is crucial for optimal performance and efficiency. The success of the installation largely depends on ensuring that both the indoor and outdoor units have sufficient space to function correctly.
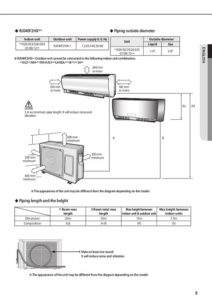
First, let’s focus on the indoor unit. It is essential to select a location that allows for proper air circulation and distribution. Make sure to avoid placing the unit near any obstacles, such as furniture or curtains, that could block airflow. Ideally, the indoor unit should be installed on an interior wall, about 7-8 feet above the floor for maximum efficiency. Ensure that there are no pipes or plumbing in the area that could interfere with the installation.
Next, consider the outdoor unit. The outdoor condenser unit should be placed on a sturdy, level surface to prevent any vibrations. Additionally, it should be located in a well-ventilated area with at least 12 inches of clearance on all sides. Avoid placing the unit under overhangs or trees that could obstruct airflow or lead to debris buildup. Therefore, assessing the installation space in advance is paramount for an effective and hassle-free Mitsubishi mini split installation.
Installing the Indoor Unit
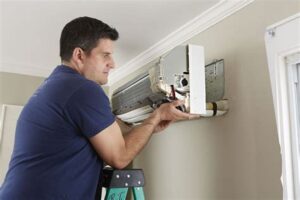
Installing the indoor unit of a Mitsubishi mini split system is a crucial step in ensuring that your heating and cooling system performs efficiently. Proper installation can enhance the overall comfort of your home while reducing energy costs. Here’s how to go about it.
Before beginning installation, make sure you have all the required tools and materials. Common tools include a drill, level, measuring tape, and screwdrivers. You will also need a mounting plate, brackets, and the actual indoor unit itself. Here is a simple list of the steps involved:
- Choose the right location for the indoor unit to maximize airflow.
- Install the mounting plate on the wall, ensuring it is level and secure.
- Attach the indoor unit to the mounting plate.
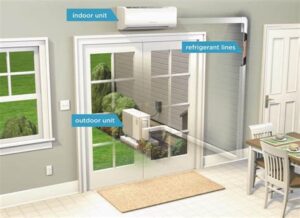
- Route the refrigerant lines and electrical wiring properly.
- Ensure proper insulation around any penetrations for the lines.
During installation, it is important to keep the following key considerations in mind:
- Ensure that the indoor unit is away from direct sunlight and sources of heat.
- Maintain sufficient clearance around the unit for maintenance and airflow.
- Check the manufacturer’s guidelines for specific installation requirements.
As you install the indoor unit, take care to follow all safety precautions and local building codes. A successful installation not only improves system efficiency but also extends the lifespan of your Mitsubishi mini split system.
Mounting the Outdoor Condenser Unit
When it comes to mounting the outdoor condenser unit for your Mitsubishi mini split system, precision and care are essential. The performance and efficiency of your air conditioning system can greatly depend on how well the outdoor unit is installed. In this section, we will explore the key aspects you should consider during the installation process.
First and foremost, select an appropriate location for the outdoor condenser unit. It should be placed on a solid, level surface, away from obstructions that could restrict airflow. Ideally, choose a spot that minimizes exposure to direct sunlight and harsh weather conditions. This helps to enhance the overall energy efficiency of your system. It’s also crucial to follow local codes and regulations regarding the distances required from walls, fences, and other structures.
Next, ensure that the unit is elevated off the ground. This can help prevent water damage during heavy rain or snow. Use concrete pads or brackets for support, and confirm that there is enough clearance for maintenance access. Finally, during the mounting process, double-check that all necessary connections—including refrigerant lines, electrical wiring, and drainage lines—are properly secured and within manufacturer specifications.
| Considerations | Importance |
|---|---|
| Level Surface | Prevents vibrations and noise |
| Clearance from Obstructions | Ensures optimal airflow |
| Erosion and Drainage | Reduces the risk of damage from water |
Testing and Commissioning the Mini Split
Once you have successfully installed your Mitsubishi mini split system, the next crucial step is to conduct a thorough testing and commissioning process. This ensures that your system operates efficiently and effectively, providing the comfort you expect.
The testing phase involves several key checks. Start by ensuring that all electrical connections are secure and that the system is properly wired. After that, turn on the power to the indoor and outdoor units and monitor the operation. Check for proper airflow and confirm that the indoor unit’s fan operates smoothly without any unusual noises.
Next, it’s important to conduct a commissioning check. This will typically involve the following steps:
| Step | Description |
|---|---|
| 1 | Check refrigerant levels to ensure they meet manufacturer specifications. |
| 2 | Measure the temperature differential between the inlet and outlet of the indoor unit. |
| 3 | Test the operation of the mini split in various modes (cooling, heating, and fan). |
| 4 | Ensure the wireless control system and any programmable settings are working correctly. |
| 5 | Check for any air leaks around ductwork or unit connections. |
Once all checks are complete and the system is functioning within the recommended parameters, you can confidently use your Mitsubishi mini split system. Remember to provide the homeowner or end-user with an overview of the system’s features, maintenance tips, and warranties to ensure optimal performance.
Frequently Asked Questions
What are the benefits of installing a Mitsubishi mini split system?
Mitsubishi mini split systems offer energy efficiency, zoning capabilities, improved air quality, and a compact design that can be installed in various spaces without requiring ductwork.
What tools are needed for installing a Mitsubishi mini split?
Tools typically required include a drill, level, measuring tape, service wrench set, and a vacuum pump for the refrigerant lines.
Can I install a Mitsubishi mini split system myself?
While DIY installation is possible, it is recommended to hire a licensed professional to ensure proper installation, compliance with local codes, and warranty protection.
What is the recommended distance between the indoor and outdoor units?
Typically, the distance between the indoor and outdoor units should not exceed 50 feet to ensure optimal performance, though specific recommendations can vary by model.
How do I maintain my Mitsubishi mini split system?
Regular maintenance includes cleaning or replacing filters monthly, checking for leaks, ensuring the outdoor unit is free from debris, and scheduling annual professional maintenance.
Are there any permits required for installing a mini split system?
Permit requirements vary by location; it’s important to check local building codes and regulations to determine if a permit is necessary for installation.
What is the lifespan of a Mitsubishi mini split system?
With proper maintenance, a Mitsubishi mini split system can last 15 to 20 years, making it a worthwhile investment for home comfort.
