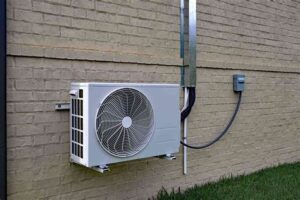
Learn how to install a mini-split unit effectively with our step-by-step guide on choosing and securing the right bracket.Installing a mini split air conditioning system can significantly enhance your indoor comfort, but the success of this installation heavily relies on properly mounting the unit. The right wall bracket not only ensures stability but also extends the lifespan of your mini split system. This blog post will guide you through crucial steps in the installation process, starting from choosing the right bracket for your mini split air conditioner, to preparing the installation area. We’ll cover securing the bracket to the wall, attaching the mini split unit, and finally, testing to ensure everything functions correctly. Whether you’re a seasoned DIY enthusiast or tackling your first installation, this comprehensive guide will help you achieve a secure and efficient setup for your home cooling solution.
Choosing the Right Bracket
When it comes to mini split wall bracket installation, selecting the correct bracket is crucial for ensuring stability and optimal performance. Not all brackets are created equal; some are designed for specific models and weights of units while others may be more universal. Understanding the weight capacity, material strength, and design of the bracket will help you make an informed choice.
First, consider the weight of your mini split unit. The bracket you choose should support a minimum of 1.5 times the weight of the unit to allow for any additional stress during operation. For instance, if your mini split weighs 100 lbs, opt for a bracket that can support at least 150 lbs. Additionally, the material of the bracket—typically steel or aluminum—will determine its durability and weather resistance.
Next, evaluate the mounting options available. Some brackets come with adjustable features that allow for flexibility during installation, making it easier to align with your mini split unit perfectly. Furthermore, be sure to select brackets that are compatible with your specific mini split model to avoid any installation challenges later on.
Preparing the Installation Area
When it comes to mini split wall bracket installation, the first crucial step is ensuring that you properly prepare the installation area. A well-prepared space not only facilitates a smoother installation process but also enhances the longevity and performance of your mini split unit.
Start by selecting a location that is easily accessible and has enough clearance for both the indoor and outdoor units. Ensure that the wall is structurally sound and free of any obstructions such as furniture, blinds, or other decorations that may interfere with air circulation.
Additionally, you should take measurements to confirm that the bracket will fit properly. For this, it’s helpful to have a stud finder at hand. Mark the stud locations with a pencil so that you can secure the bracket firmly to the wall later. Lastly, clear the installation area of any debris or it
Securing the Bracket to the Wall
Securing the bracket to the wall is a crucial step in the installation of a mini split unit, as it ensures stability and proper functioning. To start, it’s important to locate the studs in your wall. Using a stud finder will allow you to identify the strongest points to anchor your bracket securely.
Once you’ve located the studs, you should line up the bracket in the desired position. Ensure that it is level using a level tool. Mark the screw holes on the wall before proceeding. It’s essential to use the correct type of screws; typically, heavy-duty lag screws are recommended for this purpose.
After marking the holes, drill pilot holes into the wall. This will make it easier to insert the screws and help avoid damaging your wall. Using a drill and the appropriate drill bit, make sure the holes are deep enough to accommodate the screws. Once completed, secure the bracket tightly, ensuring it can support the weight of the mini split unit without any risks of sagging or detachment.
Attaching the Mini Split Unit
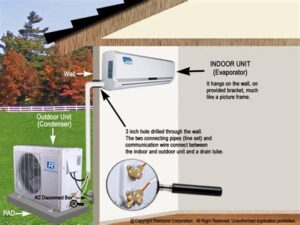
Once you have successfully installed the bracket on the wall for your mini split system, it’s time to focus on attaching the mini split unit. This vital step requires careful attention to ensure a secure and efficient setup. Follow these steps to make sure the unit is properly positioned and mounted.
Firstly, verify that the mounting bracket is level and aligned correctly. Adjustments might be necessary to ensure that the mini split unit sits evenly. It’s essential to prevent any potential water pooling or drainage issues later on due to incorrect leveling.
Secondly, gently lift the mini split unit into place, ensuring the top of the unit hooks onto the upper part of the bracket. Secure the bottom of the unit to the bracket using the locking mechanism or screws provided in your installation kit. Double-check that all screws are tightened well to ensure the unit is firm and stable.
Finally, connect the refrigerant lines and electrical wiring according to the manufacturer’s specifications. After securing all components, it’s crucial to perform a thorough inspection to confirm that everything is properly installed and ready for the next stages of your mini split setup.
Testing the Bracket and Unit
After you have successfully installed your mini split wall bracket and attached the mini split unit, it is crucial to perform a comprehensive testing to ensure everything is functioning as it should. Proper testing will help you avoid potential issues and confirm that the installation was successful.
Begin by ensuring the bracket is securely mounted and the unit is properly attached. To check this, gently tug on the unit to see if it moves. If it feels secure and doesn’t shift, that’s a good sign. Next, you’ll want to check for any visible gaps between the bracket and the wall or the unit that may need to be addressed.
Once the physical integrity of the installation is confirmed, it’s time to turn on the unit. Make sure the remote control is functioning and the settings are adjusted according to your preference. Observe the operation for a few minutes to ensure that the mini split system is cooling or heating as expected. Listen for any unusual noises that may indicate a problem. Any abnormalities should be addressed immediately to avoid damaging your unit or wasting energy.
Frequently Asked Questions
What tools are needed for installing a mini split wall bracket?
You will need a drill, level, tape measure, socket wrench, and a stud finder.
How do I determine where to install the wall bracket for my mini split?
Choose a location that provides a stable and strong support, ideally on an exterior wall, and ensure it is level and free of obstructions.
Is it necessary to use a stud finder for wall bracket installation?
Yes, using a stud finder is important to locate studs, which will provide the best support for the mini split unit.
What safety precautions should I take during installation?
Always wear safety goggles and gloves, ensure the area is clear of debris, and if you’re working at height, use a sturdy ladder.
Can I install the mini split wall bracket by myself?
While it’s possible to install it alone, having a second person can help ensure the bracket is held steady while you secure it.
How high should the mini split wall bracket be installed?
The bracket should typically be installed about 5 to 7 feet above the floor, but make sure to consult your mini split’s installation manual for specific recommendations.
What should I do if I encounter plumbing or electrical lines during installation?
If you find plumbing or electrical lines, avoid drilling into these areas and consider consulting a professional to relocate them if necessary.
