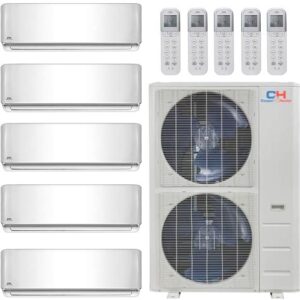
Learn how to choose, prepare, and install a mini split unit with our comprehensive guide, including wiring, electrical connections, and troubleshooting tips.Installing a mini split system can be a fantastic way to enhance your home’s comfort while improving energy efficiency. Whether you’re looking to cool down a single room or an entire house, understanding the installation process is crucial for a successful outcome. In this blog post, we’ll explore everything you need to know, starting with how to choose the right mini split unit for your needs. We’ll guide you through preparing the installation area and provide a comprehensive step-by-step installation guide that even novices can follow. Additionally, we’ll cover important aspects such as wiring and electrical connections, ensuring your system operates safely and effectively. Finally, we’ll address common issues you might encounter during installation and share troubleshooting tips to get you up and running in no time. Let’s dive into the world of mini split installations and transform your living space today!
Choosing the Right Mini Split Unit
When it comes to mini split units, selecting the right model is crucial for achieving optimal cooling and heating efficiency in your space. With a variety of options available on the market, understanding the key features will help you make an informed decision.
First and foremost, you need to consider the BTU rating of the unit, which indicates its cooling and heating capacity. A unit with too low a BTU rating for your room size will struggle to maintain comfortable temperatures, while one with too high a rating can lead to rapid cycling and inefficient operation. To find the appropriate BTU for your room, you can use this general guideline:
| Room Size (Square Feet) | Recommended BTU |
|---|---|
| 100 – 400 | 9,000 – 12,000 BTU |
| 400 – 600 | 12,000 – 18,000 BTU |
| 600 – 1,000 | 18,000 – 30,000 BTU |
Next, you’ll want to evaluate the energy efficiency of the units you are considering. Look for models with a high SEER rating (Seasonal Energy Efficiency Ratio), as this will determine how efficiently the unit consumes energy. Higher SEER ratings typically translate to lower energy bills.
Additionally, consider the brand reputation and customer reviews. Make sure to research and find models that have proven reliability, as well as excellent customer support. This will ensure that you have a dependable unit for years to come.
Preparing the Installation Area
When it comes to mini split installation, the first step is to ensure that the installation area is properly prepared. This can significantly affect the efficiency and longevity of your unit. Here are some factors to consider:
- Space Requirement: Make sure there is sufficient space both indoors and outdoors for the mini split unit. Typically, you will need at least 12 inches of clearance around the unit.
- Wall Structure: Inspect the wall where you will be mounting the indoor unit. It should be capable of supporting the weight of the unit and should be free from obstructions like electrical wiring or plumbing.
- Access to Power Supply: Check if there is a power outlet accessible within 10 to 15 feet of your planned installation zone as it will ensure safe and convenient operation.
Another crucial aspect is to decide on the location of the outdoor unit. It should be placed in an area that allows for proper air circulation and also be easily accessible for maintenance. Avoid placing the unit in a shady spot as this can hinder efficiency and performance.
“A well-prepared installation area can make all the difference in the longevity and efficiency of your mini split system.”
Lastly, ensure to clean the area thoroughly where the unit will be installed. Clear away any debris or obstacles that may interfere with the installation process, providing a clean slate for a seamless setup.
Step-by-Step Installation Guide
Installing a mini split system can be an excellent way to enhance the comfort and efficiency of your home. Below is a detailed step-by-step installation guide that will help make the process easier for you.
1. Gather Necessary Tools and Materials
Before starting, ensure you have all the tools and materials required for the installation. You will typically need:
- Mini split unit
- Mounting bracket
- Copper refrigerant lines
- Electrical wiring
- Drill and drill bits
- Level
- Pipe insulation
- Vacuum pump
2. Choose the Installation Location
Select a suitable location for both the indoor and outdoor units. Ensure the area is well-ventilated and free from obstructions. The indoor unit should be mounted high on a wall for optimal airflow.
3. Install the Mounting Bracket
Using a level, securely attach the mounting bracket to the wall where the indoor unit will be placed. Make sure it can support the weight of the unit.
4. Drill a Hole for Refrigerant Lines
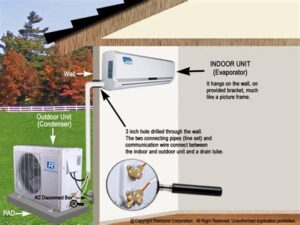
Drill a 3-inch hole through the wall to allow passage for the refrigerant lines and electrical wiring. Ensure that the hole slopes slightly downward to facilitate drainage.
5. Connect the Refrigerant Lines
Carefully connect the copper refrigerant lines to the indoor unit, following the manufacturer’s instructions. Insulate the lines to prevent heat loss.
6. Mount the Indoor Unit
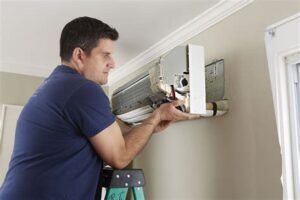
Fix the indoor unit onto the mounting bracket. Make sure it is secure and properly aligned.
7. Set Up the Outdoor Unit
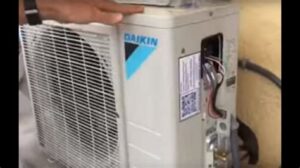
Position the outdoor unit on a flat surface, ensuring it is well-ventilated and away from direct sunlight. Secure the unit in place.
8. Make Electrical Connections
Connect the electrical wiring from the indoor unit to the outdoor unit, adhering to the manufacturer’s electrical specifications. It’s advisable to consult a licensed electrician for this step to ensure safety.
9. Test the System
Once everything is connected, turn on the system and check for proper operation. Make sure there are no leaks in the refrigerant lines and that both units are functioning efficiently.
By following these steps, you should be able to successfully install a mini split system in your home. This installation guide emphasizes safety and efficiency, ensuring your system serves you well for years to come.
Remember, if at any point you feel uncomfortable with the installation process, it is best to consult with a professional technician to avoid potential issues.
Good luck with your mini split installation!
Wiring and Electrical Connection
When it comes to installing a mini split unit, proper wiring and electrical connection is crucial for optimal performance and safety. This step is essential to ensure that the unit operates efficiently without any electrical issues. In this section, we will outline the necessary steps and considerations for wiring your mini split system.
The first step in this process is to safely disconnect power from your main electrical panel. Always use a multimeter to confirm that the power is indeed off before starting any wiring. It is recommended to use appropriate circuit breakers that can handle the load of your mini split system. Refer to the unit’s manual for the specifications on the required amperage.
Next, you’ll want to run the electrical wiring from the indoor unit to the outdoor unit. Most units require a 14 or 16 gauge wire, depending on the specific model and local electrical codes. Be sure to connect the wires correctly: black to the hot terminal, white to the neutral, and green or bare to the ground. Here’s a simple overview of the wiring setup:
| Wire Color | Connection |
|---|---|
| Black | Hot |
| White | Neutral |
| Green/Bare | Ground |
Once all connections are made, ensure that all wires are securely fastened and insulated. Wind tapes around the connection points to prevent accidental contact. After completing the wiring, restore power at the main panel and check for proper functionality. If everything is correctly wired and you follow the guidelines mentioned above, you will set yourself up for a successful and safe mini split installation.
Testing and Troubleshooting
Once you’ve completed the mini split installation, it’s crucial to ensure the system operates correctly. Proper testing and troubleshooting will help you identify any potential issues before they become significant problems. Here’s a guide to help you systematically check your mini split unit.
Step 1: Initial Power Check
- Ensure the unit is securely connected to the power supply.
- Check the circuit breaker to ensure it hasn’t tripped.
- Validate that the remote control or wall unit is functioning and responding.
Step 2: Airflow Inspection
- Turn on the mini split and listen for any unusual noises.
- Check the air filters for cleanliness; dirty filters can restrict airflow.
- Make sure vents are open and unobstructed for optimal air circulation.
Step 3: Refrigerant Check
- Monitor the refrigerant levels; insufficient refrigerant can impede performance.
- Look for any visible signs of leakage, such as oily spots or frost accumulation.
- If necessary, contact a professional for refrigerant recharging.
Step 4: Temperature Testing
- Use a thermometer to check the temperature of the air coming from the vents.
- Ensure that the temperature difference between the intake and output air meets the manufacturer’s specifications.
After performing these tests, keep a close watch on the unit for a few days to ensure it continues operating as expected. If issues persist, consult the installation manual for more in-depth troubleshooting step
Frequently Asked Questions
What is a mini split system?
A mini split system is a type of heating and cooling system that has both indoor and outdoor components, allowing for zone control of temperatures in different areas of a home or building.
What are the benefits of installing a mini split system?
Benefits include energy efficiency, cost savings on utility bills, flexible installation options, and the ability to heat and cool specific zones independently.
What tools are needed for mini split installation?
Tools typically required include a drill, level, measuring tape, wrenches, a vacuum pump, and possibly an electric saw for making openings.
Is professional installation required for mini split systems?
While some skilled individuals may choose to install a mini split system themselves, it is generally recommended to hire a professional for proper installation and to comply with local codes.
How long does mini split installation take?
Installation can take anywhere from a few hours to a full day, depending on the complexity of the setup and the number of indoor units being installed.
Can a mini split system be installed in an existing home?
Yes, mini split systems are ideal for retrofitting in existing homes without ductwork, as they require only a small hole for the refrigerant line.
What maintenance does a mini split system require?
Regular maintenance includes cleaning or replacing filters, checking refrigerant levels, and inspecting the outdoor unit for any debris or obstructions.
