Learn how to install a mini split system with expert tips on location selection, necessary tools, assembly, indoor unit mounting, and refrigerant line connection.Are you considering enhancing your home’s comfort with a mini split system? This blog post will guide you through the process, providing valuable insights and practical tips to ensure a smooth installation experience. From selecting the right location for maximum efficiency to gathering the necessary tools and assembling the system, we’ll cover it all. With clear, step-by-step instructions on mounting the indoor unit and connecting the refrigerant lines, you’ll feel confident tackling this DIY project. Whether you’re a seasoned handyman or a first-time installer, our mini split installation pictures will visually walk you through each stage, making the process straightforward and enjoyable. Let’s dive in and bring cool comfort to your space!
Selecting the Right Location
Choosing the right location for your mini split installation is crucial for maximizing efficiency and ensuring a smooth operation. There are several factors to consider:
- Proximity to the Outdoor Unit: Ensure that the indoor unit is positioned close to the outdoor compressor unit. This minimizes the length of the refrigerant lines and reduces potential energy loss.
- Room Size: The size of the room should dictate the capacity of the mini split system you need. Larger rooms may require multiple units.
- Ceiling Height: Higher ceilings can affect the air circulation. Select a location that promotes proper airflow throughout the room.
Additionally, avoid placing the unit in areas where obstructions might block airflow such as furniture or walls. It is best to mount the indoor unit high on a wall, which promotes better circulation of conditioned air.
Take into account aesthetic aspects as well. Make sure the location you choose not only meets the functional requirements but also fits harmoniously with your interior design.
Lastly, consider the access for maintenance. Ensuring that both the indoor and outdoor units are easily reachable will save you time and effort during regular service and repairs.
Gathering Necessary Tools
Before diving into your mini split installation, it’s essential to gather all the necessary tools. This ensures a smooth and efficient installation process, minimizing the risks of delays or complications.
Here’s a list of tools you will need:
- Level – To ensure your units are perfectly aligned.
- Drill – For creating holes for mounting brackets.
- Wrenches – For tightening refrigerant lines.
- Screwdrivers – Both Phillips and flathead for various screws.
- Vacuum Pump – To remove moisture from refrigerant lines.
- Manifold Gauge Set – For checking refrigerant levels.
- Pipe Cutter – To cut copper tubing as needed.
- Safety Gear – Including gloves and goggles for protection.
Having these tools ready will dramatically streamline the process of assembling and mounting your mini split system, allowing you to focus on achieving optimal i
Assembling the Mini Split System
Assembling a mini split system can seem daunting, but with the right guidance and a step-by-step approach, it can be achieved with relative ease. The first step is to gather all necessary components and tools required for a successful assembly. Typically, the primary components you will need include:
| Component | Description |
|---|---|
| Indoor Unit | This is the part that distributes the air inside your space. |
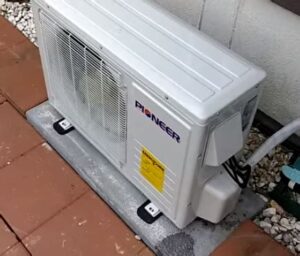
| Outdoor Unit | This unit houses the compressor and is installed outside your home. |
| Refrigerant Lines | These lines transport the refrigerant between the indoor and outdoor units. |
| Electrical Wiring | Necessary for connecting both units to power. |
Once you have all the components, the next step is to attach the indoor unit bracket to the wall, ensuring that it is level and secure. Make sure to check for studs in the wall for maximum stability. After the bracket is in place, you can hang the indoor unit onto the mounted bracket.
Next, you need to connect the refrigerant lines to both the indoor and outdoor units. Start by carefully cutting the refrigerant lines to the appropriate length and utilizing a flare nut wrench to secure them tightly. This prevents any refrigerant leaks, which is crucial for the efficiency of your mini split system. Always follow the manufacturer’s instructions regarding line connections to ensure proper assembly and operation.
Lastly, don’t forget to double-check everything. A thorough inspection of your connections might save you from future issues. Following these steps will enable you to successfully assemble your mini split system and prepare for the next stages of installation!
Mounting the Indoor Unit
When it comes to mounting the indoor unit of a mini split system, precise positioning is crucial for optimal performance. The first step involves selecting an ideal location on the wall, ensuring the area is away from obstructions that can impede air flow. Typically, you should mount the unit about 7 to 8 feet above the floor, which allows for effective air distribution throughout the room.
Before securing the unit, make sure to check that there are no hidden electrical wires or plumbing pipes behind the wall. A thorough inspection will save you from potential hazards and ensure a smooth installation process. Additionally, having a level ensures that your indoor unit is straight, thus preventing unnecessary noise and vibrations during operation.
Once you have marked the mounting bracket’s locations, drill the necessary holes and attach the bracket firmly to the wall using the included hardware. It is essential to use appropriate tools for this task; generally, a power drill, level, and screwdrivers are needed. After securing the bracket, carefully lift the indoor unit and hang it on the mounted bracket.
Connecting the Refrigerant Lines
When it comes to mini split installation, one of the most critical steps is connecting the refrigerant lines. This process ensures that your system operates efficiently and effectively. Proper connection of these lines is essential for maintaining optimal refrigerant flow, which directly impacts the heating and cooling capabilities of your system.
Before beginning this step, make sure you have all necessary tools readily available, including a refrigerant gauge, wrenches, and soldering equipment if needed. Typically, there are two lines to connect: the suction line and the liquid line. These lines should be insulated to prevent energy loss and avoid condensation issues.
Follow these steps to ensure a proper connection:
- Prepare the Lines: Cut the refrigerant lines to the required length, ensuring they are free from burrs and sharp edges.
- Connect the Lines: Use flare fittings to connect the suction and liquid lines to the corresponding service ports on the mini split unit.
- Tighten the Connections: Secure the fittings with the appropriate tools, being careful not to overtighten, which can damage the threads.
- Check for Leaks: After connecting, it’s crucial to test the connections for any refrigerant leaks by using a soapy water solution or a leak detector.
By meticulously connecting the refrigerant lines, you set the groundwork for your mini split system to perform at its best, promoting longevity and efficiency in your heating and cooling needs.
Frequently Asked Questions
What are mini-split systems?
Mini-split systems are heating and cooling systems that consist of an outdoor unit and one or more indoor units. They provide a flexible and efficient way to regulate the temperature in individual rooms or zones.
Why should I consider installing a mini-split system?
Mini-split systems are energy-efficient, easy to install, and allow for personalized climate control, making them ideal for homes without ductwork or in areas where additional heating or cooling is needed.
What are the advantages of using pictures for mini-split installation?
Pictures serve as a visual guide, helping homeowners understand the installation steps, identify components, and ensure proper placement of units, reducing potential errors during installation.
What should I look for in installation pictures?
Look for clear images that show each step of the installation process, including mounting outdoor and indoor units, connecting refrigerant lines, and electrical wiring.
Can I install a mini-split system myself?
While some homeowners may attempt self-installation, it is recommended to hire a professional. Proper installation is crucial for efficiency and ensures compliance with local codes.
What tools will I need for a mini-split installation?
Basic tools needed for a mini-split installation include a drill, level, measuring tape, wrenches, and possibly a vacuum pump for refrigerant lines.
How can I maintain my mini-split system after installation?
Regular maintenance includes cleaning or replacing filters, checking the outdoor unit for debris, ensuring drain lines are clear, and scheduling professional inspections at least once a year.


