Discover how to choose, prepare, install, and test your mini split system for optimal performance with our comprehensive guide.When it comes to keeping your home comfortable in the desert climate of Phoenix, installing a mini split system can be a game-changer. These energy-efficient heating and cooling solutions provide personalized temperature control and can significantly reduce your energy bills. However, successful mini split installation requires careful planning and execution. In this blog post, we will guide you through the essential steps, from choosing the right system for your specific needs to preparing the site and installing both the indoor and outdoor units. We’ll also cover the crucial testing and commissioning phase to ensure your system operates flawlessly. Whether you’re a DIY enthusiast or considering hiring a professional, this comprehensive guide will help you navigate the installation process with confidence. Let’s dive in!
Choosing the Right Mini Split System
When it comes to selecting the right mini split system for your home or office in Phoenix, there are several factors to consider. Mini split systems are popular for their energy efficiency and flexibility, but choosing the right one can make a significant difference in your comfort and energy bills.
Firstly, assess your heating and cooling needs by evaluating the size of the space you plan to heat or cool. It’s important to determine the BTU (British Thermal Unit) requirement. You can use the following table as a guideline for calculating the BTUs needed based on room size:
| Room Size (sq ft) | BTUs Needed |
|---|---|
| 300 – 500 | 12,000 |
| 500 – 800 | 18,000 |
| 800 – 1,200 | 24,000 |
| 1,200 – 1,600 | 30,000 |
Secondly, consider the features offered by various mini split systems. Look for energy-efficient models that come with programmable thermostats, multi-zone capabilities, or smart home integration features for enhanced convenience and saving potential. Additionally, brands with a good reputation for reliability and customer service should be prioritized to ensure a smooth experience.
Finally, factor in your budget, not just for the initial purchase but also for long-term operating costs. A more expensive, energy-efficient model can lead to significant savings over time, making it a sound investment in the long run. Prioritizing these aspects will help you in making an informed decision when it comes to selecting the best mini split system for your needs.
Site Preparation for Installation
Before diving into the installation of a mini split system, ensuring proper site preparation is vital for both functionality and efficiency. This stage lays the groundwork that will determine the success of the entire project. Here are essential steps to follow:
| Step | Description |
|---|---|
| 1. Choose the Location | Identify an optimal location for the indoor unit where it can efficiently distribute air without obstructions. |
| 2. Ensure Accessibility | Make sure that the area around the outdoor unit is accessible for future maintenance and servicing. |
| 3. Check Electrical Supply | Ensure there is a proper electrical supply to support the mini split system’s requirements. |
| 4. Assess Structural Support | Confirm that the mounting surfaces for both the indoor and outdoor units can support their weight and installation. |
| 5. Prepare the Condensation Drainage | Plan for proper drainage to avoid water accumulation around the indoor unit. |
Taking the time to address these preparation steps will save headaches during and after the installation process. Also, consider consulting with a professional if you’re unsure about any aspect of the site preparation.
Proper site preparation not only enhances the performance of your mini split system but also ensures its longevity. A well-prepared site facilitates smoother installation and optimal functionality of the unit.
In summary, proper site preparation is crucial for a successful mini split installation. Make sure to follow these steps to ensure your system operates efficiently and effectively from day one.
Installing the Indoor Unit
When it comes to mini split installation in Phoenix, installing the indoor unit is a crucial step that requires careful planning and execution. Before you begin, it’s important to select an appropriate location that allows for optimal performance.
The indoor unit should be mounted high on the wall, preferably at least six to eight feet off the ground for maximum air circulation. Make sure the location is away from direct sunlight and other heat sources, which can affect the efficiency of the unit. Additionally, ensure that there is enough room for maintenance and airflow.
Here are the basic steps to follow when installing the indoor unit:
- Step 1: Use a level to mark the mounting bracket’s position on the wall.
- Step 2: Drill holes as indicated on the bracket and insert wall anchors.
- Step 3: Secure the mounting bracket to the wall.
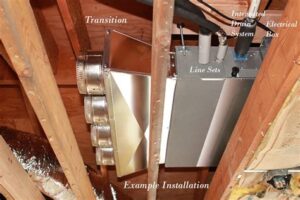
- Step 4: Create a hole for the refrigerant line and drain line, ensuring proper slope for drainage.
- Step 5: Hang the indoor unit on the mounting bracket and connect the refrigerant lines and electrical wiring.
Once the indoor unit is secured and connected, double-check all connections and ensure the unit is level. This step is essential in preventing issues such as refrigerant leaks or water drainage problems. Taking the time to install the indoor unit correctly will lead to a more efficient and effective mini split system.
Connecting the Outdoor Unit
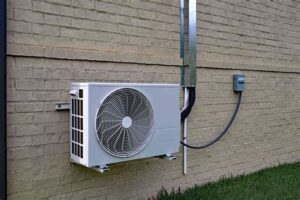
Connecting the outdoor unit of your *mini split system* is a crucial step that requires careful attention to detail. Prior to starting this process, ensure that you have the necessary tools and materials, including electrical wiring, refrigerant lines, and a suitable mounting bracket. The outdoor unit must be positioned at an appropriate height and away from obstructions to ensure unobstructed airflow.
Before proceeding with the installation, check the manufacturer’s guidelines for specific requirements. Begin by securing the outdoor unit in place using the mounting bracket, which should be firmly attached to a stable surface. Once the unit is positioned correctly, proceed to connect the refrigerant lines. Typically, these lines consist of a liquid line and a suction line, which must be insulated properly to enhance energy efficiency.
Next, it’s time to handle the electrical connections. Use a disconnect switch to connect the power supply to the outdoor unit. Ensure that the wiring is correctly routed through the conduit for protection against the elements. After connecting the electrical components and refrigerant lines, double-check for any potential leaks or loose connections. This step is vital f
Testing and Commissioning the System
Once the mini split system has been successfully installed, the next crucial step is testing and commissioning the system to ensure optimal performance. This phase involves validating that all components are functioning as intended and adjusting settings as needed. Proper commissioning can significantly enhance the system’s efficiency and lifespan.
During the testing phase, technicians will check various performance indicators, such as airflow, refrigerant levels, and temperature differentials. They will also conduct a visual inspection of the entire setup to look for any potential issues. It’s essential to verify that the indoor and outdoor units are operating together harmoniously.
In addition to checking performance, the handler will also ensure the thermostats and controls are correctly calibrated. This may involve a system reset or fine-tuning of the settings. Once everything is verified and adjusted, a final report should be documented to keep track of the system’s performance over time, which is vital for future maintenance and troubleshooting.
Frequently Asked Questions
What is a mini split system?
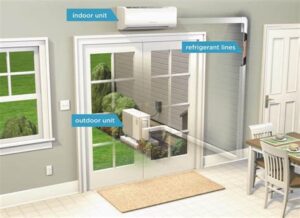
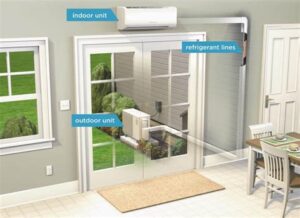
A mini split system is a type of air conditioning and heating system that consists of an outdoor compressor unit and one or more indoor air handling units. It offers energy-efficient climate control without the need for ductwork.
Why should I consider mini split installation in Phoenix?
Phoenix has a hot desert climate, and mini split systems are known for their efficiency in cooling and heating. Installing a mini split can provide precise temperature control, lower energy bills, and increased comfort during extreme weather.
What are the benefits of a ductless mini split system?
Ductless mini split systems provide flexibility in installation, improved energy efficiency, reduced energy costs, and the ability to control the temperature in different rooms independently.
How long does a mini split installation take?
A typical mini split installation can take anywhere from 4 to 8 hours, depending on the complexity of the installation and the number of indoor units being installed.
Do I need a professional for mini split installation?
Yes, it is highly recommended to hire a licensed HVAC professional for mini split installation to ensure it is done correctly, safely, and in compliance with local building codes.
What maintenance is required for a mini split system?
Maintenance for a mini split system includes regular cleaning or replacement of filters, cleaning the outdoor unit, and having a professional inspection performed at least once a year to ensure optimal performance.
Are there any rebates or incentives for installing mini splits in Phoenix?
Yes, there are often rebates and incentives available for energy-efficient installations like mini splits in Phoenix. It’s best to check with local utility companies and government programs for current offerings.
