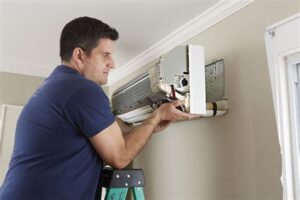
Discover the essential components, selection tips, installation process, challenges, and benefits of using a mini split installation kit for efficient cooling solutions.Are you considering a mini split system for your home? Installing this energy-efficient heating and cooling solution can be a rewarding project, but it’s essential to have the right tools and knowledge in your arsenal. A mini split installation kit can simplify the process significantly, ensuring you have all the necessary components for a successful setup. In this blog post, we’ll explore the key elements of a typical mini split installation kit, guide you in selecting the best one for your needs, and walk you through a step-by-step installation process. We’ll also address common challenges you might encounter during installation and highlight the benefits of using a specialized kit. Whether you’re a seasoned DIY enthusiast or a first-time installer, this guide will provide valuable insights to help you achieve a seamless mini split installation.
Components of Mini Split Installation Kit
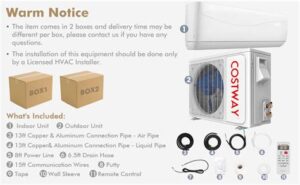
A mini split installation kit is essential for anyone looking to install a mini split air conditioning system. This kit usually contains several components that facilitate an efficient and effective installation process. Understanding these components is crucial for ensuring a successful setup. Below are the typical elements included in a mini split installation kit:
| Component | Description |
|---|---|
| Line Set | The copper tubing that carries refrigerant between the indoor and outdoor units. |
| Drain Hose | A tube used to remove condensation from the indoor unit, preventing water damage. |
| Electrical Wiring | Wiring needed to connect the indoor and outdoor units to power. |
| Mounting Brackets | Hardware that secures the indoor and outdoor units in place. |
| Insulation | Foam insulation that covers the line set to prevent energy loss. |
Each of these components plays a vital role in the overall functionality of the system. For example, without a proper line set, the refrigerant cannot efficiently flow between the units, leading to suboptimal performance. Similarly, a good quality drain hose prevents issues related to water buildup.
When purchasing a mini split installation kit, make sure all necessary components are included. Compatibility with your specific mini split system is also crucial, as not all kits will work with every model. Therefore, checking the specifications before buying is always a wise move.
Investing in a quality mini split installation kit can save time and money in the installation process. It ensures that you have all the needed materials, reducing the chances of having to make additional trips to the store while in the middle of an installation. This preparedness ultimately leads to a smoother and more efficient installation experience.
Selecting the Right Kit for Your Mini Split
Choosing the right mini split installation kit is crucial for ensuring a seamless installation and operation of your unit. With various options available on the market, it can be overwhelming to determine which kit suits your needs best. Here are several factors to consider when selecting the ideal kit for your mini split system.
1. Compatibility: Always check if the installation kit is compatible with your specific mini split model. Kits are often designed to fit various brands and models, ensuring that you have all necessary components.
2. Contents of the Kit: A typical mini split installation kit usually includes essential components such as refrigerant lines, electrical wiring, insulation, and mounting hardware. Make sure the kit contains everything you need to complete the installation.
3. Quality of Materials: Opt for kits made from durable and high-quality materials. This will not only improve the longevity of the installation but also enhance the efficiency of your mini split unit.
4. Customer Reviews: Before making a purchase, take the time to research customer reviews. This can provide valuable insights into reliability and ease of use, helping you make an informed decision.
By considering these factors, you can ensure that you choose the right installation kit for your mini split system, making the installation process smoother and more efficient.
Step-by-Step Installation Process
Installing a mini split system can seem daunting, but by following a systematic step-by-step installation process, you can achieve a successful setup. Here’s a comprehensive guide to ease your installation journey.
Tools and Materials Needed:
- Mini split unit
- Installation kit
- Drill with a masonry bit
- Level
- Line set (included in the installation kit)
- Refrigerant
- Electrical tools
Step 1: Choose the Ideal Location
Before starting, select a location for both the indoor and outdoor units that allows for optimal airflow and minimal hindrance. Make sure there’s easy access to electrical outlets and a drainage path for condensation.
Step 2: Mount the Indoor Unit
Use a level to mark where you’ll install the indoor unit. Drill holes in the wall for the line set and mounting bracket, ensuring the hole is slightly inclined for water drainage. Secure the bracket in place, then install the indoor unit onto it.
Step 3: Install the Outdoor Unit
Position the outdoor unit on a stable surface away from obstructions. Ensure it’s level and securely attached using the installation kit’s brackets. Connect the line set and condensate drain line from the indoor unit to the outdoor unit carefully.
Step 4: Connect Electrical Lines
Follow the electrical diagram provided in the manual to connect the electrical lines safely. Make sure to adhere to local codes and regulations, as the electrical part of the installation is critical for safe operation.
Step 5: Vacuum the Line Set
Using a vacuum pump, remove air and moisture from the line set. This step is essential to ensure the efficiency of the mini split system and prevent any damage that could occur from moisture exposure.
Step 6: Test the System
Once everything is connected, turn on the power supply. Check the system by running it in cooling and heating modes to ensure it operates efficiently. Make sure to monitor for any unusual noises or leaks.
Following these step-by-step installation instructions can make the process more manageable and ensure your mini split system functions effectively. Remember to consult your installation manual for model-specific instructions and safety guidelines.
Common Challenges During Installation
Installing a mini split installation kit can be a rewarding process, but several challenges often arise that can complicate matters. Understanding these potential hurdles can help you prepare better and ensure a smoother installation experience. Below, we explore some of the most common challenges faced during the installation of a mini split system.
1. Proper Sizing and Equipment Selection: One of the most critical aspects of mini split installation is ensuring that the system is properly sized for the space it will serve. A unit that is too large or too small can lead to inefficiencies and affect your heating and cooling performance.
2. Navigating the Refrigerant Lines: Running refrigerant lines can be tricky, particularly in complicated layouts where walls or other obstructions are present. Misrouting these lines can lead to leaks or reduced efficiency. It’s essential to carefully plan the path of your lines before proceeding.
3. Electrical Wiring Challenges: Connecting the electrical components of your mini split can pose problems, especially if you’re not familiar with electrical work. Issues may arise with voltage requirements or grounding, which can lead to safety hazards if not addressed correctly.
By being aware of these common challenges and preparing accordingly, you can enhance your chances of a successful mini split insta
Benefits of Using a Mini Split Installation Kit
When considering the installation of a mini split system, using a mini split installation kit offers several significant advantages that can streamline the process. These kits are specifically designed to include all the essential components and tools needed for a successful installation, eliminating the need to source individual items separately. Here are some notable benefits of utilizing a mini split installation kit:
- Comprehensive Components: A typical mini split installation kit includes all necessary parts, such as refrigerant lines, electrical wiring, and mounting brackets.
- Cost-Effective: Purchasing a kit can often be more economical than buying each component separately, saving you money in the long run.
- Simplified Process: With everything you need in one package, the installation process becomes straightforward, making it accessible even for those with limited HVAC experience.
- Time Savings: Having a pre-packaged kit reduces the time spent shopping around for different parts, allowing for quicker installation.
- Quality Assurance: Most kits are manufactured to meet industry standards, ensuring that you are using high-quality components.
Another key point to consider is the convenience of ensuring that all components are compatible with each other. Many installation kits are designed with specific models in mind, which means that you won’t have to worry about mismatched parts that could lead to operational issues.
Moreover, the inclusion of installation instructions in many kits can serve as a helpful guide, providing step-by-step procedures that cater to both seasoned professionals and DIY enthusiasts. This means you can gain confidence in performing the installation yourself.
In summary, the benefits associated with using a mini split installation kit are numerous. From cost savings and time efficiency to the assurance of compatibility and quality, these kits are an invalua
Frequently Asked Questions
What is a mini split installation kit?
A mini split installation kit typically includes all the necessary components and tools for installing a mini split air conditioning system, such as pipes, insulation, mounting brackets, and electrical wiring.
What components are included in a typical mini split installation kit?
A typical kit may include copper refrigerant lines, a condensate drain line, insulated electrical wiring, mounting brackets, and sometimes tools like line wrenches and sealing tape.
Can I install a mini split system myself with an installation kit?
While some handy homeowners may attempt a DIY installation, it’s recommended to hire a professional HVAC technician to ensure proper installation and compliance with local codes.
What are the benefits of using a mini split installation kit?
Using an installation kit helps streamline the installation process by providing all the necessary components in one package, saving time and ensuring compatibility.
How do I choose the right mini split installation kit?
Choose a kit that is compatible with your specific mini split system model and size. Check the specifications for pipe length, diameter, and electrical requirements.
Is a mini split installation kit cost-effective for homeowners?
Yes, buying an installation kit can be cost-effective as it often reduces the overall cost of purchasing components separately, but homeowners should also consider potential installation costs.
What safety precautions should I take during installation?
Always follow the manufacturer’s instructions, wear protective gear, turn off power to the electrical system, and ensure proper handling of refrigerant lines to avoid leaks.
