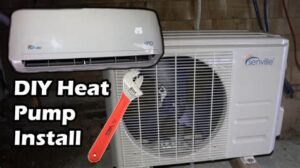
Learn how to choose and install a mini split system, from preparation and indoor unit installation to connecting refrigerant lines and troubleshooting tips.Installing a mini split air conditioning system can seem daunting, but with the right guidance, it’s a manageable DIY project that can enhance your home’s comfort. Mini splits are praised for their energy efficiency, flexibility, and quiet operation, making them an increasingly popular choice for homeowners. Whether you’re cooling a single room or an entire house, understanding the installation process is crucial. In this blog post, we’ll walk you through each essential step, from choosing the right mini split system tailored to your needs to preparing the installation area and executing the installation with confidence. By the end, you’ll be equipped with the knowledge needed to install your unit successfully and troubleshoot any issues, ensuring your space remains perfectly climate-controlled. Let’s dive in and get started on your mini split installation journey!
Choosing the Right Mini Split System
When it comes to selecting the right mini split system, there are several factors to consider ensuring that your investment meets your specific needs. A mini split system offers flexibility and efficiency, making it a popular choice for both residential and commercial spaces.
First, evaluate the cooling and heating capacity needed for your space. This is usually measured in British Thermal Units (BTUs). A quick way to assess this is by determining the size of the area you want to condition:
| Room Size (sq ft) | BTUs Required |
|---|---|
| 200 – 400 | 9,000 |
| 400 – 600 | 12,000 |
| 600 – 800 | 18,000 |
| 800 – 1,000 | 24,000 |
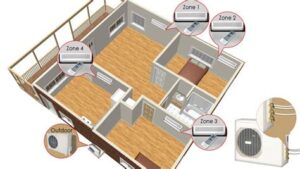
Next, consider whether you need a single-zone or multi-zone system. A single-zone system is perfect for conditioning one area, while a multi-zone system can service multiple rooms, allowing for more control over temperature settings in each space.
Finally, don’t forget to check the energy efficiency ratio (EER) and seasonal energy efficiency ratio (SEER) ratings. The higher these ratings, the more energy-efficient the system will be, which translates to lower utility bills. Always ensure that the mini split system you choose fits your specific requirements and budget for optimal performance.
Preparing the Installation Area
Before embarking on your mini split installation, it’s crucial to prepare the installation area meticulously. This preparation ensures that your system operates efficiently and minimizes potential future issues. Begin by selecting the best location for both the indoor and outdoor units. It’s essential to keep in mind factors such as accessibility for maintenance, proximity to electrical connections, and sufficient airflow.
Once you’ve chosen the location, clear the area of any obstructions. Move any furniture or items that might hinder installation or airflow. For the indoor unit, ensure there is a minimum distance from walls and ceilings as specified in the manufacturer’s guidelines, generally around 6-12 inches. The outdoor unit should also have enough clearance for optimal air circulation.
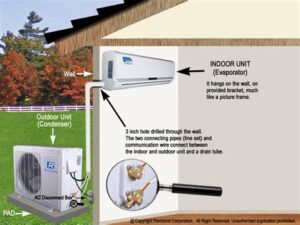
Next, ensure that the wall where the indoor unit will be mounted is structurally sound. If mounting on drywall, consider the weight of the unit and ensure that it is anchored into studs or reinforced appropriately. This step is essential to prevent future damage or accidents. Also, plan the route for the refrigerant lines and electrical connections, ensuring these pathways are as direct as possible and free from obstructions.
Installing the Indoor Unit
Installing the indoor unit of a mini split system is a crucial step in ensuring optimal performance and comfort in your space. Before you get started, it’s important to gather all necessary tools and materials.Tools you will need include a drill, level, screwdriver, and a stud finder. Additionally, make sure to have the instruction manual for your specific mini split model on hand for reference.
1. Choose an appropriate location: The location of your indoor unit matters greatly. You should select a spot that ensures excellent airflow and doesn’t obstruct any pathways. Ideally, the unit should be mounted on an interior wall, around 7 to 8 feet above the floor for effective air distribution.
2. Secure the mounting bracket: Once you have identified the right spot, use the stud finder to locate the studs in the wall. Using a level, mark a straight line to ensure your unit is hung level. Attach the mounting bracket to the wall using appropriate anchors and screws. It is crucial that the bracket is secure to bear the weight of the indoor unit.
3. Installation of the unit: Lift the indoor unit onto the mounted bracket, making sure it locks securely in place. Next, you will need to connect the power cable and the communication cable to the indoor unit. These connections are usually well-labeled to avoid any confusion.
4. Final checks: After securing all connections, double-check the stability of the installation and ensure everything is properly aligned. A minor adjustment in position can sometimes affect the performance of the unit. Once you are satisfied, you can proceed to connect the refrigerant lines and the outdoor unit.
Remember to consult the user manual for any specific requirements related to your mini split model. The indoor unit’s installation lays the foundation for a successful mini split system operation, so approach this step with attention to detail.
Connecting the Refrigerant Lines
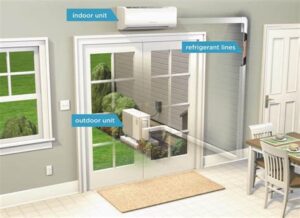
Connecting the refrigerant lines is a crucial step in the mini split installation process. These lines are responsible for transporting the refrigerant to and from the indoor and outdoor units, ensuring efficient heating and cooling. Here’s a step-by-step guide to help you successfully connect the refrigerant lines.
1. Gather Necessary Tools and Materials:
- Refrigerant tubing (liquid and suction lines)
- Line set insulation
- Flare fittings
- Wrench
- Refrigerant gauge set
2. Prepare the Tubing: Measure and cut the liquid and suction lines to the required length, ensuring they are free from any bends or kinks. Make sure to deburr the ends of the tubes to avoid refrigerant leaks.
3. Attach the Fittings: Use a flare tool to create the flared ends of the tubing. Connect the fittings tightly using a wrench, ensuring that they are secure but not overly tight to avoid damaging the connections.
4. Insulate the Lines: After connecting the lines, wrap them with line set insulation to prevent heat loss and improve system efficiency.
5. Connect to the Indoor Unit: Insert the refrigerant lines into the indoor unit’s connection port. Make sure to follow the manufacturer’s guidelines to ensure accurate placement.
6. Connecting to the Outdoor Unit: Follow the same procedure to connect the other end of the refrigerant lines to the outdoor unit. Ensure that everything is snug and secure.
7. Perform a Leak Test: After all connections are made, perform a leak test to ensure the integrity of the connections. Open the valves and use a refrigerant gauge set to monitor for pressure drops, which may indicate a leak.
Successfully connecting the refrigerant lines will contribute significantly to the overall performance and longevity of your mini split system. Make sure to follow all safety precautions and installation guidelines provided by the manufacturer for optimal results.
Testing and Troubleshooting the System
Once your mini split system is installed, it’s crucial to conduct thorough testing and troubleshooting to ensure that everything operates efficiently. The testing phase will help identify any issues that need addressing before the system is fully operational.
Begin by checking the thermostat settings to ensure they are programmed correctly. The thermostat is the brain of your system; if it’s not set properly, it could lead to inefficient cooling or heating. Also, ensure that all the remote controls or wall units are functioning as intended.
During the troubleshooting process, be on the lookout for common issues such as unusual noises, poor performance, or leaking refrigerant. If you experience refrigerant leaks, this could indicate a larger problem, and it’s advisable to contact a professional for repairs. For minor issues, such as fluctuating temperatures, resetting the system might help restore normal function.
Also, make sure to regularly service your mini split system as part of preventive maintenance. This includes cleaning or replacing air filters to enhance efficiency and prolong the lifespan of your system.
Frequently Asked Questions
What tools are needed for mini split installation?
The essential tools include a drill, level, measuring tape, wrench set, screwdriver set, and a vacuum pump.
How do I choose the right location for the indoor unit?
Select a location with good airflow, away from direct sunlight, and near a power source and the outdoor unit for easier installation.
What are the main steps in installing the outdoor unit?
The main steps include selecting a solid and level mounting location, securing the unit to a concrete slab or brackets, and connecting the refrigerant lines and drain hose.
Is electrical work required for mini split installation?
Yes, mini splits require electrical wiring for both the indoor and outdoor units, which should be done by a licensed electrician.
How do I connect the refrigerant lines?
Carefully follow the manufacturer’s instructions to connect the refrigerant lines, ensuring they are properly insulated and securely tightened to prevent leaks.
What should I do after the installation is complete?
After installation, check for any leaks, run the system to ensure it operates correctly, and refer to the user manual for operating instructions.
Do I need a professional for mini split installation?
While some DIY enthusiasts may opt to install it themselves, hiring a professional is advisable to ensure proper installation and warranty coverage.
