Explore the essentials of mini split systems, from understanding components to installation, wiring best practices, and the benefits they offer for efficient heating and cooling.When it comes to efficient heating and cooling solutions, mini split systems have emerged as a popular choice for both homeowners and businesses. Their versatility and effectiveness make them an ideal option for various spaces, whether you’re retrofitting an older building or aiming for a more energy-efficient design. In this blog post, we will take a closer look at the essential components of mini split systems, along with a detailed step-by-step installation guide that demystifies the process. We’ll also highlight best practices for wiring to ensure a safe and effective setup. Finally, we’ll explore the many benefits of these systems, ranging from cost savings to improved indoor air quality. Join us as we navigate the intricacies of mini split installation and unlock the full potential of this innovative climate control solution.
Understanding Mini Split Systems
A mini split system is a type of heating and cooling system that offers versatility and efficiency for modern homes and businesses. Unlike traditional HVAC systems, mini splits do not require ductwork, which makes them an ideal choice for retrofitting older buildings or adding climate control to specific rooms.
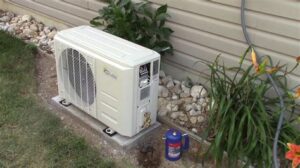
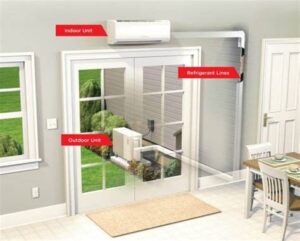
Mini split systems consist of two primary components: an outdoor unit and one or more indoor units. The outdoor unit is responsible for compressing and releasing refrigerant, while the indoor units distribute the conditioned air throughout the space. This separation allows for greater flexibility in temperature control and energy efficiency.
Additionally, mini split systems are known for their energy efficiency and zoning capabilities, allowing users to heat or cool individual rooms as needed. This targeted approach not only saves energy but also lowers utility bills. Many mini split systems are equipped with inverter technology, which helps to maintain a consistent temperature without excessive energy use.
Components of Mini Split Systems
Mini split systems are becoming increasingly popular for heating and cooling homes and offices due to their efficiency and flexibility. These systems are composed of several key components that work together to provide effective climate control. Understanding these components is essential for anyone considering installation or maintenance.
Here’s a quick overview of the primary components of a mini split system:
| Component | Description |
|---|---|
| Indoor Unit | This is the part of the system that is located inside your home, responsible for distributing cooled or heated air. |
| Outdoor Unit | This unit houses the compressor and condenser, which are essential for cooling the refrigerant. |
| Refrigerant Lines | These lines transport refrigerant between the indoor and outdoor units, enabling heat exchange. |
| Drain Line | This line removes excess condensation from the indoor unit to prevent water damage. |
| Thermostat | Controls the temperature settings and operates the system according to your preferences. |
Each of these components plays a crucial role in the operation of a mini split system. For instance, the indoor unit is responsible for effectively circulating air in the living space, while the outdoor unit compresses and cools the refrigerant. Proper installation and maintenance of all components are vital for maximizing energy efficiency and the longevity of the system.
Being familiar with these key components will not only help when making decisions regarding installation but also assist in troubleshooting issues if they arise. Making sure each component is in good working order is essential for ensuring optimal performance of your mini split system.
Step-by-Step Installation Guide
Installing a mini split system can greatly enhance your home or office’s comfort and energy efficiency. Below is a detailed step-by-step installation guide to help you through the process.
Before beginning, ensure you have all the necessary tools and materials, including your mini split components, electrical wiring, mounting brackets, and refrigerant lines. Having everything on hand will streamline the installation process.
Follow these steps for a successful installation:
- Select the Location: Choose a suitable spot for the indoor and outdoor units, ideally on a wall that promotes optimal airflow.
- Install the Indoor Unit: Mount the indoor unit on the wall using the provided brackets. Make sure it is level.
- Punch a Hole: Drill a hole through the wall for the refrigerant lines and drain line, ensuring that it tilts downwards to allow condensation to escape.
- Connect Refrigerant Lines: Carefully connect the refrigerant lines and drain line between the indoor and outdoor units.
- Install the Outdoor Unit: Place the outdoor unit on a stable base and ensure that it is level. Secure it in place with brackets.
- Electrical Connection: Connect the electrical wiring according to the manufacturer’s instructions. Ensure that you follow all safety protocols.
- Test the System: Once everything is connected, turn on the power and test the system to ensure there are no leaks and that it operates correctly.
By following these instructions, you can effectively install your mini split system
Best Practices for Wiring
When it comes to installing mini split systems, proper wiring is crucial for safety and efficiency. Using the right practices ensures that your system operates effectively without any hazards. Here are some best practices to keep in mind:
- Follow Manufacturer Instructions: Always start by consulting the installation manual provided by the manufacturer. This guide will help you understand the specific wiring requirements for your mini split system.
- Use the Correct Gauge Wire: Ensure that you use the appropriate wire gauge for your unit. Too thin a wire can lead to overheating, while too thick can be unwieldy.
- Employ Dedicated Circuits: Mini split systems should ideally be connected to a dedicated circuit. This prevents overload and ensures that your system receives an adequate power supply without interference.
It’s also essential to be mindful of the placement of your electrical lines. Keep them away from moisture and other potential hazards to maintain safety. If you are unsure about the installation process or wiring, consider hiring a qualified electrician to handle the task.
Additionally, always prioritize safety by turning off power at the circuit breaker before starting any wiring tasks. Using proper personal protective equipment and tools can greatly reduce the risk of electrical accidents.
Following these best practices for wiring your mini split system will offer peace of mind and enhance system performance. By ensuring everything is set up correctly from the start, you can enjoy all the benefits that a mini split system has to offer without worrying about potential issues down the line.
Benefits of Mini Split Systems
Mini split systems have gained tremendous popularity in both residential and commercial settings due to their numerous advantages. These systems not only provide efficient heating and cooling but also offer flexibility and convenience that traditional HVAC systems may lack.
One of the key benefits of mini split systems is their energy efficiency. Unlike traditional systems that utilize ductwork, mini splits operate through individual units installed in specific rooms. This targeted approach minimizes energy loss, leading to lower utility bills and a reduced carbon footprint.
Additionally, mini split systems are incredibly versatile. They can be installed in various configurations to fit different spaces, from single rooms to entire homes. With the ability to control the temperature in each space individually, users can enjoy personalized comfort without wasting energy on unoccupied areas.
Furthermore, the installation of mini split systems is relatively straightforward and less invasive compared to traditional systems. This means that homeowners can often have their systems up and running in a shorter timeframe, without the need for extensive remodeling.
In summary, the benefits of mini split systems include energy efficiency, versatility, and ease of installation, making them a fantastic choice for those looking to enhance their indoor climate control.
Frequently Asked Questions
What is a mini split installation diagram?
A mini split installation diagram is a visual representation that outlines the components and steps required to install a mini-split HVAC system, including indoor and outdoor units, refrigerant lines, and electrical connections.
Why is a mini split installation diagram important?
It is important because it allows installers to see the layout and connections needed for proper installation, ensuring that the system operates efficiently and meets safety standards.
What are the key components illustrated in a mini split installation diagram?
Key components typically include the indoor unit, outdoor unit, refrigerant lines, electrical wiring, condensate drain, and thermostat.
Can I install a mini split system myself using the diagram?
While a diagram can provide guidance, it is recommended to hire a professional HVAC technician for installation to ensure compliance with local codes and to guarantee proper system performance.
What should I check before accessing a mini split installation diagram?
Before accessing a mini split installation diagram, check the manufacturer’s installation manual for specific details related to the model, as diagrams can vary by brand and unit type.
Are there any common mistakes to avoid when following a mini split installation diagram?
Common mistakes include improper placement of units, incorrect refrigerant line sizing, inadequate insulation of lines, and overlooking electrical requirements which may lead to system inefficiency or failure.
Where can I find a mini split installation diagram?
You can typically find mini split installation diagrams in the manufacturer’s installation manual, on their official website, or through HVAC industry resources and forums.

