Learn how to install effectively with our guide on choosing locations, tools, and ensuring proper insulation for a seamless final installation process.Installing a mini split air conditioning system can transform your home into a comfortable oasis, especially during the sweltering summer months. Whether you’re looking to beat the heat or improve air circulation, understanding the installation process is crucial to ensuring your system runs efficiently. In this blog post, we’ll guide you through the essentials of installing a mini split unit, complete with informative pictures to help visualize each step. From choosing the right location for your indoor and outdoor units to gathering the necessary tools, we’ll cover everything you need to know to set up your system like a pro. We’ll also discuss the importance of checking for proper insulation and provide a detailed step-by-step installation process, leading up to the final touches that complete the job. Join us as we navigate this cooling solution that not only enhances comfort but also adds value to your home.
Choosing the Right Location
When it comes to the installation of a mini split system, choosing the right location is crucial for optimal performance. The placement of both the indoor and outdoor units can significantly impact the efficiency and effectiveness of the system.
Consider the following aspects while selecting the location:
- Indoor Unit Location: Aim for a central location on the wall to ensure even air distribution. Avoid areas that are blocked by furniture or curtains.
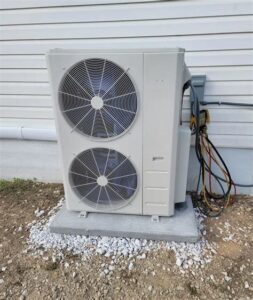
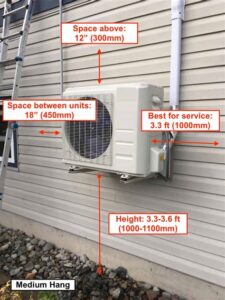
- Outdoor Unit Location: Ensure that the outdoor unit is positioned on a stable surface, preferably elevated to avoid flooding. It should be away from direct sunlight to minimize overheating during summer months.
- Access for Maintenance: Leave enough space around both units for future maintenance and repairs.
Furthermore, think about the aesthetics of your home. The location of the mini split system should harmonize with your interior and outdoor decor. Also, consider local building codes which might dictate specific installation requirements.
Finally, consulting with a professional before finalizing the location can help in making informed decisions that enhance the overall functionality of your mini split system.
Gathering Necessary Tools
Before beginning the installation of a mini split system, it is crucial to gather all the necessary tools. This ensures a smooth and efficient process, reducing the likelihood of interruptions or delays. The right tools will not only make the job easier but will also help in achieving a professional finish.
Here’s a list of essential tools you will need for a successful mini split installation:
- Drill: For making holes in walls and ceilings.
- Level: To ensure that the indoor and outdoor units are straight.
- Pipe Wrench: For handling the refrigerant lines securely.
- Stud Finder: To locate wall studs for mounting the indoor unit.
- Measuring Tape: To measure spaces accurately.
- Refrigerant Gauge Set: For checking the refrigerant levels during installation.
- Vacuum Pump: To evacuate air and moisture from the refrigerant lines.
- Safety Gear: Such as gloves and goggles to ensure your safety during the installation.
Having these tools at hand will make your mini split installation much more manageable. Remember, preparation is key, so take the time to gather everything you need before starting this home improvement project.
Step-by-Step Installation Process
Installing a mini split system can greatly enhance the comfort of your home. To ensure a smooth and effective installation process, follow these step-by-step instructions.
1. Gather Your Materials: Before you begin, make sure you have all the necessary tools at hand. This includes a drill, level, studs finder, wrenches, and a vacuum pump. Having everything ready will streamline your process.
2. Choose the Indoor Unit Location: Select a spot on the wall that allows for proper airflow and is close to the outdoor unit. Ideally, it should be at least a few inches from the ceiling and accessible for maintenance.
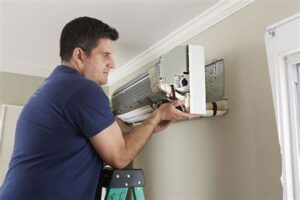
3. Mount the Indoor Unit: Using a level, position the mounting bracket on the wall and drill pilot holes. Secure the bracket using screws. Next, hang the indoor unit onto the bracket, ensuring it is well supported.
4. Create a Hole for the Refrigerant Line: Drill a hole through the wall for the refrigerant lines. Follow the manufacturer’s specifications for size and placement to avoid any issues with installation.
5. Install the Outdoor Unit: Place the unit on a stable surface, making sure it is level. Connect it to the wiring and refrigerant lines from the indoor unit according to the installation manual.
6. Vacuum the Lines: Once everything is connected, use a vacuum pump to remove any air and moisture from the refrigerant lines. This is critical for the efficiency and longevity of your system.
7. Test the System: Finally, power up your mini split system and conduct a thorough check. Ensure it is operating correctly by adjusting the thermostat and confirming that warm or cool air is flowing from the indoor unit.
By following these steps carefully, you can effectively install a mini split system that will keep your space comfortable and efficient.
Checking for Proper Insulation
When it comes to installing a mini-split system, proper insulation plays a critical role in its efficiency and overall performance. Before you finalize your installation, it’s essential to assess the insulation in the area where the mini-split unit will be installed.
First, check the walls and ceilings for any gaps, cracks, or areas where insulation may be missing. Insulation helps in maintaining the desired temperature in your space, ensuring that your system works optimally. Here are some tips to ensure your insulation is up to par:
- Examine existing insulation for any damage or wear.
- Seal any noticeable openings with appropriate sealing materials.
- Consider adding insulation to walls and ceilings if the space lacks sufficient thermal protection.
It’s also advisable to inspect insulation around the line set that connects the indoor and outdoor units of the mini-split. Proper protection of these lines helps in preventing energy loss, which can significantly affect your unit’s efficiency.
In conclusion, ensuring your space is well-insulated not only enhances the performance of your mini-split system but also contributes to energy savings in the long run. Making adjustments to your insulation before the final setup can lead to a more comfortable and efficient environment.
Finalizing the Installation
Once you have completed the installation process for your mini split system, the next critical step is finalizing the installation. This stage not only ensures that everything is properly in place but also guarantees the efficiency and longevity of your unit.
To finalize the installation, begin by carefully checking all connections, including the refrigerant lines, electrical connections, and the drain line. Make sure there are no leaks, as this could significantly impact the performance of your system. Using a simple pressure test can help identify any potential issues early.
Another essential task is to configure your system settings. This may involve setting up your remote control and adjusting any program schedules according to your needs. Make sure to familiarize yourself with the user manual to understand the optimal settings for energy efficiency.
| Task | Description |
|---|---|
| Check Connections | Inspect all lines for leaks and ensure secure connections. |
| Configure Settings | Set up your remote and adjust settings as needed. |
| Test System | Run the system to ensure it operates properly. |
Lastly, conduct a test run of your mini split system to see how it performs. Monitor the indoor and outdoor units for optimal operation and listen for any unusual sounds that may indicate a problem. With these steps, you can ensure that your mini split installation is fully finalized and ready for efficient use.
Frequently Asked Questions
What are mini splits and why are they popular?
Mini splits are compact heating and cooling systems that provide efficient temperature control for individual rooms. They are popular due to their energy efficiency, flexibility in installation, and ability to provide zone heating and cooling.
What should I look for in mini split install pictures?
Look for clear visuals of the indoor and outdoor units, proper placement on walls, and any required ductwork or electrical connections. Good install pictures should highlight the aesthetic integration with the space.
How do I know if my home is suitable for mini split installation?
Your home is suitable for mini split installation if it has adequate wall space for the indoor unit, access to an exterior wall for the outdoor unit, and the ability to run refrigerant lines and electrical wiring.
What tools are typically required for a mini split installation?
Typical tools for mini split installation include a drill, level, screwdrivers, wrenches, pipe cutters, and refrigerant gauges, among others.
Are there any common mistakes to avoid during mini split installation?
Common mistakes include improper sizing of the units, incorrect refrigerant line installation, neglecting to secure the outdoor unit firmly, and failing to ensure proper drainage for condensate.
How long does the installation process of a mini split typically take?
The installation process for a mini split typically takes between 4 to 8 hours, depending on the complexity and the number of indoor units being installed.
Can I install a mini split myself, or should I hire a professional?
While some homeowners may have the skills to install a mini split themselves, hiring a professional is recommended to ensure safe and correct installation, especially regarding electrical and refrigerant handling.


