Learn how to choose the right location, select the proper unit size, prepare the area, install the ceiling cassette unit, and troubleshoot effectively.Are you considering upgrading your home’s heating and cooling system? Installing a mini split ceiling cassette can be an excellent choice for maximizing comfort while minimizing visual impact. Unlike traditional systems, these units are discreetly mounted in the ceiling, delivering efficient climate control without sacrificing valuable wall space. However, the success of your installation hinges on careful planning and execution. In this blog post, we will guide you through the essential steps to ensure your mini split ceiling cassette operates effectively. From choosing the right location and selecting the appropriate unit size to preparing the installation area and troubleshooting any issues that may arise, we’ll cover everything you need to know for a seamless installation experience. So, let’s dive in and transform your indoor environment with this innovative heating and cooling solution!
Choosing the Right Location
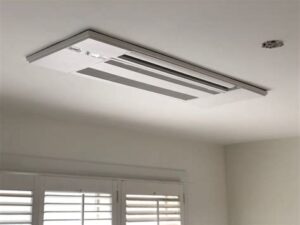
When it comes to mini split ceiling cassette installation, selecting the right location for the unit is crucial for optimal performance and efficiency. The placement of your ceiling cassette unit will impact the airflow, heating, and cooling capabilities throughout the space.
Here are some key points to consider when choosing the location:
- Central Positioning: Ideally, the cassette unit should be placed in a central location within the room to ensure even distribution of air.
- Avoid Obstructions: Ensure there are no obstructions like beams or furniture that could block airflow or affect the unit’s efficiency.
- Consider Room Usage: Take into account how the room is used. Areas with high foot traffic or heat-generating appliances may require careful consideration for unit placement.
By following these considerations, you’ll set yourself up for a more effective mini split installation that enhances comfort and maintains energy efficiency throughout your space.
Selecting the Proper Unit Size
When it comes to installing a mini split ceiling cassette, one of the most crucial steps is selecting the proper unit size. An improperly sized unit can lead to inefficiency, higher energy costs, and inadequate heating or cooling. Therefore, understanding how to choose the right size for your space is essential.
To determine the right size, consider the following factors:
- Square Footage: Measure the area of the room where the mini split will be installed. Generally, a larger space requires a larger unit to ensure effective temperature control.
- Ceiling Height: The height of the ceiling can impact the performance of the unit. Taller ceilings may require a more potent system to circulate air adequately.
- Insulation Quality: Well-insulated spaces retain heat better and may allow for a smaller unit size; conversely, poorly insulated spaces may require a more robust system.
- Climate Conditions: Consider the local climate; areas with extreme temperatures may necessitate larger units to ensure effective performance.
Using the BTU (British Thermal Unit) ratings is a common method to determine proper unit size. A rule of thumb is approximately 20 BTU per square foot, but this can vary based on factors such as window sizes, orientation, and body heat from occupants.
Consulting with a professional can provide tailored insights for your specific situation, ensuring that the mini split ceiling cassette you choose effect
Preparing the Installation Area
Preparing the installation area is a crucial step when installing a mini split ceiling cassette unit. This preparation ensures not only a smooth installation process but also optimal performance of the unit after it’s set up. Below are some considerations to take into account when preparing your space.
- Clear the Area: Remove any obstacles, furniture, or decorations that may hinder access to the installation site.
- Check Ceiling Height: Ensure that your ceiling height can accommodate the cassette unit while allowing adequate air circulation.
- Verify Structural Integrity: Inspect the ceiling and surrounding walls for any signs of damage or weakness; the unit’s weight must be supported adequately.
- Access to Electrical Supply: Ensure that there is a nearby electrical outlet or connection point for powering the unit.
- Drainage Consideration: Make provisions for any drain line if the unit requires condensate drainage.
In addition to the structural requirements, it’s essential to consider the environmental factors. Ensure that the installation area is free from excessive dust, dirt, or contaminants that could interfere with the unit’s operation.
Lastly, keeping safety in mind is paramount. Utilize proper tools and safety gear during installation, and be aware of your surroundings to prevent accidents. With everything in place, you are now ready to move on to the ne
Installing the Ceiling Cassette Unit
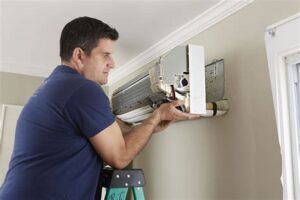
When it comes to optimizing your space with a mini split ceiling cassette system, installing the ceiling cassette unit is a crucial step. Proper installation not only ensures efficient operation but also enhances the aesthetics of your room. Before you dive into the installation, it’s important to have the necessary tools and materials at hand.
Begin by selecting a suitable location for the ceiling cassette. The unit should be mounted in a central position to effectively distribute air throughout the room. Consider the clearances needed around the unit for maintenance as well. Once the location is determined, follow the steps below for installation:
- Step 1: Prepare the ceiling by removing any existing fixtures or obstructions.
- Step 2: Create an opening in the ceiling that accommodates the dimensions of the ceiling cassette unit.
- Step 3: Install the mounting frame or bracket for the unit, ensuring it is securely attached to the ceiling for stability.
- Step 4: Position the ceiling cassette into the opening and connect the refrigerant lines, electrical connections, and drain hose as per the manufacturer’s instructions.
- Step 5: Once secured, finish the installation by covering the unit with the decorative grille and securing it in place.
Following these steps will help you successfully install the ceiling cassette unit in your home or workspace. Lastly, ensure that you have the unit properly positioned and leveled before proceeding to test its functionalities.
Testing and Troubleshooting
After successfully installing your mini split ceiling cassette, it’s crucial to conduct thorough testing and troubleshooting to ensure optimal performance. This process involves checking both the functionality and the efficiency of your system. Below are key steps and considerations during this phase:
- Power On the Unit: Start by turning on the mini split ceiling cassette and setting it to the cooling mode. Monitor whether the unit powers on without any unusual noises.
- Check Airflow: Once the unit is running, ensure that the airflow is consistent and unobstructed. You can use an anemometer to measure the airflow speed, which should match the specifications outlined in the unit’s manual.
- Inspect for Leaks: Examine the refrigerant lines and drainage pipes for any signs of leaking. A leak can lead to poor performance and increased energy consumption.
- Temperature Test: Use a thermometer to gauge the temperature of the air entering and exiting the unit. There should be a noticeable difference, indicating that the unit is effectively cooling the space.
- Inspect Remote Functionality: Test the remote control to ensure all buttons are functioning correctly. This includes temperature settings, fan speeds, and timer functions.
- Check for Error Codes: Many modern mini split systems come with diagnostic features, which may display error codes on the remote or the unit itself. Refer to the user manual to decode any issues that arise.
If you encounter any problems during these tests, it’s important to troubleshoot efficiently. Some common issues include:
- No Cooling: This could be due to low refrigerant levels, blocked filters, or improper installation.
- Excessive Noise: Check for loose parts or misplaced mounting brackets that may cause vibrations.
- Frequent Cycling: This may indicate an oversized unit or incorrect thermostat placement.
Don’t hesitate to consult a professional HVAC technician if you’re unable to resolve the issues yourself. Regular maintenance checks are also advisable to keep your mini split
Frequently Asked Questions
What are mini split ceiling cassettes?
Mini split ceiling cassettes are a type of ductless heating and cooling system that is installed flush with the ceiling, providing efficient climate control without taking up wall space.
What tools do I need for the installation of a mini split ceiling cassette?
You will need tools such as a drill, measuring tape, level, screwdrivers, and possibly a refrigerant line flaring tool for proper installation.
How do I choose the right location for the cassette installation?
Choose a location that allows for optimum airflow and is close to the outdoor unit. Ensure it is not blocked by furniture or other obstacles.
What are the steps to install a mini split ceiling cassette?
The installation steps include measuring and marking the install location, cutting an opening for the unit, mounting the cassette, connecting the refrigerant lines, and finally, connecting the electrical wiring.
Is professional installation required for mini split ceiling cassettes?
While competent DIYers can install mini split ceiling cassettes, hiring a professional is recommended for safety and to ensure compliance with local codes.
What is the maintenance required for mini split ceiling cassettes?
Regular maintenance includes cleaning the air filters, checking refrigerant levels, and scheduling an annual check-up with a HVAC professional.
Can a mini split ceiling cassette be used in all climates?
Yes, mini split ceiling cassettes are versatile and can operate efficiently in various climates, though extreme temperatures may require additional considerations.
