Learn how to choose, install, and troubleshoot your mini split system with our comprehensive guide. Ensure efficient cooling and heating for your space!Are you considering a mini split system for your heating and cooling needs? The convenience and efficiency of these systems make them an excellent choice for both homeowners and renters. In this guide, we’ll take you through the essential steps for a successful Lowes mini split installation. From choosing the right model to preparing your space and executing both indoor and outdoor unit installations, we’ll ensure you’re well-equipped for each phase of the process. We’ll even cover some useful tips for testing and troubleshooting after installation, helping you enjoy the benefits of your mini split system without a hitch. Whether you’re a DIY enthusiast or just looking to understand the process better, this post will provide valuable insights to navigate your journey. Let’s dive in!
Choosing the Right Mini Split
When selecting a mini split system, several crucial factors must be considered to ensure optimal heating and cooling for your space. The size, efficiency, and features of the unit will have a significant impact on its performance and your satisfaction.
First and foremost, you need to assess the size of the area you want to cool or heat. To do this, calculating the BTU (British Thermal Units) required for your room is essential. The general rule of thumb is that 20 BTUs are needed per square foot of living space. You can use an online calculator or consult with an HVAC professional to get an accurate estimate.
Next, consider the efficiency rating of the mini split. Look for units with a High Energy Efficiency Ratio (EER) or Seasonal Energy Efficiency Ratio (SEER) rating, as these will save you money on energy bills and reduce your environmental footprint. Additionally, evaluate whether the unit offers advanced features such as inverter technology, which allows for variable speed operation, enhancing efficiency and comfort.
Lastly, consider the design and aesthetics of the mini split. Some models are equipped with sleek, low-profile units that can complement your home decor. The ability to customize the unit’s appearance and functionality can enhance your overall satisfaction with the installation.
In summary, taking the time to research and choose the right mini split will ensure that you have the right system for your home’s heating and cooling needs.
Preparing for Installation
Before diving into the installation of your new mini split system from Lowes, it’s crucial to properly prepare your space. This ensures that the installation process goes smoothly and the system operates efficiently. In this section, we will outline the key steps you need to take to prepare for your mini split installation.
Firstly, identify the optimal location for both the indoor and outdoor units. The indoor unit should be placed in a central location where airflow is maximally effective. Consider the following factors:
- Ceiling Height: Ensure there is enough clearance and that the unit can distribute air evenly.
- Wall Space: Choose a wall that is free from obstructions (like furniture or decorations).
- Access to an Energy Source: Make sure the indoor unit can easily connect to your electrical system.
- Outdoor Unit Considerations: Ensure the outdoor unit has sufficient space for airflow and maintenance.
Secondly, check the necessary tools and equipment you’ll need for the installation of your mini split system. Here’s a quick checklist:
| Tools | Purpose |
|---|---|
| Drill | For securing the indoor and outdoor units. |
| Level | To ensure units are properly aligned. |
| Pipe Wrench | To tighten refrigerant lines. |
| Wire Strippers | For electrical connections. |
Lastly, prepare yourself for common challenges during the installation process. This includes understanding local building codes and regulations to avoid any compliance issues. Familiarize yourself with your mini split’s manual and, if needed, consul
Installing the Indoor Unit
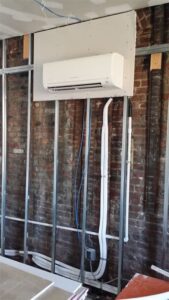
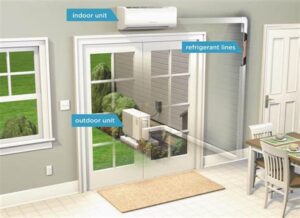
Installing the indoor unit of a mini split system is a crucial step in ensuring efficient and effective heating and cooling. Before you start the installation, carefully choose the location where the unit will be mounted. Ideally, it should be situated on an interior wall that can easily connect with the outdoor unit through refrigerant and drainage lines.
Here are the key steps to follow when installing the indoor unit:
- Prepare the mounting bracket: Use a level to mark the position where the wall bracket will be installed, ensuring it is straight and secure.
- Drill a hole: Use a concrete or masonry bit, depending on your wall type, to drill a hole for the refrigerant lines.
- Mount the indoor unit: Secure the indoor unit onto the bracket carefully, ensuring that it is firmly held in place.
Make sure to follow the manufacturer’s instructions throughout the process. This ensures that the installation is compliant with safety standards and performance guidelines. Once the unit is mounted, you can proceed to connect the refrigerant lines and electrical components.
In summary, proper installation of the indoor unit is essential for maximizing the efficiency of your mini split system. Don’t hesitate to consult professionals if you’re unsure about any steps in the process.
Mounting the Outdoor Unit
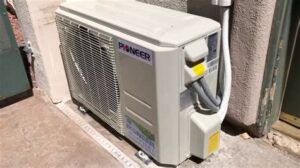
When it comes to mounting the outdoor unit of your mini split HVAC system, proper installation is crucial for optimal performance and longevity. Here are some key steps to follow:
- Choose the Right Location: Select a spot that is well-ventilated and free from obstructions. Ensure it’s far from trees or other structures that may block airflow.
- Secure the Base: Use a sturdy platform or concrete pad for the unit to prevent vibrations. Ensure it is level to facilitate drainage.
- Check the Distance: Follow the manufacturer’s guidelines regarding the maximum length of refrigerant lines and electrical connections.
Before you start with the mounting, gather all the necessary tools and materials, including bolts, screws, and a mounting bracket. Make sure to have safety gear on hand as well.
Once the location is selected and prepared, you can proceed to attach the mounting bracket securely to the wall or platform. It’s important to ensure that the bracket can handle the weight of the unit and any potential environmental stressors.
Addtionally, once the outdoor unit is mounted, double-check for levelness, which will help prevent any issues with refrigerant flow. Properly mounting the outdoor unit will significantly influence the efficiency and effectiveness of your mini split system.
Testing and Troubleshooting
Once you have successfully installed your Lowe’s mini split system, it’s crucial to perform thorough testing and troubleshooting to ensure optimal performance. This phase of the installation process helps in identifying any potential issues that could affect the efficiency of your unit. Below are some key steps and checks you should perform:
- Check for Refrigerant Leaks: Inspect all connection points, including the indoor and outdoor units, for any signs of refrigerant leaks.
- Verify Electrical Connections: Ensure that all electrical connections are secure and that the system is properly grounded.
- Test the Thermostat: Confirm that the thermostat is functioning correctly by setting it to different temperatures and ensuring the system responds accordingly.
- Examine Airflow: Check that the indoor unit is blowing air at the correct capacity and direction. Adjust the louvers as necessary.
- Run a System Check: Operate the unit in both heating and cooling modes to determine if it runs smoothly without any unusual noises or vibrations.
If you encounter any issues during your testing phase, the following troubleshooting tips can help:
Common Issues and Solutions:
| Issue | Possible Cause | Solution |
|---|---|---|
| Unit not cooling | Low refrigerant levels | Check for leaks and recharge the system |
| Unusual noise from the unit | Loose components | Tighten screws and inspect for loose parts |
| Thermostat not responding | Power issue | Check power supply and circuit breaker |
By carefully going through these testing and troubleshooting steps, you can ensure that your Lowe’s mini split system operates effectively and provides the comfort you need. Regular maintenance and checks are also recommended to prolong the lifespan of your unit.
Frequently Asked Questions
What is a mini split system?
A mini split system is a type of heating and cooling system that consists of an outdoor condenser unit and one or more indoor air-handling units, providing efficient climate control without the need for ductwork.
What tools are required for Lowe’s mini split installation?
The installation typically requires tools such as a drill, level, measuring tape, wall bracket or mounting plate, refrigerant lines, and electrical connectors.
Do I need to hire a professional for the installation?
While some homeowners may install mini split systems themselves, it is often recommended to hire a licensed HVAC professional to ensure proper installation and compliance with local codes.
How much can I expect to spend on a mini split installation from Lowe’s?
The cost of a mini split system installation can vary widely based on factors such as the size of the unit, labor costs, and any additional materials needed, but it typically ranges from $1,500 to $4,500.
What are the benefits of using a mini split system?
Mini split systems are known for their energy efficiency, flexibility in installation, ability to provide zone heating and cooling, and quieter operation compared to traditional HVAC systems.
How long does it take to install a mini split system?
The installation of a mini split system generally takes between 4 to 8 hours, depending on the complexity of the setup and the number of indoor units being installed.
How often should I maintain my mini split system?
It is recommended to clean or replace the air filters every 1-3 months and schedule professional maintenance at least once a year to keep the system running efficiently.
