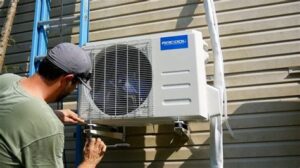
Learn how to install mini split systems with our comprehensive guide covering location selection, necessary tools, step-by-step instructions, and troubleshooting tips.Installing a Mr. Cool mini split system can be a game changer for your home’s heating and cooling needs, providing efficient temperature control without the hassle of ductwork. As energy prices continue to rise, homeowners are increasingly seeking cost-effective and flexible climate solutions, and mini split systems fit the bill perfectly. In this comprehensive guide, we’ll walk you through everything you need to know about installing your mini split, from understanding how these systems work to selecting the best location for optimal performance. We’ll also provide a detailed step-by-step installation process, along with tips for gathering the necessary tools and troubleshooting any potential issues. Whether you’re a seasoned DIY enthusiast or a first-time installer, this blog post will equip you with the insights and knowledge to successfully set up your Mr. Cool mini split and enjoy year-round comfort.
Understanding Mini Split Systems
Mini split systems are efficient and versatile heating and cooling solutions that consist of two main components: an outdoor unit and one or more indoor units. Unlike traditional HVAC systems that require ductwork, mini splits offer a ductless approach, allowing for easy installation in a variety of settings. This makes them an ideal choice for homes and apartments where ducting may not be feasible.
One of the primary benefits of a mini split system is its ability to provide zoned heating and cooling, which means that different areas of a property can be controlled independently. This leads to enhanced comfort and can result in energy savings due to the ability to heat or cool only the spaces that are in use. Additionally, these systems often have high energy efficiency ratings, contributing to lower utility bills.
Another noteworthy feature is the inverter technology commonly found in modern mini split systems. This technology allows the system to adjust its power output based on the cooling or heating needs at any given time, rather than constantly switching on and off. This results in quieter operation and increased longevity of the unit.
Overall, understanding how mini split systems work and their advantages can help homeowners make informed decisions when considering heating and cooling options.
Choosing the Right Location
Choosing the right location for your Mr. Cool Mini Split system is crucial for optimal performance and efficiency. The placement will not only affect the cooling but also the heating capabilities, ensuring that your home remains comfortable year-round. Here are some key considerations to keep in mind:
- Indoor Unit Placement: Select a central location where the air can circulate freely in the room. Avoid corners and locations obstructed by furniture.
- Outdoor Unit Location: The outdoor unit should be installed on a stable, level surface, ideally on a concrete slab. Ensure it is away from direct sunlight and has ample airflow.
- Distance Between Units: Maintain a reasonable distance between the indoor and outdoor units to prevent issues with refrigerant lines. Ideally, this should be no more than 50 feet.
Remember to also consider the external obstacles that may impede airflow, such as trees, walls, or fences. Keeping the outdoor unit clear of debris will help maintain its efficiency.
Lastly, check local building codes and regulations regarding the installation of HVAC systems, as these might influence where you can install your units.
In summary, the success of your Mr. Cool Mini Split system largely depends on choosing the right location. Take the t
Gathering Necessary Tools and Supplies
Before diving into the installation of your Mr Cool mini split system, it’s crucial to have the right tools and supplies on hand. This preparation ensures a smoother installation process and helps you avoid unnecessary disruptions.
Here’s a necessary checklist of items you will need:
- Drill – For creating holes in walls for the refrigerant lines.
- Saw – A reciprocating saw or utility knife for cutting insulation and mounting plates.
- Tape Measure – To measure distances accurately for optimal placement.
- Screwdriver Set – Essential for securing the indoor and outdoor units.
- Level – To ensure your units are installed perfectly horizontal.
- Refrigerant Wrench – For working with refrigerant lines.
- Safety Gear – Including gloves and goggles for personal protection.
- Voltage Meter – To check electrical connections.
Additionally, ensure you have sufficient insulation material and the installation kit that comes with your Mr Cool mini split unit, which typically includes refrigerant lines, the mounting bracket, and a condensate drain line.
By gathering these tools and supplies beforehand, you’ll be able to streamline your installation process, minimizing the risk of delays or complications. Remember, proper planning is key to a successful installation!
Step-by-Step Installation Process
Installing a Mr. Cool mini split system can seem daunting, but with the right guidance, you can complete the task efficiently. Follow these step-by-step instructions to ensure a successful installation.
Step 1: Gather all necessary tools and supplies. You will need a level, a drill, a screwdriver, wrenches, a keyhole saw, and a stud finder, along with the Mr. Cool mini split units and installation hardware.
Step 2: Choose the proper location for your indoor and outdoor units. Ensure that both units are placed in a well-ventilated area and free from obstructions. Use a stud finder to locate studs for mounting and mark the positions accordingly.
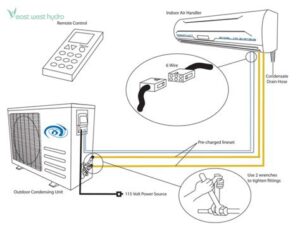
Step 3: Install the indoor unit by attaching the mounting bracket to the wall. Make sure it is level using a level tool. After securing the bracket, connect the refrigerant lines and electrical wiring, following the manufacturer’s guidelines.
Step 4: For the outdoor unit, place it on a sturdy, level surface, ensuring it is not directly in contact with the ground. Use rubber pads if necessary to reduce vibration. Connect the refrigerant lines and electrical connections as per the manufacturer’s instructions.
Step 5: Once both units are installed and connected, vacuum the refrigerant lines using a vacuum pump to prevent moisture from entering the system. This step is crucial for the efficient operation of your Mr. Cool mini split.
Step 6: Finally, check for leaks and ensure that all connections are tight. Restore power to the system and test the installation by setting the desired temperature on the remote control. Monitor the operation to ensure everything is functioning properly.
Following these steps will lead you through the installation process of your Mr. Cool mini split system, allowing you to enjoy a comfortable environment in your space.
Testing and Troubleshooting
Once you have successfully installed your Mr. Cool Mini Split system, it’s essential to ensure that everything is functioning correctly. Testing and troubleshooting are crucial steps that will help you identify any issues right away, allowing for a smoother operation of your cooling or heating system.
The first step in testing your system is to turn it on and observe its performance. Make sure the indoor and outdoor units are operating smoothly and listen for any unusual noises. If the system doesn’t turn on or produces erratic behavior, proceed with the following troubleshooting steps.
Common issues that you might encounter include:
- No Power: Check the circuit breaker and ensure that the unit is receiving power.
- Insufficient Cooling or Heating: Verify that the thermostat is set correctly and that the filters are clean.
- Leaking Refrigerant: Look for any signs of refrigerant leaks in the lines or connections.
If you encounter a problem, consulting the Mr. Cool Mini Split user manual can provide valuable insights and troubleshooting tips. If the issue persists, consider reaching out to a professional technician who specializes in mini-split systems.
Frequently Asked Questions
What is a Mr. Cool mini split system?
A Mr. Cool mini split system is an energy-efficient heating and cooling system that consists of an outdoor condenser unit and one or more indoor air handling units, providing flexibility in controlling temperatures in different rooms.
What tools do I need to install a Mr. Cool mini split system?
You’ll typically need tools such as a drill, wrenches, level, measuring tape, screwdrivers, a vacuum pump, and a refrigerant gauge set for installation.
Can I install a Mr. Cool mini split system myself?
Yes, Mr. Cool systems are designed for easy DIY installation with features like pre-charged lines and step-by-step instructions, making them accessible for homeowners.
What are the steps for installing a Mr. Cool mini split system?
The installation steps generally include choosing an appropriate location, mounting the indoor and outdoor units, connecting refrigerant lines and electrical wires, and then vacuuming and testing the system.
Do I need to hire a professional for installation?
While the Mr. Cool system is DIY-friendly, if you are uncomfortable with electrical work or HVAC systems, it may be wise to consult a professional.
What are the benefits of using a mini split system?
Benefits of mini split systems include energy efficiency, zoning capabilities (heating or cooling specific rooms), and minimal installation disruption, making them a flexible solution for climate control.
How do I maintain my Mr. Cool mini split system?
Regular maintenance includes cleaning or replacing the air filters, checking refrigerant levels, and ensuring that the outdoor unit is free of debris to keep the system running efficiently.
