Learn how to choose the right location and size for your installation, prepare the area, connect refrigerant lines, and ensure proper operation.Installing mini splits can be a game-changer for both comfort and energy efficiency in your home. These versatile heating and cooling systems offer targeted temperature control, making them a popular choice for modern living spaces. However, a successful installation hinges on a few critical factors, from choosing the right location to ensuring proper connections and setup. In this blog post, we will guide you through essential steps such as selecting the appropriate size unit for your space, preparing the installation area, and connecting refrigerant lines. Additionally, we will discuss how to test and verify the system’s operation to ensure you’re getting the most out of your mini split system. Whether you’re a DIY enthusiast or looking to hire a professional, this comprehensive guide will equip you with the knowledge needed to achieve a seamless installation and enjoy ultimate comfort year-round.
Choosing the Right Location
Choosing the right location for your mini split system is crucial for optimal performance and efficiency. The location determines not just the effectiveness of the system but also affects its longevity. Here are key factors to consider when selecting the perfect spot:
- Distance from Outdoor Unit: Ensure that the indoor unit is within a reasonable distance from the outdoor condenser. Ideally, the length of the refrigerant lines should be minimized.
- Airflow: Locate the unit where it can provide maximum airflow throughout the room. This means avoiding corners or areas that might block the air.
- Sunlight Exposure: Keep in mind the amount of sunlight hitting the unit. Direct sunlight can impact efficiency, so position it away from bright windows or invest in insulating shades.
- Height Installation: Install the indoor unit at least 7 feet from the floor for optimal air distribution.
- Aesthetics: Consider how the unit will fit into your existing decor. A well-placed unit can seamlessly blend into your space.
Involving professionals who can assess the best placement based on your home’s layout might be a smart approach. The right choice can lead to significant savings on energy bills in the long run.
Remember that poor placement can lead to inefficient operation, reduced lifespan of the system, and could even breach warranty terms. Consequently, taking the time to consider location can help prevent future issues.
In summary, proper planning during the initial installation process will ensure your mini split system operates effectively, providing you with comfort year-round.
Selecting the Appropriate Size
When it comes to installing mini splits, one of the most critical steps is selecting the appropriate size for your unit. This decision directly impacts the system’s efficiency, overall comfort, and energy use.
To ensure you’re choosing the right size for your space, consider the following factors:
- Square Footage: The first step is to measure the area you wish to cool or heat. Mini splits are generally rated in BTUs (British Thermal Units), which indicate the capacity to heat or cool a specific area.
- Ceiling Height: Standard calculations often assume an 8-foot ceiling. If your space has higher ceilings, you may need a larger unit.
- Insulation Quality: Well-insulated homes require less BTU capacity, while poorly insulated spaces will need more to compensate for heat loss.
A common rule of thumb is that you need about 20 BTUs per square foot of living space. However, you can refer to a simple BTU calculator or consult with a professional to get a more tailored recommendation based on your unique circumstances.
The choices can be vast, but by following these guidelines, you can effectively minimize energy costs and maximize comfort in your space through the proper selection of mini split size.
Preparing the Installation Area
When it comes to installing mini splits, one of the most critical steps is preparing the installation area. A well-prepared space ensures that the installation process goes smoothly and that the unit operates effectively once installed.
Before beginning the installation, ensure that the area is free from any obstructions. This includes clearing out furniture, décor, and any other items that might hinder the installation process. Also, consider the proximity of the indoor unit to the outdoor unit, as this can affect the efficiency of the mini split system.
Additionally, check for any necessary electrical outlets and ensure that they are safely positioned. The installation area should also be level, as any tilt can lead to potential issues with drainage and operation. Taking these preparatory steps will ultimately contribute to the performance and longevity of your mini split system.
Connecting the Refrigerant Lines
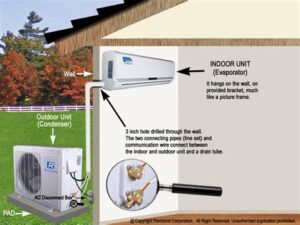
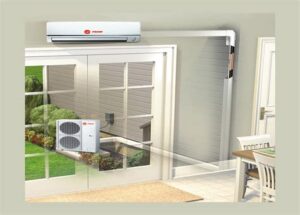
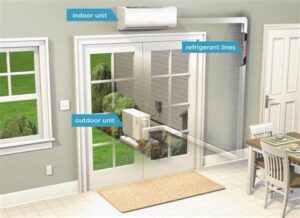
When it comes to installing mini splits, one of the critical steps involves connecting the refrigerant lines. These lines play a vital role in the mini split system’s operation, as they are responsible for transporting refrigerant between the indoor and outdoor units. Proper connection of these lines is essential for ensuring optimal performance and energy efficiency.
Before starting, gather the necessary tools and materials, including a tube cutter, flare nut wrench, and refrigerant lines. Ensure you are using the right size refrigerant lines, as specified by the manufacturer. The typical sizes are 1/4 inch and 3/8 inch, but it’s crucial to consult the mini split’s manual for exact requirements.
Follow these steps for an effective connection:
- Measure and cut the refrigerant lines to the required length.
- Deburr the cut ends to avoid any leaks.
- Flare the ends of the refrigerant lines using a flaring tool.
- Attach the lines to the respective ports on the indoor and outdoor units.
- Ensure all connections are tight but be careful not to overtighten, as this can cause damage.
After completing the connections, it is crucial to perform a leak test using nitrogen before adding refrigerant to the system. This process will help ensure that there are no leaks, which is essential for the efficient operation of your mini split.
Testing and Verifying Proper Operation
After installing your mini-split system, one of the most crucial steps is testing and verifying proper operation. This ensures that your unit is functioning efficiently and effectively. Start by ensuring that the power supply to the indoor and outdoor units is connected properly, and that the electrical circuit is functioning as intended.
Next, you should check the thermostat settings to confirm that the desired temperature is set correctly. This will allow the system to cycle on and off as needed. Once you’ve done that, turn on the unit and listen for any unusual noises that might indicate an issue, such as rattling or grinding.
Lastly, it is important to check the airflow from the indoor unit. The air should be flowing freely and at an appropriate temperature. Use a thermometer to measure the air temperature and compare it with the settings on your thermostat. If there are discrepancies, it may point to an installation problem, refrigerant issue, or other maintenance needs that require attention.
Frequently Asked Questions
What are mini-splits and how do they work?
Mini-splits are ductless heating and cooling systems that consist of an outdoor compressor and one or more indoor air-handling units. They work by transferring heat from indoors to outdoors or vice versa, depending on whether they are in heating or cooling mode.
What are the benefits of installing mini-splits?
Some benefits include energy efficiency, flexibility in zoning and temperature control, and easier installation compared to traditional HVAC systems. They also take up less space and can be more aesthetically pleasing.
How do I choose the right size mini-split for my room?
To choose the right size, you need to calculate the BTU (British Thermal Unit) requirements based on the room’s size, insulation, ceiling height, and sun exposure. A general rule is 20 BTU per square foot, but it’s advisable to consult a professional for accurate sizing.
Can I install a mini-split system myself?
While DIY installation is possible, it requires knowledge in electrical work, refrigerant handling, and proper mounting. Hiring a licensed professional is recommended to ensure safety and compliance with local building codes.
What is the average cost of installing a mini-split system?
The average cost can range from $2,000 to $5,000 or more, depending on factors like the number of indoor units, system size, and installation complexity. It’s best to get quotes from multiple contractors.
Are mini-splits energy efficient?
Yes, mini-splits are highly energy efficient, often achieving SEER (Seasonal Energy Efficiency Ratio) ratings above 20. This can lead to lower energy bills and a reduced carbon footprint compared to traditional heating and cooling systems.
What maintenance is required for mini-split systems?
Maintenance includes regularly cleaning or replacing air filters, cleaning the outdoor unit from debris, checking the refrigerant levels, and scheduling annual inspections with a qualified technician to ensure optimal performance.
