Learn how to optimize your HVAC installation from system selection to ductwork insulation for maximum efficiency and comfort.Installing a multi-zone mini split system can be a game-changer for your home’s comfort and energy efficiency. Unlike traditional HVAC systems, these versatile units offer customized climate control for different areas of your home, allowing you to enjoy the perfect temperature in every room. However, before you dive into the installation process, it’s essential to understand several key factors to ensure optimal performance and longevity of your system. This blog post will guide you through the crucial steps of selecting the right system, planning your installation layout, calculating BTU requirements, sizing and placing indoor units, and sealing and insulating ductwork. Whether you’re a seasoned DIYer or a novice looking to upgrade your home’s heating and cooling, these insights will help you make informed decisions for a successful installation. Let’s start transforming your indoor climate!
Selecting the Right System
When it comes to installing a multi-zone mini split system, the first and foremost step is selecting the right system that fits your needs. There are various types of mini split systems available in the market, each with its own set of features and specifications. Understanding these options can help you make an informed decision.
Consider the following factors when choosing a mini split system:
- BTU Capacity: Ensure that the system can handle the specific heating and cooling demands of each zone.
- Energy Efficiency: Look for systems with a high SEER (Seasonal Energy Efficiency Ratio) rating to save on energy bills.
- Brand Reputation: Research and select reputable brands known for reliability and support.
- Size and Aesthetics: Choose units that fit well visually and spatially within your existing decor.
Additionally, it’s essential to consider future requirements; for instance, whether you might want to expand the system to additional zones down the line. A multi-zone mini split provides flexibility, so consider options that allow for growth.
Planning the Installation Layout
When planning to install a multi-zone mini split system, one of the crucial steps is planning the installation layout. A well-thought-out layout will ensure optimal efficiency and comfort in your living space.
Begin by assessing the area where the indoor units will be located. Consider the following factors:
- Room Size: Measure the square footage of each room to determine the number of indoor units needed.
- Airflow: Ensure that each indoor unit can distribute air effectively across the room.
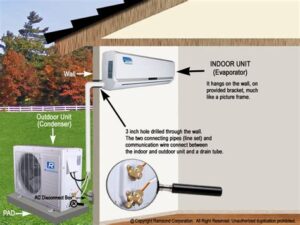
- Access to the Outdoors: Identify where the outdoor condenser unit will be placed, keeping in mind the necessary clearances.
- Exposed Ductwork: Plan for the routing of linesets and ductwork, ensuring minimal exposure to maintain aesthetics and efficiency.
Creating a detailed floor plan can be immensely beneficial. You may consider using tools such as graph paper or digital design software to accurately depict where each component will be installed. Make sure to account for clearance spaces around each unit to allow for proper airflow and maintenance access.
Additionally, consult with a professional HVAC technician, as they can provide valuable insights into system configuration and any potential challenges that may arise during installation. This will not only help in achieving the desired climate control but also extend the life of your mini split system.
Calculating the BTU Requirements
When it comes to installing a multi zone mini split system, one of the most critical steps is calculating the BTU requirements. BTU, or British Thermal Units, measure the amount of heat needed to raise the temperature of one pound of water by one degree Fahrenheit. For HVAC systems, accurately determining BTU requirements ensures optimal performance, energy efficiency, and comfort.
To effectively calculate the BTU requirements for your space, consider the following factors:
- Room Size: Measure the length and width of each room to calculate the total square footage.
- Ceiling Height: High ceilings may require additional BTUs, so take note of the height differences.
- Insulation Quality: Well-insulated rooms retain heat better, potentially reducing BTU needs.
- Sunlight Exposure: Rooms that receive ample sunlight may require more cooling capacity, increasing BTU requirements.
- Number of Occupants: Each additional person can add up to 600 BTUs, so account for the typical occupancy.
Once you gather all this data, you can refer to a BTU calculator or guideline to determine the total BTUs needed for your multi zone mini split installation. This calculation is essential for selecting the right system and ensuring energy efficiency in your home.
Sizing and Placing the Indoor Units
When it comes to installing a multi-zone mini-split system, one of the most crucial aspects is sizing and placing the indoor units. Proper sizing ensures that each unit can effectively cool or heat the space, while strategic placement maximizes comfort and efficiency. Here are some key considerations to keep in mind.
| Factors to Consider | Description |
|---|---|
| Room Size | Measure the square footage of each room to determine the appropriate BTUs needed. |
| Ceiling Height | Higher ceilings may require additional BTUs for effective temperature control. |
| Room Orientation | South-facing rooms may gain more heat, influencing the sizing requirement. |
| Insulation Quality | Well-insulated rooms will maintain temperature better and may require smaller units. |
| Number of Occupants | Consider how many people typically occupy the room to account for heat generation. |
After determining the appropriate size, the next step is to focus on the placement of the indoor units. Aim for central locations that allow for optimal airflow throughout the room. Avoid placing units in corners or blockages from furniture, as this can hinder their efficiency.
Additionally, consider the aesthetic aspects of placement. Strategic positioning can help maintain the interior design without compromising on performance. For instance, wall-mounted units should be placed above doors or windows to effectively circulate air while also blending into the room’s decor.
In summary, the success of your multi-zone mini-split installation heavily relies on the correct sizing and strategic placement of the indoor units. Taking the time to assess room specifics will not only enhance comfort but also boost the overall energy efficiency of your system.
Sealing and Insulating the Ductwork
When it comes to installing a multi zone mini split, ensuring the efficiency of your system is paramount. One of the key steps in maximizing this efficiency is sealing and insulating the ductwork. Proper sealing prevents air leaks that can lead to energy loss and discomfort in your living spaces.
The first part of the process involves inspecting the ductwork for any gaps, holes, or damage. This can be done using a simple visual inspection, or for a more thorough check, you may choose to perform a blower door test. If any leaks are found, they should be sealed using a high-quality duct sealant or mastic tape.
In addition to sealing, insulating the ductwork is equally important. Insulation helps to maintain the temperature of the air traveling through the ducts, ensuring that the air supplied to your indoor units remains consistent. Use duct insulation materials that are appropriate for your climate and budget to enhance the performance of your multi zone mini split system.
| Step | Description |
|---|---|
| 1 | Inspect ductwork for leaks |
| 2 | Seal gaps and holes with mastic tape |
| 3 | Insulate ducts with appropriate materials |
Frequently Asked Questions
What is a multi-zone mini split system?
A multi-zone mini split system is a type of heating and cooling system that consists of one outdoor unit connected to multiple indoor units, allowing for independent temperature control in different areas of a building.
What are the benefits of installing a multi-zone mini split?
Benefits include improved energy efficiency, individual zone temperature control, lower installation costs compared to traditional systems, and the ability to heat or cool specific areas of a home or building.
What tools are required for the installation of a multi-zone mini split?
Essential tools include a drill, level, screwdriver set, pipe wrenches, measuring tape, and a vacuum pump for pressure testing the refrigerant lines.
Can I install a multi-zone mini split system myself?
While it is possible to install a mini split system yourself, it is recommended to hire a professional, especially for refrigerant handling and electrical work, to ensure safety and compliance with local codes.
How do I determine the proper size for a multi-zone mini split?
To calculate the proper size, consider the square footage of the area to be cooled or heated, the climate zone, insulation levels, and the number of indoor units needed. Consulting a HVAC professional can provide an accurate assessment.
What maintenance is required for a multi-zone mini split system?
Regular maintenance includes cleaning or replacing air filters, checking refrigerant levels, cleaning condensate drain lines, and ensuring that outdoor units are free of debris. Annual professional maintenance is also recommended.
How energy-efficient are multi-zone mini split systems?
Multi-zone mini splits are known for their high energy efficiency, often rated with SEER (Seasonal Energy Efficiency Ratio) ratings above 20, leading to lower energy bills compared to traditional HVAC systems.


