Learn how to install mini split units with our comprehensive guide covering benefits, location selection, preparation, tools, and step-by-step instructions for a successful setup.Are you considering upgrading your home’s heating and cooling system? Installing a mini split unit might be the perfect solution for you. These efficient and versatile systems offer a range of benefits, including improved climate control, energy savings, and flexible installation options. In this blog post, we’ll walk you through everything you need to know about installing a mini split unit in your space. From understanding the advantages these systems provide to choosing the ideal location, we’ll guide you through the essential steps, including preparing the installation area and gathering the necessary tools and materials. Finally, we’ll present a clear, step-by-step installation guide to ensure your project goes smoothly. Say goodbye to temperature fluctuations and hello to comfort with a mini split unit! Let’s dive into the details.
Benefits of Mini Split Units
Mini split units have become increasingly popular for both residential and commercial cooling and heating solutions. One of the primary benefits is their energy efficiency. Unlike traditional HVAC systems, mini splits allow for zoned heating and cooling, which means you can control the temperature in different areas of your space independently. This results in lower energy consumption and reduced utility bills.
Another significant advantage is their flexibility in installation. Mini split systems can be installed in various configurations and locations, making them ideal for spaces where traditional ductwork is not feasible. You can mount these units on walls, ceilings, or even have them as floor-mounted options, giving you plenty of options to suit your decor and design needs.
Moreover, mini splits operate with quiet technology. Unlike traditional air conditioning units, they create less noise, ensuring a more comfortable environment for your home or office. This is particularly beneficial in areas where silence is valued, like bedrooms or study rooms. With these advantages combined, mini split units emerge as a cost-effective and efficient solution for modern climate control needs.
Choosing the Right Location
When installing a mini-split unit, one of the most critical steps is choosing the right location. The efficiency and performance of your unit can be significantly impacted by its placement, so careful consideration is essential. Here are some key factors to think about:
- Proximity to the Outdoor Unit: Ensure that the indoor and outdoor units are not too far apart. This will help reduce the length of refrigerant lines and improve the overall efficiency.
- Airflow: Avoid placing the indoor unit near walls, furniture, or other obstructions that can block airflow. Aim for a spot that allows for free circulation of air throughout the room.
- Height: Install the indoor unit at an appropriate height. Ideally, it should be around 7-8 feet above the floor to maximize its effectiveness in heating and cooling.
Additionally, consider the aesthetics of the installation location. While functionality is paramount, you also want to choose a location where the unit does not detract from the room’s decor. In some cases, consult with a professional installer who can offer insights based on their experience.
Lastly, it’s also worth mentioning that local building codes and regulations may have specific requirements for the placement of mini-split units. En
Preparing the Installation Area
When it comes to installing a mini split unit, one of the most critical steps is to effectively prepare the installation area. Ensuring that the location is suitable not only facilitates a smoother installation process but also enhances the overall performance of the unit.
Before beginning the installation, ascertain that the chosen area is free from any obstructions. This includes ensuring adequate space around both the indoor and outdoor units. Ideally, you’ll want at least 4 inches of clearance on either side and the top of the indoor unit, while the outdoor unit should have about 12 inches of clearance from any walls or debris.
In addition to space, consider the electrical requirements for the mini split unit. Make sure that the installation area can accommodate the necessary electrical connections and is up to code. It may be beneficial to consult an electrician if you’re unsure about the requirements. Proper preparation in this stage can save a lot of hassle later on.
Remember, a well-prepared installation area is crucial for the efficiency and effectiveness of your mini split unit.
| Preparation Checklist |
|---|
| Clear debris and obstructions |
| Ensure adequate spacing around the unit |
| Verify electrical requirements |
| Plan for drainage options |
Basic Tools and Materials Needed
Installing a mini split unit requires some essential tools and materials to ensure a smooth and efficient installation process. Below is a comprehensive list of the basic items you’ll need before starting the project.
First and foremost, here’s a list of required tools:
- Drill – A power drill is necessary for making holes for mounting the indoor and outdoor units.
- Screwdriver Set – You’ll need both flathead and Phillips screwdrivers for securing various components.
- Level – To ensure that your units are mounted correctly and evenly.
- Wrenches – Adjustable wrenches will help tighten and loosen the connections.
- Pipe Cutter – A pipe cutter is crucial for cutting the refrigerant lines to the required lengths.
- Vacuum Pump – This is essential for removing air and moisture from the refrigerant lines.
- Manifold Gauges – Used to check the pressure levels in the system to ensure proper installation.
In addition to tools, you will also need the following materials:
| Materials | Description |
|---|---|
| Refrigerant Lines | The copper lines that connect the indoor and outdoor units. |
| Drain Line | A line for draining condensate away from the indoor unit. |
| Electrical Wiring | Required for powering the mini split system. |
| Mounting Bracket | Used to secure the indoor unit to the wall. |
| Insulation Material | To insulate refrigerant lines, preventing energy loss. |
| Sealant | To seal any gaps around the installation areas. |
By gathering these tools and materials in advance, you’ll save time and ensure a successful installation of your mini split unit. It is crucial to have everything organized and ready before embarking on this task to avoid any unnecessary delays.
Step-by-Step Installation Guide
Installing a mini split unit can be a straightforward process if you follow the right steps. Below is a detailed step-by-step guide to help you with the installation. Make sure you have all the necessary tools and materials before starting.
Step 1: Gather Tools and Materials
- Mini split unit
- Drill
- Mounting bracket
- Refrigerant lines
- Electrical wiring
- Insulation tape
- Level
- Safety goggles
Step 2: Choose the Right Location
Decide on the best location for your indoor and outdoor units. The indoor unit should be mounted high on a wall, away from direct sunlight and obstructions. The outdoor unit should have adequate airflow and be positioned on a stable surface.
Step 3: Install the Mounting Bracket
Using a level, mark the area on the wall for the mounting bracket of the indoor unit. Drill holes according to the bracket’s specifications, and secure it firmly to the wall.
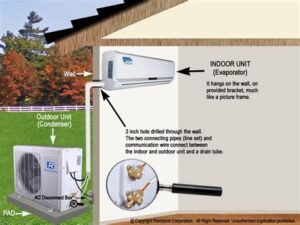
Step 4: Drill a Hole for the Refrigerant Lines
Drill a hole through the wall to facilitate the passage of the refrigerant lines and electrical wiring. Ensure the hole is slightly slanted downward to allow for drainage.
Step 5: Connect the Refrigerant Lines
Carefully thread the refrigerant lines and electrical wiring through the hole. Connect the refrigerant lines to the indoor unit and ensure all fittings are secure to prevent leaks.
Step 6: Secure the Indoor Unit
Lift the indoor unit onto the mounting bracket and secure it. Check that it is level and properly aligned before proceeding.
Step 7: Install the Outdoor Unit
Position the outdoor unit on a solid surface and secure it in place. Connect the refrigerant lines and electrical wiring to the outdoor unit as per the manufacturer’s instructions.
Step 8: Test Your Unit
Once all connections are made, turn on the mini split unit and check for proper operation. Look for any leaks and ensure both units are functioning efficiently.
Complete your installation by cleaning up the area and ensuring that all tools are put away. With the right approach and attention to detail, you can successfully install a
Frequently Asked Questions
What is a mini split unit and how does it work?
A mini split unit is a type of heating and cooling system that consists of an outdoor compressor and one or more indoor air-handling units. It works by transferring heat from inside to outside and vice versa, using refrigerant as the medium.
What tools are needed for installing a mini split unit?
Essential tools include a drill, level, screws, and brackets for mounting, a vacuum pump for the refrigerant lines, wrenches, and tubing cutters.
What is the first step in installing a mini split unit?
The first step is to choose an appropriate location for both the indoor and outdoor units, ensuring adequate clearance and access to power and drainage.
How do I run the refrigerant lines for the mini split?
Run the refrigerant lines from the outdoor unit to the indoor unit, ensuring that they are properly insulated and routed through the wall for a clean installation.
Are there any electrical requirements for a mini split installation?
Yes, mini split systems usually require a dedicated electrical circuit and should be installed according to local codes and manufacturer specifications.
What maintenance is required for a mini split unit post-installation?
Regular maintenance includes cleaning or replacing filters, checking refrigerant levels, and ensuring that the outdoor unit is clear of debris to maintain efficiency.
Can I install a mini split unit myself, or should I hire a professional?
While DIY installation is possible for those with experience, hiring a professional is recommended to ensure proper installation, efficiency, and warranty compliance.


