Learn how to assess garage space, choose the right mini split system, prepare for installation, and maintain it for optimal performance.Are you looking to transform your garage into a comfortable workspace or relaxation area? Installing a mini split system is an excellent way to achieve the perfect climate control you need for this versatile space. Unlike traditional HVAC systems, mini splits are efficient, easy to install, and offer flexibility in cooling and heating. In this blog post, we will guide you through the essential steps of installing a mini split in your garage. From assessing your garage space to selecting the right unit, preparing for installation, and ensuring proper testing and maintenance—each step will empower you to create a comfortable environment year-round. Let’s dive in and get your garage ready for any project or pastime!
Assessing Garage Space
When it comes to installing a mini split in your garage, the first step is assessing the garage space. This fundamental process will determine the suitability and efficiency of the mini split system you plan to integrate. Start by measuring the dimensions of your garage, including height, width, and depth, to gain a clear understanding of the total volume.
Next, consider the layout of your garage. Are there any obstructions such as shelves, vehicles, or tools that might impede airflow? Arranging your garage in a way that maximizes space will optimize the efficiency of the mini split system. Pay careful attention to areas where the unit could be installed; aim for high or centralized locations that allow for even cooling or heating distribution.
Additionally, think about insulation and energy efficiency. A well-insulated garage will keep the temperature more stable, allowing your mini split system to function more effectively. Examine the walls, doors, and windows for drafts or weak spots that could impact performance. Addressing these issues prior to the installation will increase the lifespan and efficacy of your system.
Selecting the Right Mini Split
When it comes to installing a mini split in your garage, selecting the right unit is crucial for achieving optimal comfort and efficiency. The first step is to determine the size of the mini split you need. This is measured in BTUs (British Thermal Units). Generally, the larger the garage, the higher the BTU rating required. A BTU calculator can help you find the perfect fit based on your garage’s dimensions and insulation levels.
Next, consider the type of mini split system you want. There are generally three categories: single-zone systems, which are ideal for smaller spaces; multi-zone systems, useful if you plan to heat or cool multiple areas; and high-velocity mini splits, designed for homes with limited space for ducts. Each type comes with its own advantages, making it important to assess your specific needs.
Finally, pay attention to the energy efficiency of the units you’re considering. Look for the SEER rating (Seasonal Energy Efficiency Ratio), which indicates how much cooling you get for every watt of electricity consumed. A higher SEER rating means better energy efficiency, allowing you to save on long-term energy costs while also reducing your carbon footprint.
Preparing for Installation
Before you embark on installing a mini split system in your garage, it’s crucial to properly prepare for the installation process. This ensures that everything runs smoothly and efficiently from the very start. Here are some essential steps to consider:
1. Measure Your Space: Accurately measure your garage to determine the best location for the indoor and outdoor units of the mini split system. This helps prevent any spatial issues during installation.
2. Choose the Right Equipment: Selecting an appropriate mini split system involves considering the size of your garage and the climate in your area. Make sure to check the manufacturer’s specifications to ensure that you choose a unit with adequate BTUs for your space.
3. Gather Necessary Tools: Ensure you have all the essential tools on hand. Basic tools needed for installation include a drill, screwdrivers, level, and a vacuum pump for the refrigerant lines. Having everything ready will help expedite the installation process.
4. Review the Installation Manual: Before beginning, it is vital to thoroughly read the installation manual provided by the manufacturer. Familiarizing yourself with the instructions will eliminate potential pitfalls later on.
5. Plan for Electrical Work: Depending on your mini split system, you may need electrical modifications or additional circuits. Consult with a licensed electrician if needed to ensure that everything is in compliance with local codes.
By diligently preparing for your mini split installation, you set the stage for a successful project that will enhance your garage’s comfort and utility for years to come.
Installing the Mini Split System
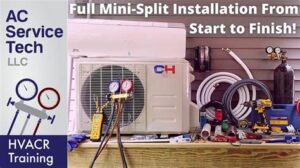
When it comes to installing a mini split system in your garage, there are several key steps to ensure a successful setup. First, you need to make sure you have the right tools and materials ready for the job. This includes a mounting bracket, refrigerant lines, electrical wiring, and a drill. It’s essential to assess the space adequately and confirm that the system is compatible with your garage’s size.
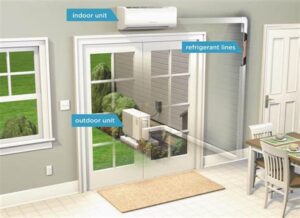
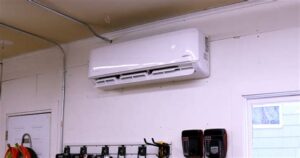
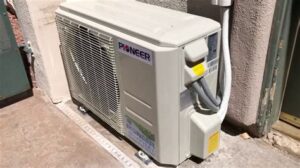
Next, place the indoor unit on the wall, ensuring it’s located high enough to disperse cool air effectively. The outdoor unit should be positioned outside, ideally on a solid base that allows for adequate airflow. You may need to create a pilot hole to run the refrigerant and electrical lines between the indoor and outdoor units. For this, you’ll need to measure precisely to avoid any complications.
Once the units are properly aligned and the lines are run, it’s vital to make the necessary electrical connections while following safety protocols. After all connections are secured, test the system to ensure it’s functioning properly. Regular testing and maintenance will help keep your mini split system running efficient
Testing and Maintenance Tips
Proper maintenance is essential for ensuring that your mini split system operates efficiently and lasts for years. Here are some critical tips to keep your system running smoothly:
- Regular Filter Cleaning: The air filters in your mini split should be cleaned or replaced every few months. A clogged filter can significantly reduce efficiency.
- Inspect the Outdoor Unit: Keep the outdoor unit free from debris, such as leaves or dirt. Ensure that the area around the unit is clear to allow for proper airflow.
- Check Refrigerant Levels: Low refrigerant levels can indicate a leak. If you suspect a leak, contact a professional to handle it.
Additionally, you may want to schedule a professional maintenance check at least once a year. During this visit, an HVAC technician will check the entire mini split system, ensuring all components are functioning correctly.
Don’t forget to monitor the thermostat settings and make adjustments as needed for optimal comfort and efficiency. This will help in keeping your garage at the perfect temperature, no matter the weather outside.
By adhering to these testing and maintenance tips, you can enhance the efficiency of your mini split system and prolong its lifespan, ensuring your garage remains a comfortable space year-round.
Frequently Asked Questions
What is a mini split system?
A mini split system is a type of air conditioning and heating system that allows for zoned climate control, providing both heating and cooling options for separate areas of a home or garage.
Why should I install a mini split in my garage?
Installing a mini split in your garage can provide temperature control, making it a more comfortable space for activities such as working on cars, woodworking, or hobbies throughout the year.
What are the advantages of using a mini split over traditional HVAC systems?
Mini split systems are generally more energy-efficient, easier to install, and allow for individualized climate control for different zones compared to traditional HVAC systems.
Do mini split systems require ductwork?
No, mini split systems are ductless, which means they do not require traditional ductwork for installation, making them easier to install in spaces like garages where ducts may not be available.
What size mini split do I need for my garage?
The size of the mini split you need depends on the garage’s square footage, insulation, and climate; it’s recommended to consult a professional for proper sizing.
What is involved in the installation process for a mini split in a garage?
The installation process typically involves mounting the indoor unit on the wall, connecting it to the outdoor unit via refrigerant lines, and securing the electrical wiring, which can often be done in a day by a qualified technician.
How much does it cost to install a mini split in a garage?
The cost of installing a mini split system can vary widely depending on the unit type, installation complexity, and labor costs, typically ranging from $2,000 to $5,000.
