Discover how to install DIY mini split systems with our comprehensive guide covering location selection, tools needed, and step-by-step installation tips.Installing a mini split system can be an efficient and rewarding way to enhance your indoor climate control, and what better choice than the MR Cool DIY Mini Split? This versatile and user-friendly unit empowers homeowners to take charge of their comfort without the need for professional installation. In this blog post, we’ll explore the essentials of DIY mini split systems, ensuring you have the knowledge and tools necessary for a successful installation. From selecting the ideal location for your unit to a comprehensive step-by-step guide, we’ll walk you through the entire process. Additionally, we’ll touch on the importance of testing and fine-tuning your system to achieve optimal performance. Whether you’re a seasoned DIY enthusiast or a curious novice, this guide will help you make the most of your MR Cool installation project. Let’s dive into the details!
Understanding DIY Mini Split Systems
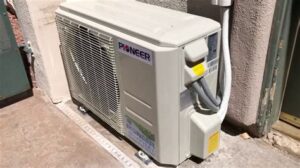
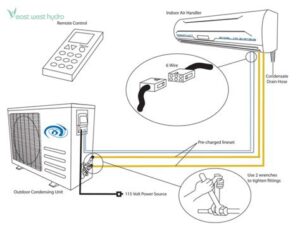
A DIY mini split system is an ideal choice for those looking to efficiently heat or cool their spaces without the need for extensive renovations. These systems are composed of two main parts: the indoor unit and the outdoor compressor. The indoor unit is responsible for releasing conditioned air into your home, while the outdoor compressor handles the heat exchange.
One of the biggest advantages of a DIY mini split system is their flexibility in installation. Unlike traditional HVAC systems, mini splits do not require ductwork, making them a great option for homes that lack existing ducts. Additionally, they can be installed in various locations, allowing for customizable comfort in specific rooms or areas.
Moreover, energy efficiency is a key feature of these systems. Many DIY mini splits operate quietly and can significantly lower your energy bills compared to standard heating and cooling methods. When selecting a unit, consider its SEER rating, which indicates the energy efficiency during
Choosing the Right Location for Installation
Choosing the right location for installing your Mr. Cool DIY mini split system is crucial for maximizing its efficiency and performance. Here are some key factors to consider when determining the optimal spot for your unit:
- Proximity to the Outdoor Unit: Ensure that the indoor unit is near the outdoor compressor. This minimizes the length of the refrigerant lines, which can enhance energy efficiency and reduce installation complexity.
- Centralized Location: Position the indoor unit in a central location within the room for even air distribution. Avoid corners or cramped spaces, which can hinder airflow.
- Height and Clearance: Ideally, the indoor unit should be mounted at least 7 feet from the floor to allow for optimal air circulation. Additionally, keep at least 6 inches of clearance on the sides and top of the unit.
- Sunlight and Obstructions: Avoid placing the unit in direct sunlight or behind obstructions such as furniture or drapes, as this can impact the cooling or heating performance.
- Access for Maintenance: Ensure there is enough space for maintenance access to the indoor and outdoor units to facilitate regular upkeep.
After considering all these factors, you will be better equipped to select an effective and efficient position for your Mr. Cool DIY mini split system. Careful planning at this stage can lead to not only improved comfort levels but also long-term reliability of your unit.
Remember to check any applicable building codes and regulations when choosing your installation spot, as there might be specific requirements depending on your location.
By prioritizing the location of your mini split system installation, you can enjoy the benefits of efficient heating and cooling with minimal hassle in the future.
Preparing the Necessary Tools and Equipment
When it comes to installing a Mr. Cool DIY mini split system, preparation is key. Having the right tools and equipment on hand will make the entire installation process smoother and more efficient. Below is a list of essential items that you will need:
- Drill: A power drill to make holes for mounting the indoor and outdoor units.
- Level: To ensure that the units are perfectly aligned.
- Stud Finder: To locate the studs in your wall for secure mounting.
- Pipe Wrench: For tightening fittings on the refrigerant lines.
- Refrigerant Gauge Set: To measure refrigerant pressure during and after installation.
- Electrical Tools: Wire cutters, strippers, and screwdrivers for electrical connections.
- Vacuum Pump: To evacuate the refrigeration lines of moisture and air.
- Safety Gear: Gloves and safety goggles to protect yourself during the installation process.
In addition to tools, you will also need some materials for the installation:
| Item | Quantity |
|---|---|
| Refrigerant Lines | 1 Set |
| Electrical Wire | As Required |
| Mounting Bracket | 1 set |
| Insulation | As Required |
Before starting the installation, take some time to gather and organize all your tools and materials. This preparation will not only save you time but also enhance your overall efficiency during the installation of your Mr. Cool DIY mini split system.
Step-by-Step Installation Process
Installing a Mr. Cool DIY mini split system can seem daunting, but with the right approach and step-by-step guidance, you can achieve a successful installation! Below is a comprehensive guide to help you set up your mini split system efficiently.
Before you begin, ensure you have all the necessary tools and equipment ready. You will need:
- Drill with drill bits
- Level
- Wrench set
- Pipe cutter
- Refrigerant tubing
- Electrical wiring and connectors
- Insulation tape
Now, let’s break down the installation process into manageable steps:
- Select the Location: Choose a suitable location for the indoor and outdoor units, ensuring they are connected by a line set.
- Install the Indoor Unit: Use the level to mark the mounting bracket on the wall, drill holes, and attach the bracket securely.
- Drill the Hole: Drill a small hole in the wall for the copper refrigerant line and wiring, ensuring it’s at a slight downward angle for drainage.
- Connect the Indoor Unit: Carefully connect the refrigerant pipes and electrical wiring to the indoor unit according to the manufacturer’s instructions.
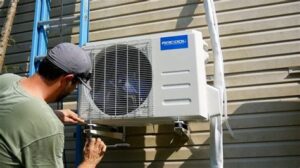
- Install the Outdoor Unit: Place the outdoor unit on a sturdy surface and ensure it’s level. Connect the refrigerant lines and ensure all the seals are tight.
- Check the Line Set: Insulate the refrigerant pipes with insulation sleeves to prevent energy loss.
- Power Up: Connect the power supply to the outdoor unit, and then turn on the circuit breaker to test the system.
Upon completion of all these steps, it’s important to check for any refrigerant leaks and ensure that both units function correctly. This DIY installation will not only save you money but also provide you
Testing and Fine-Tuning the System
Once you have successfully installed your Mr. Cool DIY Mini Split system, it’s time to move on to the crucial phase of testing and fine-tuning the system. This step is essential to ensure that your unit is operating at optimal performance and providing the comfort you desire.
Start by turning on your system and setting the desired temperature on the thermostat. Once the system kicks in, pay attention to the airflow. Make sure the air is circulating freely and there are no obstructions around the indoor and outdoor units. Observing the temperature differences between the air entering and leaving the units can help you gauge the cooling or heating efficiency.
Next, check for any unusual sounds or vibrations. A well-installed mini-split system should operate quietly. If you detect any strange noises, it may indicate an issue that needs to be addressed. Additionally, observe the refrigerant lines for any signs of leaks or condensation, which could signal improper installation or a need for adjustment. Fine-tuning may involve adjusting the settings on the remote control or the wall-mounted unit to achieve your comfort goals.
Frequently Asked Questions
What tools do I need to install the Mr. Cool DIY mini split?
You will need basic tools such as a drill, wrenches, a level, and a screwdriver for the installation.
Is special training required to install the Mr. Cool DIY mini split?
No special training is required, as the Mr. Cool DIY mini split is designed for easy installation by homeowners.
How long does it typically take to install the Mr. Cool DIY mini split?
Most homeowners can complete the installation in about 4 to 8 hours, depending on their experience level.
What is the best location to install the indoor unit of the mini split?
The indoor unit should be installed on an interior wall that’s a central point for airflow, away from obstructions.
Do I need to hire a professional for the installation?
No, the Mr. Cool DIY mini split is designed for easy self-installation, so you can do it yourself without hiring a professional.
What kind of maintenance does the Mr. Cool DIY mini split require?
Routine maintenance includes cleaning or replacing the air filters, checking the outdoor unit for debris, and ensuring the condensate drain is clear.
Can the Mr. Cool DIY mini split be installed in colder climates?
Yes, the Mr. Cool DIY mini split is capable of heating and cooling in various climates, including cold weather, as long as you choose the appropriate model.


