Learn how to install Mitsubishi Mini Splits with our comprehensive guide covering location, tools, step-by-step process, and troubleshooting tips.Installing a Mitsubishi mini split system can be a transformative decision for your home’s heating and cooling needs. With their energy efficiency, quiet operation, and flexibility in temperature control, these units offer a modern solution tailored to fit any space. However, proper installation is key to maximizing their effectiveness and longevity. In this blog post, we’ll guide you through everything you need to know, from understanding the unique features of Mitsubishi mini splits to selecting the ideal location for your unit. We’ll also provide a comprehensive list of tools and materials required, followed by a detailed step-by-step installation process and tips for testing and troubleshooting your new system. Whether you’re a seasoned DIYer or a first-time installer, this guide will empower you with the knowledge to successfully install a Mitsubishi mini split and enjoy year-round comfort.
Understanding Mitsubishi Mini Splits
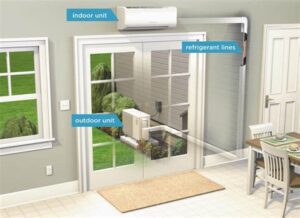
Mitsubishi mini splits are a popular choice for heating and cooling residential and commercial spaces due to their efficiency and flexibility. Unlike traditional HVAC systems, mini splits do not require ductwork, making them an ideal solution for homes without existing ducts or for room additions where extending ductwork may be impractical.
One of the key components of a Mitsubishi mini split system is its inverter technology, which allows the unit to adjust its speed according to the current heating or cooling needs of the space. This leads to lower energy consumption and more consistent temperatures throughout your home. Additionally, Mitsubishi mini splits are known for their whisper-quiet operation, which enhances comfort without disruptive noise.
When considering a Mitsubishi mini split, it is essential to evaluate what type of system will best suit your needs. Systems generally come in single-zone or multi-zone configurations, allowing for targeted temperature control in specific areas or rooms of your home. Properly understanding your unique requirements will help you choose the right Mitsubishi mini split that provides optimal performance and energy savings.
Choosing the Right Location for Installation
Choosing the right location for the installation of your Mitsubishi Mini Split is crucial for ensuring optimal performance and energy efficiency. Here are some essential factors to consider:
- Indoor Unit Placement: Install the indoor unit in a central location where air can circulate freely throughout the room.
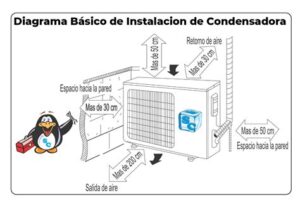
- Outdoor Unit Location: The outdoor unit should be placed in a shaded area to avoid overheating and direct exposure to elements.
- Wall Compatibility: Ensure that the chosen wall can support the weight of the indoor unit and is free from obstructions such as furniture or curtains.
For a more effective installation, it is beneficial to avoid direct sunlight, as it can affect the unit’s efficiency. If possible, place the outdoor unit on a stable surface that allows for proper drainage and airflow.
Furthermore, consider accessibility for maintenance. Units should be easily reachable for regular cleaning and servicing, avoiding any barriers that could complicate these tasks.
Finally, keep in mind any local building codes or regulations that might affect where you can install both the indoor and outdoor units. Proper compliance will ensure a hassle-free installation process.
Gathering the Necessary Tools and Materials
Before embarking on the journey to install a Mitsubishi mini split, it’s crucial to gather all the necessary tools and materials. This preparation will streamline the installation process and ensure that you have everything on hand when needed.
Here’s a comprehensive list of tools you will typically need:
- Drill and Drill Bits: Essential for creating holes in walls for piping.
- Level: Important for ensuring that the indoor and outdoor units are mounted correctly.
- Stud Finder: Helps in locating the studs within your walls for secure mounting.
- Wrench Set: Necessary for tightening connections and securing components.
- Pipe Bender: Useful for bending refrigerant lines without kinks.
- Refrigerant Gauges: Important for measuring and controlling refrigerant levels.
Besides tools, you’ll also need specific materials to complete your mini split installation. These materials usually include:
| Material | Description |
|---|---|
| Insulated Copper Line Set | Connects the indoor and outdoor units, essential for refrigerant flow. |
| Drain Hose | Used to remove condensation from the indoor unit. |
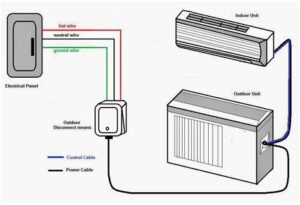
| Electrical Wiring | For connecting the unit to the power supply. |
| Wall Bracket or Mounting Plate | Provides stable support for the outdoor unit. |
Having the right tools and materials is fundamental for a successful Mitsubishi mini split installation. Ensuring everything is ready beforehand will help you avoid u
Step-by-Step Installation Process
Installing a Mitsubishi Mini Split system can seem daunting, but with the right approach, it can be a straightforward process. Below, we outline the essential steps to ensure a successful installation. Make sure to follow these steps carefully and refer to the manufacturer’s guidelines for specific instructions related to your model.
1. Prepare the Installation Site
- Identify the ideal location for both the indoor and outdoor units.
- Ensure the area is free from obstructions and allows for proper airflow.
- Check for sufficient electrical supply and necessary drainage options.
2. Gather Necessary Tools and Materials
Before starting, assemble all required tools and materials:
| Tool/Material | Purpose |
|---|---|
| Drill | To create holes for mounting and piping. |
| Level | To ensure the indoor unit is straight and properly installed. |
| Line set | Connects the indoor and outdoor units. |
3. Mount the Indoor Unit
Using the level, position the indoor unit on the wall at an appropriate height. Secure it using wall brackets, ensuring it is firmly attached.
4. Install the Outdoor Unit
Select a location for the outdoor unit, ensuring it’s on a sturdy base to reduce vibration noise. Connect the outdoor unit to the indoor unit using the refrigerant lines, following the prescribed guidelines for routing and securing the pipes.
5. Electrical Connections
Make the necessary electrical connections according to local building codes, ensuring all safety standards are met. This step often requires assistance from a licensed electrician.
6. Vacuum the System
Use a vacuum pump to remove air and moisture from the refrigerant lines. This step is crucial for the efficiency and longevity of your Mitsubishi Mini Split system.
7. Test the System
Once everything is connected, it’s time to power up the system. Check for any leaks, and ensure that both the heating and cooling functions operate correctly. Adjust settings as necessary for optimal performance.
By carefully following these steps, you can successfully install your Mitsubishi Mini Split system, enhancing your h
Testing and Troubleshooting the Mini Split
Once you’ve successfully installed your Mitsubishi mini split, it’s crucial to perform thorough testing and troubleshooting to ensure everything is functioning efficiently. Below are steps and considerations that should guide you in this important phase.
First, check the remote control operation. Ensure that the air conditioning unit responds correctly to the remote commands. Keep an eye on the display panel for any error codes that may indicate a malfunction.
Next, inspect the airflow. Verify that the indoor and outdoor units are both producing adequate airflow. Use an anemometer to measure the airflow rate and ensure it aligns with the specifications provided in the manual. If you notice any discrepancies, it could be a sign of obstructed filters or ducts, which require immediate attention.
Another essential aspect to evaluate is the refrigerant level. Low refrigerant levels can drastically affect the performance of the system. If your system isn’t cooling efficiently, it may be necessary to check for leaks and recharge the refrigerant as needed.
Lastly, always review the installation manual for any specific troubleshooting guidelines provided by Mitsubishi. Following these guidelines can help resolve
Frequently Asked Questions
What tools do I need to install a Mitsubishi mini split?
You will need basic tools such as a level, drill, screwdriver, pipe cutter, refrigerant gauge, and a vacuum pump. Additionally, you may need a ladder for mounting the indoor unit.
Can I install a Mitsubishi mini split unit myself?
Yes, you can install a Mitsubishi mini split unit yourself if you have some experience with HVAC systems. However, it’s recommended to hire a professional for best results and to ensure compliance with local building codes.
Where should I place the indoor unit of my Mitsubishi mini split?
The indoor unit should be placed in a location where it can distribute air evenly throughout the room, avoiding obstacles like furniture. Ideally, it should be mounted high on a wall for optimal airflow.
What is the typical installation time for a Mitsubishi mini split system?
The installation time can vary but typically takes between 3 to 6 hours for a single zone system, depending on the complexity of the setup and whether you are installing it yourself or hiring a professional.
Do I need a permit to install a Mitsubishi mini split?
Permits may be required depending on your local regulations and the specifics of the installation. It’s best to check with your local building department before starting the installation.
What kind of maintenance does a Mitsubishi mini split require?
Regular maintenance includes cleaning or replacing filters, checking refrigerant levels, and ensuring the outdoor unit is free of debris. An annual professional tune-up is also recommended to keep the system running efficiently.
How energy-efficient are Mitsubishi mini split systems?
Mitsubishi mini split systems are known for their energy efficiency, often achieving SEER ratings of 20 or higher. This translates to lower energy bills and a reduced carbon footprint compared to traditional HVAC systems.


