Learn how to install a mini split system yourself with our step-by-step guide, including benefits, components, common mistakes, and maintenance tips.Are you looking to save on installation costs while ensuring your home stays comfortable year-round? Installing a mini split system yourself might be the perfect solution! Mini splits are efficient heating and cooling options, and tackling the installation can be a rewarding challenge. This blog post will guide you through the numerous benefits of a DIY mini split installation, provide a clear understanding of the system’s components, and outline a step-by-step process to get the job done right. You’ll also learn about common pitfalls to avoid and tips for maintaining your system for long-lasting performance. Whether you’re a seasoned DIY enthusiast or a curious beginner, this guide will equip you with the knowledge you need to successfully install a mini split in your home. Let’s dive in!
Benefits of Installing Mini Split Yourself
When considering a mini split installation, many homeowners ponder whether to hire a professional or tackle the project themselves. Opting to install a mini split yourself comes with a range of advantages that can enhance your home comfort while saving you money.
Firstly, one of the most significant benefits is the cost savings involved. By choosing to handle the installation on your own, you can avoid the hefty labor fees that professionals charge. For example, a simple breakdown of costs can illustrate potential savings:
| Expense Type | Cost (Approx.) |
|---|---|
| Professional Installation | $500 – $1,500 |
| DIY Installation Supplies | $300 – $700 |
In addition to saving money, installing a mini split yourself allows you to gain valuable knowledge about your home’s HVAC system. Familiarizing yourself with the components and functionality of the mini split unit not only empowers you but also enables you to perform routine maintenance and troubleshoot any issues that arise in the future. Furthermore, completing the installation can provide a sense of accomplishment and can be a fun DIY project for you or your family.
Lastly, choosing to install a mini split yourself can be a convenient option that allows you to schedule the installation on your terms. You won’t have to coordinate with a contra
Understanding the Components of Mini Split System
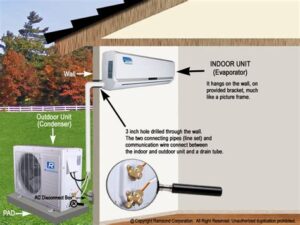
A mini split system is an efficient and versatile solution for heating and cooling spaces without the need for ductwork. To effectively install and maintain a mini split, it is essential to understand its key components and how they work together. Below are the primary components:
| Component | Description |
|---|---|
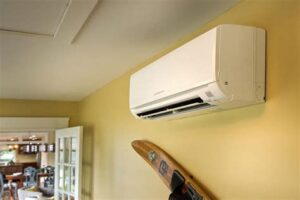
| Indoor Unit | The indoor unit is responsible for circulating air and typically includes a fan and evaporator coil. It is the component that you see in your living space. |
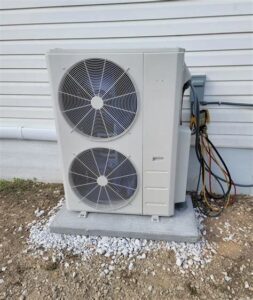
| Outdoor Unit | This unit houses the compressor and condenser coil. It is essential for expelling heat absorbed from the indoor air, thus cooling your environment. |
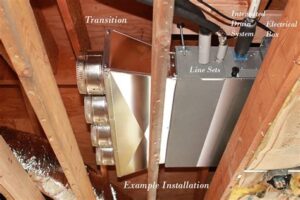
| Refrigerant Lines | These two insulated lines transport the refrigerant between the indoor and outdoor units. One line carries liquid refrigerant to the indoor unit while the other returns gas refrigerant to the outdoor unit. |
| Draining Pipe | This pipe allows condensation to drain away from the indoor unit, preventing water damage and promoting optimal efficiency. |
| Remote Control | This handy device allows you to adjust the temperature and settings of your mini split system with ease, enhancing user convenience. |
Understanding these components is crucial for anyone looking to install a mini split system themselves. Each piece plays a pivotal role in ensuring the unit operates efficiently and effectively.
When you know how these components fit together, troubleshooting issues becomes much easier. It also aids in proper maintenance, enabling you to keep your mini split system running smoothly for years to come.
Overall, having a thorough understanding of the components of a mini split will empower you to make informed decisions during installation and can lead to a more comfortable living environment.
Step-by-Step Installation Process for Mini Split
Installing a mini split system can seem daunting, but with the right preparation and a clear understanding of the steps involved, it’s a task that many homeowners can accomplish on their own. Here’s a detailed step-by-step guide to help you perform the installation of your mini split system successfully.
1. Gather Your Tools and Materials:
- Mini split unit
- Line set (refrigerant lines)
- Electrical wiring
- Mounting brackets
- Drill and bits
- Screwdriver
- Measuring tape
- Level
2. Choose the Right Location: Select a spot for the indoor unit that provides optimal airflow and accessibility. Ensure it’s mounted high on the wall, away from obstructions. The outdoor unit should be placed in a well-ventilated area, away from direct sunlight and moisture.
3. Install the Indoor Unit: Following the manufacturer’s instructions, mount the indoor unit on the wall using the provided brackets. Use a level to ensure it is straight, and secure it with screws. Then, drill a hole through the wall to accommodate the refrigerant lines and connect the units.
4. Set Up the Outdoor Unit: Position the outdoor unit on a stable surface, ensuring it’s level and accessible for maintenance. Secure it with the appropriate brackets or pads to prevent vibration.
5. Connect the Line Set: Carefully connect the refrigerant lines from the indoor unit to the outdoor unit. Insulate the lines properly to maintain efficiency. Ensure that all fittings are tightly secured to prevent leaks.
6. Electrical Connection: Follow the electrical wiring diagram provided by the manufacturer to connect the power supply to both the indoor and outdoor units. It’s crucial to ensure that the power supply is disconnected while making these connections for safety.
7. Test the System: Once everything is connected, turn the power back on and test the system. Check for any leaks and ensure that the unit operates smoothly, providing adequate heating or cooling.
8. Final Touches: Seal any holes in the wall to prevent air leaks. Additionally, follow up with any cosmetic adjustments to ensure your installation looks neat and professional.
By following this comprehensive step-by-step guide, you can effectively install your mini split system yourself, saving both time and money.
Common Mistakes to Avoid During Installation
Installing a mini split system can be an excellent choice for home comfort, but it can also be a challenging task for the uninitiated. As you embark on this project, it’s crucial to be aware of some common mistakes that commonly occur during installation. Not only can these errors lead to inefficiencies, but they can also incur additional costs and even damage the system.
One of the most frequent mistakes involves improper sizing of the mini split system. It’s essential to carefully determine the heating and cooling capacity required for your space. If the system is too small, it won’t effectively heat or cool your area, while a system that is too large can lead to frequent cycling and increased energy bills.
Another common pitfall is neglecting to follow the manufacturer’s instructions thoroughly. Each unit may have specific requirements for installation, including precise placement of indoor and outdoor units, proper line set lengths, and electrical connections. Ignoring these guidelines can compromise the performance and longevity of your mini split system.
Finally, not sealing the connections properly can lead to refrigerant leaks. Ensure all joints are secured and checked for leaks during installation. Failing to test the system after installation is another mistake that can often be overlooked. Completing a thorough check will help ensure everything is functioning correctly before you depend on your new mini split for comfort.
By being vigilant about these common mistakes, you can enhance the efficiency and lifespan of your mini split system, making your installation experience smooth and successful.
Tips for Maintaining and Troubleshooting Mini Split
Maintaining your mini split system is essential for ensuring its longevity and efficiency. Here are some useful tips to help you keep your system in top shape:
- Regular Filter Cleaning: Dirty filters can hinder air flow and cause your system to work harder. Clean or replace the filters every one to three months, depending on usage.
- Inspect the Outdoor Unit: Ensure that the outdoor unit is free from debris, leaves, and snow. This prevents blockage and allows the unit to operate efficiently.
- Check for Refrigerant Leaks: Monitor the performance of your mini split. If you notice decreased cooling or heating capacity, it might be due to a refrigerant leak, which requires professional attention.
Additionally, familiarizing yourself with the components of your mini split system can help you troubleshoot common issues:
The primary components include the indoor unit, outdoor unit, and refrigerant lines. Understanding these elements can simplify diagnosing problems.
If you experience problems with your mini split, here are some troubleshooting tips to consider:
- Unit Not Turning On: Check the power supply and reset the circuit breaker if necessary.
- Inconsistent Temperature: Ensure that doors and windows are properly sealed, as drafts can impact system performance.
- Unusual Noises: Listen for strange sounds; these could indicate loose parts or a malfunctioning compressor.
By following these maintenance and troubleshooting tips, you can enhance the pe
Frequently Asked Questions
What tools do I need to install a mini split myself?
To install a mini split yourself, you’ll typically need tools such as a drill, a level, a stud finder, a pipe cutter, and basic hand tools like screwdrivers and wrenches.
Is it difficult to install a mini split system on my own?
Installing a mini split system can be challenging if you lack experience in HVAC systems, electrical work, and plumbing. However, with the right preparation and following the manufacturer’s instructions, it can be manageable.
What are the steps involved in installing a mini split system?
The steps usually include selecting an appropriate location, mounting the indoor and outdoor units, connecting the refrigerant lines, running electrical wires, and testing the system for leaks and proper operation.
Do I need a permit to install a mini split unit myself?
Permit requirements vary by location. It’s essential to check with your local building department to determine if you need a permit for installation.
What is the best location to install the indoor unit of a mini split?
The best location for the indoor unit is typically centrally located in the room at least 7 feet from the floor, allowing for optimal airflow and heating/cooling performance.
Can I install a mini split system without prior HVAC experience?
While it’s possible to install a mini split system without prior HVAC experience, a basic understanding of refrigeration and electrical systems is highly recommended to ensure safe and efficient installation.
What are some common mistakes to avoid when installing a mini split system?
Common mistakes include improper mounting of the indoor and outdoor units, incorrect refrigerant line size, inadequate insulation of lines, and failing to vacuum the lines before charging the system.

