Discover how to assess your space, select the right unit, and ensure proper installation and insulation for optimal performance with essential maintenance tips.Installing a mini split air conditioning system on the second floor of your home can significantly enhance your comfort during those sweltering summer months. Not only does this energy-efficient solution allow for temperature control in specific areas, but it also helps avoid the inefficiencies of central air systems. In this blog post, we’ll guide you through the essential steps to successfully install a mini split in your upper living space. We’ll start by assessing the layout and dimensions of your area, followed by tips on selecting the right unit for your needs. We’ll explore the professional installation process to ensure it’s done correctly, discuss the importance of proper insulation for efficiency, and provide regular maintenance tips to keep your system running smoothly. Let’s dive into this rewarding home improvement project that promises to make your living space more comfortable and inviting!
Assessing the Space
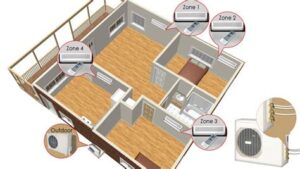
When considering how to install a mini split on the second floor, the initial step is to assess the space thoroughly. Begin by evaluating the overall layout of the room or area where you intend to place the unit. Ensure that there is ample space for the indoor unit, as well as the outdoor compressor, taking into account the necessary clearances for efficient operation.
It’s important to measure the dimensions of the room to understand the cooling capacity you’ll need from your mini split system. Generally, you can use the rule of thumb which states that you need about 20 BTUs (British Thermal Units) per square foot of living space. This will ensure that your unit can effectively regulate the temperature in your second-floor environment.
While assessing the space, also check for possible obstructions like furniture, curtains, or decorative elements that might interfere with the airflow of the mini split system. This consideration is crucial for maximizing efficiency and ensuring comfortable climate control throughout the room.
Selecting the Right Unit
When it comes to installing a mini-split system on your second floor, selecting the right unit is crucial for ensuring optimal performance and efficiency. There are several factors to consider, including the size of the space, the BTU rating of the unit, and the specific features suited to your needs.
First, it’s essential to assess the square footage of the area you wish to cool or heat. This measurement will help you determine the appropriate BTU rating needed for the mini-split. As a general rule, you can use the following table as a guideline:
| Room Size (sq. ft.) | Recommended BTU |
|---|---|
| 300 – 400 | 9,000 BTU |
| 400 – 600 | 12,000 BTU |
| 600 – 800 | 18,000 BTU |
Next, consider the features of available units. Look for options that offer energy efficiency, such as inverter technology, which can adjust the cooling capacity based on the temperature needs. You might also want to consider additional functionalities like remote control, programmable timers, and built-in air purification systems to enhance your comfort.
Ultimately, selecting the right mini-split unit involves weighing all these factors carefully to ensure you make a choice that fits both your budget and your comfort needs.
Professional Installation Process
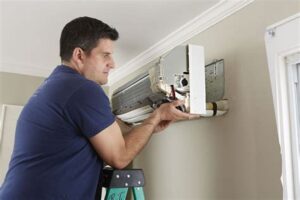
Installing a mini split system on the second floor requires careful consideration and professional expertise. The professional installation process involves several key steps that ensure efficiency and optimal performance of your cooling system. By following these steps, you can rest assured that your mini split will operate effectively and is safely installed.
1. Assessing the Site: The first step in the professional installation process is a thorough assessment of the site. This involves checking the dimensions of the space, identifying the best location for the indoor and outdoor units, and ensuring that there are no obstructions. A professional will take measurements and evaluate the existing ductwork and electrical connections to determine the best setup.
2. Preparing the Installation Area: After assessing the site, the next step is to prepare the installation area. This may involve clearing furniture or other items from the vicinity of the units. A clean workspace helps avoid any accidents and ensures a smooth installation. Furthermore, safety protocols must be followed, including wearing the appropriate personal protective equipment (PPE).
3. Mounting the Indoor Unit: The indoor unit is typically mounted high on the wall or ceiling. Proper mounting is crucial for airflow and aesthetic purposes. The installation technician will securely attach the mounting bracket to the wall, ensuring that it can support the weight of the unit.
4. Installing the Outdoor Unit: Selecting a proper location for the outdoor unit is equally important. It should be placed on a stable surface, preferably on a concrete pad or brackets that keep it elevated off the ground. The professional installer will also ensure there is enough space around the unit for maintenance and repair access.
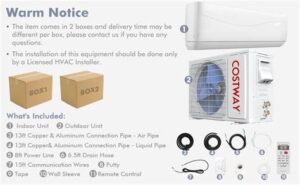
5. Connecting the Lines: After both units are mounted, the technician will connect the refrigerant lines, drain line, and electrical wiring. This step is critical, as improper connections can lead to leaks and system failures. The technician will use specialized tools and follow best practices to ensure the connections are secure.
6. Testing the System: Once the installation is complete, the final step is to test the system. This includes inspecting the refrigerant levels, checking for leaks, and testing the operation of both the indoor and outdoor units to ensure they are functioning correctly. A professional installer will also explain how to use the system and perform any necessary adjustments.
Overall, a professional installation process for a mini split system not only enhances efficiency but also extends the lifespan of your unit. It is essential to hire qualified technicians who understand the intricate details involved in the installation procedure.
Ensuring Proper Insulation
When installing a mini split system on the second floor, ensuring proper insulation is crucial for achieving optimal performance and efficiency. Without adequate insulation, the benefits of the mini split system may be compromised, leading to higher energy costs and discomfort.
To ensure proper insulation, consider the following factors:
- Wall Insulation: Check that the walls have the necessary insulation materials, like fiberglass or foam, to minimize heat transfer.
- Attic Insulation: Properly insulated attics help prevent heat loss during winter and keep cooling from escaping during summer.
- Sealing Gaps: Use caulking or insulation foam to seal any gaps around windows, doors, and where the wall meets the floor to prevent drafts.
It’s advisable to consult with a professional to assess the current insulation levels and recommend improvements if needed. Remember, an insulated space not only enhances comfort but also extends the lifespan of your mini split system while maximizing its efficiency.
Regular Maintenance Tips
Regular maintenance is essential to ensure your mini split system operates efficiently and lasts for many years. Following these tips can help maximize your system’s performance and extend its lifespan.
1. Clean or Replace Filters: One of the most important maintenance tasks is to regularly clean or replace the air filters. Clogged filters can restrict airflow, causing your system to work harder and inefficiently. Depending on usage, check your filters every month and clean or replace them as needed.
2. Check the Outdoor Unit: Keep the outdoor unit clean and free from debris. Remove leaves, dirt, and any obstacles that may restrict airflow. It’s best to inspect the unit every season to ensure optimal functionality.
3. Schedule Professional Maintenance: While regular cleaning is vital, don’t overlook professional checks. Scheduling annual maintenance with a qualified technician ensures all components of your mini split are functioning properly and efficiently.
4. Inspect Ductless Connections: If your mini split system is ductless, ensure that the connection points are sealed correctly. Inspect for leaks that could lead to energy loss.
5. Monitor Refrigerant Levels: Proper refrigerant levels are crucial for efficient heating and cooling. If you notice a drop in performance, it may indicate a refrigerant leak, which should be addressed immediately by a professional.
Regular care not only enhances comfort but also cuts down on repair costs and energy bills. By following these maintenance tips, you can enjoy a well-functioning mini split system for years to come.
Frequently Asked Questions
What is a mini split air conditioning system?
A mini split air conditioning system is a type of cooling and heating system that consists of an outdoor compressor and one or more indoor air-handling units, providing efficient temperature control without the need for ductwork.
Why should I install a mini split on the second floor?
Installing a mini split on the second floor can provide efficient cooling and heating, particularly because upper levels tend to get hotter in summer and cooler in winter, ensuring comfort in your living spaces.
What are the advantages of using a mini split system for second-floor installation?
Some advantages of using a mini split system include better energy efficiency, individual climate control for different zones, and easier installation compared to traditional HVAC systems.
Do I need a professional to install a mini split system?
While DIY installation is possible, it’s recommended to hire a professional for optimal performance and warranty validity, as they have the expertise to handle the refrigerant lines and electrical components safely.
How do I choose the right size mini split for my second floor?
To choose the right size mini split, consider factors such as the square footage of the area, insulation quality, sunlight exposure, and the desired temperature; a professional can conduct a load calculation for precise sizing.
What maintenance does a mini split system require?
Maintenance for a mini split system includes regularly cleaning or replacing the filters, checking the outdoor unit for debris, ensuring proper drainage of the condensate line, and scheduling professional inspections at least once a year.
Can a mini split system be used for heating in the winter?
Yes, many mini split systems are heat pump models that can efficiently provide heating during the winter, making them a versatile choice for year-round comfort.


