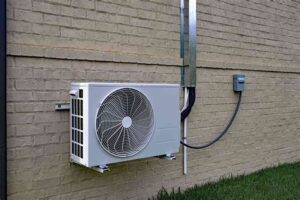
Learn how to install a mini-split system with our comprehensive guide covering selection, preparation, installation, connection, and testing for optimal performance.Are you ready to enhance your home’s comfort and efficiency with a mini-split system? This versatile and energy-efficient heating and cooling solution can significantly improve your indoor climate while reducing energy costs. In this blog post, we’ll guide you through the entire installation process step by step, ensuring you have all the knowledge needed to make your project a success. From selecting the right mini split for your specific needs, to preparing the area and successfully installing both the indoor and outdoor units, we’ll cover everything you need to know. Plus, we’ll share tips on testing and fine-tuning your system for optimal performance. Let’s dive in and transform your living space with a mini split installation!
Selecting the Right Mini Split
When it comes to installing a mini split system, choosing the right model is crucial for achieving optimal efficiency and comfort in your space. Factors such as the size of the area, climate, and specific heating and cooling needs should guide your decision.
One of the first steps is to determine the correct BTU (British Thermal Unit) capacity needed for your space. Smaller rooms may only require a unit with 9,000 to 12,000 BTUs, while larger areas might need up to 36,000 BTUs. You can consult a professional or use an online calculator to get an accurate estimate based on your specific situation.
Additionally, consider the features that will best suit your lifestyle. For instance, multi-zone systems are perfect for larger homes, allowing you to control the temperature in multiple rooms independently. Energy efficiency ratings, such as the SEER (Seasonal Energy Efficiency Ratio), should also influence your choice, as more efficient systems can lead to significant savings on energy bills.
Preparing the Installation Area
Before you begin the process of installing a mini split system, proper preparation of the installation area is crucial. This ensures a smooth installation and optimal functionality of your new heating and cooling system. Here are some key steps to consider when preparing your space:
- Select an Appropriate Location: Choose a spot for the indoor unit that is central to the area you want to cool or heat. Avoid places near sources of heat or moisture.
- Ensure Sufficient Space: Make sure there’s enough room around the indoor and outdoor units for airflow and maintenance. Check the minimum clearance requirements stated in the manufacturer’s manual.
- Check Wall Stability: If installing the indoor unit on a wall, ensure it is stable and can support the unit’s weight. Reinforce if necessary.
- Access to Power Supply: Verify that an electrical supply is nearby. The unit typically requires a dedicated circuit, so plan accordingly.
In addition to these considerations, you should also assess the drainage requirements. Mini split systems expel condensate, so it’s important to have a proper drainage plan to avoid any water damage.
Finally, it’s wise to clear the area of any obstacles and debris before you begin your installation. This not only provides a safer workspace but also facilitates an easier installation process.
By adequately preparing your installation area, you set the stage for a successful mini split ins
Installing the Indoor Unit
Installing the indoor unit of a mini split system is a crucial step in ensuring that your heating and cooling needs are met effectively. This process requires careful attention to detail and an understanding of the unit’s requirements and specifications.
Before you begin, gather the necessary tools and materials. You will typically need the following:
- Drill and drill bits
- Level
- Screwdrivers
- Stud finder
- Measuring tape
- Electrical tools for wiring
Once you have all the tools ready, choose an appropriate location for the indoor unit. Ideally, it should be mounted on an interior wall with good air circulation, away from direct sunlight, and near an electrical outlet. After selecting the spot, use the stud finder to locate the wall studs, ensuring the unit is mounted securely.
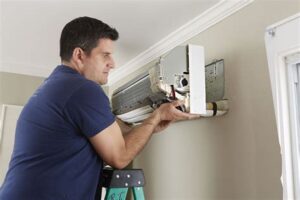
Next, use the level to mark where the mounting bracket will go, ensuring that it is straight. Drill pilot holes and attach the mounting bracket to the wall. After the bracket is securely in place, hang the indoor unit on the bracket and make sure it is leveled.
Finally, connect the refrigerant lines and electrical wiring according to the manufacturer’s instructions. Always refer to the installation manual for specific guidelines related to your model. Double-check all connections to ensure they are secure and properly installed.
Following these steps carefully will help ensure that your mini split system operates efficiently, providing comfort to your space.
Connecting the Outdoor Unit
Once you have installed the indoor unit of your mini split system, the next step is to focus on connecting the outdoor unit. This process is crucial as it involves establishing an efficient link between the two units to ensure optimal performance. Proper installation of the outdoor unit enhances the overall effectiveness of the cooling and heating provided by your mini split system.
Before you start, make sure to prepare your tools and materials. You’ll need copper lines, electrical wiring, a vacuum pump, and possibly some insulation tape. Follow these steps to ensure a proper connection:
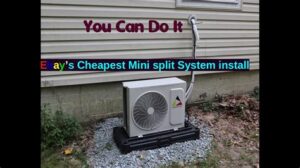
- Position the outdoor unit: Place the outdoor unit on a stable platform, ensuring it is level and clear of any obstructions that might hinder airflow.
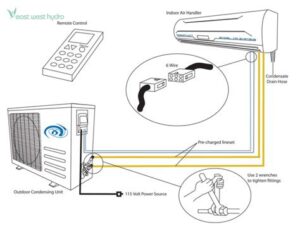
- Connect the refrigerant lines: Carefully connect the copper lines from the outdoor unit to the indoor unit. Ensure that the connections are tight to prevent any refrigerant leaks.
- Electrical connections: Run the electrical wiring from the outdoor unit to your power source. Always adhere to local electrical codes and consult a professional electrician if you are unsure.
- Drainage connection: Make provisions for the condensate drain line to ensure moisture is properly expelled from the indoor unit.
After making these connections, check everything thoroughly. It’s critical to ensure there are no leaks in the lines and that connections are secure. Once satisfied, you can proceed to the next steps of testing and fine-tuning your mini split system.
Testing and Fine-Tuning the System
Once you have successfully installed your mini split system, the next essential step is to focus on testing and fine-tuning it to ensure optimal performance. This stage is critical, as it allows you to identify any issues or inefficiencies that may arise after installation.
Begin by checking the connections between the indoor and outdoor units. Ensure that all electrical and refrigerant lines are properly secured and leak-free. You can utilize a manifold gauge set to check the refrigerant pressures and confirm they align with the manufacturer’s specifications.
Next, it’s time to assess the system’s air flow. Measure the air temperatures coming from the vents and compare them to the recommended settings. Make necessary adjustments to the airflow settings using the built-in controls or remote. It might also help to calibrate the thermostat to ensure accurate temperature readings.
After all adjustments, monitor the system’s operation over a few days to ensure it cycles correctly and maintains the desired indoor climate. Check for any unusual sounds, smells, or performance dips, which might indicate the need for further adjustments.
Ultimately, fine-tuning the system is vital for creating a comfortable environment and ensuring energy efficiency in the long run. Taking the time to test and adjust your mini split now will save you trouble and costs in the future.
Frequently Asked Questions
What are the benefits of installing a mini split system?
Mini split systems provide efficient heating and cooling, allowing for zoned temperature control. They are also more energy-efficient compared to traditional HVAC systems and take up less space.
What tools do I need to install a mini split system?
To install a mini split system, you’ll typically need a drill, level, vacuum pump, refrigerant line set, electrical tools, and safety gear like goggles and gloves.
Can I install a mini split system myself, or should I hire a professional?
While some homeowners may have the skills to install a mini split themselves, hiring a professional is recommended to ensure proper installation and compliance with local codes.
What is the average cost of installing a mini split system?
The average cost of installing a mini split system ranges from $3,000 to $5,000, depending on the number of indoor units, the complexity of the installation, and the brand.
How do I choose the right size mini split system for my space?
To choose the right size mini split system, calculate the BTUs (British Thermal Units) needed for your space based on its square footage, insulation, and heat sources.
What maintenance is required for a mini split system?
Maintenance for a mini split system includes cleaning or replacing filters regularly, ensuring outdoor units are free from debris, and scheduling annual professional inspections.
Are mini split systems noisy?
Mini split systems are generally quieter than conventional HVAC systems, with indoor units operating at around 19 to 55 decibels, making them suitable for residential use.
