Learn essential tips for installing your HVAC system, from choosing the right location to testing and commissioning for optimal performance.Are you looking to beat the heat or stay cozy during the winter months? Installing a Mitsubishi mini split system can be an excellent solution to ensure comfort in your home year-round. These versatile systems offer efficient heating and cooling while providing the flexibility of individual room control. However, the installation process might seem daunting to some. Fear not! In this comprehensive guide, we’ll walk you through every step of the installation process—from choosing the right location for your units to successfully connecting the refrigerant lines and testing the system. With the right preparation and tools, you’ll be able to enjoy the benefits of your new mini split system in no time. Let’s dive into the details and get started!
Choosing the Right Location
When installing a Mitsubishi mini split system, one of the most crucial steps is choosing the right location for the indoor unit. This decision will significantly affect the efficiency and effectiveness of your heating and cooling system.
To begin with, consider the following factors when selecting a location:
- The location should be centrally situated to maximize air distribution throughout the room.
- Avoid placing the unit near heat sources, such as radiators or direct sunlight, as they can interfere with the system’s performance.
- Ensure that the area around the unit is clear of obstacles to allow for proper airflow.
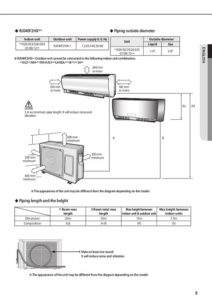
In addition, you should check for adequate clearance for maintenance and cleaning. Generally, a space of about 6 inches should be left on all sides of the indoor unit. This will not only facilitate easy access for repairs but will
Selecting the Proper Tools
When embarking on the journey of installing a Mitsubishi mini split, one of the pivotal steps is selecting the proper tools. Using the right equipment will ensure a smoother installation process and higher-quality results.
Below is a list of essential tools you will need for the installation:
- Refrigerant Gauge Set – To measure refrigerant levels and pressures.
- Drill and Drill Bits – For creating holes in walls for mounting brackets and refrigerant lines.
- Wrench Set – To tighten fittings securely.
- Pipe Cutter – For cutting the refrigerant lines to the appropriate lengths.
- Level – To ensure the indoor and outdoor units are installed perfectly straight.
- Vacuum Pump – To remove air and moisture from the refrigerant lines before adding refrigerant.
- Torque Wrench – To apply the correct amount of torque to the fittings.
By having these tools readily available, you will be well-equipped to tackle the installation of your Mitsubishi mini split. It allows you to work efficiently and minimizes the likelihood of errors during the installation process.
Mounting the Indoor Unit
When it comes to installing a Mitsubishi mini split system, mounting the indoor unit is a critical step that can significantly impact the unit’s efficiency and performance. The first thing to consider is the ideal location for the indoor unit. It should be mounted high on a wall, preferably in the center of the room, to ensure even air distribution.
Next, ensure that you have a sturdy bracket or mounting kit before proceeding. Most Mitsubishi mini splits come with specific mounting brackets that are designed to support the weight of the indoor unit. Securely attach the bracket to the wall using appropriate wall anchors, especially if you’re installing on drywall.
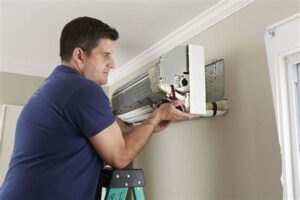
After securing the bracket, carefully hang the indoor unit on it. Make sure it is level by using a bubble level. Check that there is sufficient clearance around the unit for proper airflow and maintenance accessibility. Lastly, fasten the unit to the bracket according to the manufacturer’s specifications to prevent any potential movement or vibrations.
Connecting the Refrigerant Lines
Connecting the refrigerant lines is a critical step in the installation of a Mitsubishi mini split system. This process requires careful handling and precision to ensure the system operates efficiently. In this section, we will go over the key aspects of connecting the refrigerant lines.
Before you begin, it’s essential to gather the necessary tools and materials. You will need the following:
- Refrigerant copper lines (sized based on your system requirements)
- Flare fittings and wrenches
- Line set insulation
- Pipe wrenches
- Measuring tape
When you have everything in place, follow these steps:
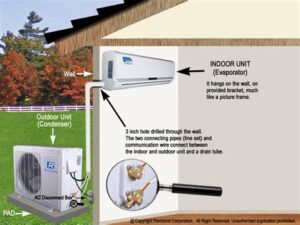
- Measure the distance between the indoor and outdoor units to determine the length of the refrigerant lines needed.
- Cut the copper lines to the appropriate length.
- Ensure that the ends of the copper lines are free from burrs and debris.
- Attach the flare fittings to each end of the copper lines.
- Carefully connect the lines to the indoor and outdoor units, ensuring they are securely tightened to prevent leaks.
Finally, insulate the connected lines with appropriate line set insulation to enhance efficiency and protect against energy loss. Following these steps will ensure that your Mitsubishi mini split operates smoothly and efficiently.
Testing and Commissioning the System
Once you have successfully installed your Mitsubishi mini split system, the next crucial step is testing and commissioning the system. This process ensures that the system operates efficiently and meets manufacturer specifications. Here’s a detailed guide on how you can perform this important step.
First, you need to check the electrical connections. Verify that all wiring and connections are secure and that the power supply meets the required voltage and phases. Utilize a multimeter to measure voltage at the unit and confirm it matches the specifications indicated in the installation manual.
After confirming the electrical setup, you need to check for leaks in the refrigerant lines. This can be done by using a leak detection solution or nitrogen pressure testing. If any leaks are found, address them immediately to prevent future system malfunctions. Lastly, ensure that the thermostat is calibrated correctly and test the unit in both heating and cooling modes to ensure it responds accurately.
| Step | Action | Notes |
|---|---|---|
| 1 | Check Electrical Connections | Use a multimeter for voltage testing. |
| 2 | Test Refrigerant Lines for Leaks | Utilize leak detection solutions or nitrogen. |
| 3 | Calibrate Thermostat | Test in heating and cooling modes. |
By following these steps, you can ensure your Mitsubishi mini split system is fully operational and efficient. Proper testing and commissioning will not only enhance your comfort but also improve the longevity and reliability of the system.
Frequently Asked Questions
What tools do I need to install a Mitsubishi mini split?
You will need a drill, screwdrivers, a level, a wrench, and possibly a vacuum pump for the refrigerant lines.
Do I need to hire a professional for installation?
While some skilled DIY enthusiasts may install a mini split themselves, it is generally recommended to hire a licensed HVAC technician to ensure proper installation and compliance with local codes.
What is the first step in the installation process?
The first step is to choose the correct location for the indoor and outdoor units, ensuring that the indoor unit is mounted high on the wall with clearance for airflow.
How do I connect the indoor and outdoor units?
You will need to run refrigerant lines, a condensate drain line, and electrical wiring between the indoor and outdoor units, following the manufacturer’s guidelines.
Is it necessary to use a vacuum pump during installation?
Yes, using a vacuum pump is crucial to remove any air and moisture from the refrigerant lines, ensuring efficient operation and preventing damage to the system.
What should I test after installation?
After installation, test the system for proper operation by checking the refrigerant levels, running the unit on both heating and cooling settings, and inspecting for any leaks.
What maintenance is needed for a Mitsubishi mini split?
Regular maintenance includes cleaning or replacing filters, checking refrigerant levels, and cleaning the outdoor unit to ensure optimal performance and longevity.
