Learn how to install a cooling system with tips on location, tools, surface preparation, refrigerant line connection, and system testing.Installing a Mitsubishi mini split system can be a transformative upgrade for your home, providing efficient heating and cooling tailored to your needs. Whether you’re looking to enhance comfort in a single room or across your entire home, understanding the installation process is essential for achieving optimal performance. This guide will walk you through crucial steps, from selecting the ideal location for your unit to gathering all necessary tools and preparing the mounting surface. We’ll also cover the intricate connection of refrigerant lines and the essential tests and adjustments needed to ensure your system runs smoothly. With careful planning and execution, installing a Mitsubishi mini split can be a rewarding DIY project that enhances your living space. Let’s dive into the details and get started on your journey to a more comfortable home!
Choosing the Right Location
Choosing the right location for your Mitsubishi mini split system is crucial for optimal performance and efficiency. The placement will not only affect the cooling or heating abilities of the unit but also its lifespan and energy consumption. Here are some key factors to consider:
- Indoor Unit Positioning: Ideally, the indoor unit should be installed at least 7 feet above the floor for proper air circulation. It should also be located away from direct sunlight and obstacles to ensure even distribution of air.
- Outdoor Unit Accessibility: The outdoor unit must be placed in a location that allows for easy access for maintenance and repairs. Ensure there’s sufficient airflow around the unit and avoid areas with heavy vegetation or debris.
- Consider Noise Levels: Remember that the outdoor unit produces noise; hence, place it in a less intrusive area, away from bedrooms or living spaces, to maintain comfort.
Additionally, consult local building codes and regulations, as they may dictate specific requirements for installation locations. Conducting a thorough assessment will help in alleviating future issues related to performance and noise.
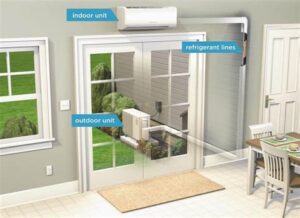
Always remember to consider the layout of your home. Think about how cool or warm air flows throughout the space. Ideally, the indoor and outdoor units should be positioned to facilitate a straight line for the refrigerant lines, minimizing the need for long pipe runs that could impact efficiency.
By taking the time to carefully select the proper location, you are making a significant move towards achieving a well-functioning, efficient Mitsubishi mini split system.
Gathering the Necessary Tools
Installing a Mitsubishi mini split system requires careful preparation and the right set of tools. Ensuring you have the necessary tools on hand before starting the installation process will facilitate a smooth operation and help you avoid any unnecessary delays. Below is a comprehensive list of tools that you’ll need:
- Drill and Drill Bits: To create holes for mounting the indoor and outdoor units.
- Level: To ensure that your units are installed perfectly horizontal and vertical.
- Wrench Set: For tightening and loosening fittings on the refrigerant lines.
- Pipe Cutter: To cut the refrigerant lines to the correct lengths.
- Vacuum Pump: Essential for evacuating air and moisture from the refrigerant lines.
- Manifold Gauge Set: For measuring refrigerant pressure during installation and adjustments.
- Tape Measure: To ensure accurate measurements when positioning the units.
- Safety Gear: This includes gloves and goggles to protect yourself during installation.
It’s also beneficial to have a screwdriver set ready, as you’ll need it for securing various components. Organizing your tools before you begin will not only streamline the process but will also help prevent any misplacement of tools during the installation.
Once you have gathered all the necessary tools, check them against the manufacturer’s instructions to ensure that you have everything required for the job. This preparation phase is crucial to achieving a successful installation of your Mitsubishi mini split.
Preparing the Mounting Surface
Before installing a Mitsubishi mini split system, it’s crucial to properly prepare the mounting surface. The mounting surface must be stable and strong enough to support the indoor unit and ensure its functionality. Follow these steps to ensure a successful installation.
1. Select the Right Location: Choose a wall or surface that is free from any obstructions. Ensure that the selected area allows for proper airflow around the unit and provides easy access for regular maintenance.
2. Check for Levelness: Use a level tool to confirm that the mounting surface is even. An uneven surface can lead to improper drainage and might damage the system over time. If the wall is not level, make necessary adjustments such as shimming or reinforcing the wall.
3. Secure Fasteners: Using appropriate fasteners, ensure the mounting bracket is securely attached to the wall. It’s essential to select screws that can hold up against the weight of the unit and adhere to the mounting surface material—this might include drywall, concrete, or wood.
4. Consider Insulation: If installing in an area prone to temperature fluctuations, consider adding insulation around the mounting surface to enhance energy efficiency. This helps maintain the right indoor climate conditions and can further the lifespan of your mini split system.
Proper preparation of the mounting surface contributes to the overall efficiency and effectiveness of your Mitsubishi mini split system. Don’t rush this step, as it is vital for a sound and durable installation.
Connecting the Refrigerant Lines
When installing a Mitsubishi mini split, connecting the refrigerant lines is a critical step that ensures your unit operates efficiently. Improper connections could lead to refrigerant leaks and decreased performance. Below is a step-by-step guide to help you correctly connect the refrigerant lines:
| Step | Description |
|---|---|
| 1 | Ensure that you have the correct sized lines according to the specifications of your mini split system. |
| 2 | Identify the indoor and outdoor unit connection points where the refrigerant lines will be connected. |
| 3 | Carefully remove the service caps from the refrigerant ports on both the indoor and outdoor units. |
| 4 | Using a pipe wrench, thread the refrigerant lines securely into the designated ports. |
| 5 | Once secured, you may leak-test the connections using a soap solution and look for bubbles that indicate leaks. |
Make sure to avoid over-tightening the connections, as this may cause damage to the fittings. Always refer to the manufacturer’s instructions for the specific requirements regarding refrigerant type and amounts, as they may vary from one model to another.
After making the connections, it is important to vacuum the lines before adding refrigerant. This eliminates any moisture and air from the system, as they can cause damage to the compressor and reduce efficiency. Use a vacuum pump and gauge set for this process.
Finally, check all connections again before proceeding with further installation steps. Properly connecting the refrigerant lines is key to ensuring that your Mitsubishi mini split system runs efficiently and lasts for years to come.
Testing and Adjusting the System
Once you’ve successfully installed your Mitsubishi mini split system, the next crucial step is testing and adjusting the system to ensure optimal performance. This process not only helps in identifying any issues that may have arisen during installation but also guarantees that the system works efficiently and effectively for your comfort.
Start by turning on the system and setting the thermostat to your desired temperature. Monitor the unit to see if it responds accordingly. If the temperature does not reach the desired level, check for any issues such as improper settings or installation errors. It’s essential to refer to the manufacturer’s manual for specific guidelines related to your model.
Next, use a manifold gauge set to check the refrigerant pressure. The pressure readings will help you determine if the refrigerant level is within the correct range. If the pressures are low, you may need to add refrigerant. Conversely, if they are high, it might be necessary to troubleshoot for blockages or overcharging issues. Throughout this process, bear in mind that a well-adjusted system will operate quietly and efficiently while providing consistent cooling or heating.
Frequently Asked Questions
What tools do I need to install a Mitsubishi mini split?
You will need a drill, level, measuring tape, pipe cutter, wrenches, screwdriver, and possibly a vacuum pump.
Do I need to hire a professional to install my Mitsubishi mini split?
While it’s possible to install it yourself, hiring a professional HVAC technician is recommended for optimal performance and compliance with local codes.
What are the steps involved in installing a Mitsubishi mini split?
The main steps include choosing the installation location, mounting the indoor and outdoor units, running refrigerant lines, and connecting the electrical wires.
Can I install a Mitsubishi mini split in a small room?
Yes, Mitsubishi mini splits are designed for various room sizes, and they are often very effective in small spaces.
How long does it take to install a Mitsubishi mini split?
The installation process can take anywhere from 4 to 8 hours, depending on complexity and whether you’re doing it yourself or with a professional.
What maintenance does a Mitsubishi mini split require after installation?
Regular maintenance includes cleaning the filters, checking for leaks, and ensuring the outdoor unit is free of debris.
Are Mitsubishi mini splits energy efficient?
Yes, Mitsubishi mini splits are known for their high energy efficiency, often featuring SEER ratings that can significantly lower energy bills.


