Learn how to choose, prepare, and install a mini split system, including connecting lines and troubleshooting for effective operation.Installing a mini split system can be an excellent way to enhance the comfort of your home without the need for extensive renovations or ductwork. With the right tools and some careful planning, you can tackle this project yourself and enjoy the benefits of efficient heating and cooling. This blog post will guide you through the essential steps to install a mini split system, from selecting the perfect unit to fitting the indoor and outdoor components. Whether you’re a seasoned DIY enthusiast or a first-time installer, our straightforward approach will provide you with the knowledge and confidence needed to complete the installation. Let’s embark on this journey towards a more comfortable living environment by exploring the steps to effectively install a mini split system yourself.
Choosing the Right Mini Split System
When it comes to selecting a mini split system, it’s essential to consider several factors to ensure you make the right choice for your space. Mini split systems are versatile, energy-efficient heating and cooling solutions that can provide comfort in various settings, from homes to commercial spaces.
First, assess the size of the area you need to cool or heat. To do this, calculate the BTU (British Thermal Unit) requirements based on the room’s square footage. For more accurate results, consider factors such as the ceiling height, insulation quality, number of windows, and local climate conditions. Generally, the higher the BTU, the larger the area it can effectively service.
Next, think about the number of zones you wish to condition. A single-zone system works well for smaller spaces, while multi-zone systems are ideal for larger areas with multiple rooms that require individual temperature control. Additionally, pay attention to the system’s energy efficiency rating, as opting for a higher SEER (Seasonal Energy Efficiency Ratio) rating will save you money on energy costs in the long run.
Lastly, consider the features that come with different models. Some mini split systems offer advanced technology like smart thermostats, which can allow you to control the system remotely. Other features like noise levels, aesthetic designs, and warran
Preparing the Installation Area
Preparing the installation area is a crucial step in successfully setting up your mini split system. A well-prepared area ensures that your unit operates efficiently and effectively. Here are some key considerations to keep in mind while preparing:
- Choose the Right Location: Ensure the indoor unit is located where you need the most heating or cooling. Avoid placing the unit in corners or behind furniture to allow for optimal air circulation.
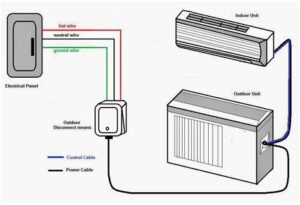
- Consider Electrical Access: The location should be close to an electrical outlet. You may need to hire an electrician if additional wiring is necessary.
- Assess Wall Structure: Make sure the wall is strong enough to support the indoor unit. Use a stud finder to locate the studs and ensure that the installation hardware can be securely anchored.
- Clear the Area: Remove any furniture, decorations, or obstructions from the installation area. This will give you a clear workspace and help prevent any damage to your belongings.
- Check for Drainage: Ensure there’s appropriate drainage for the condensate drain line of the indoor unit. The area should be sloped away from the wall if possible.
Once you have completed these preparations, it’s time to proceed to the next step in your mini split system installation. Proper preparation not only speeds up the installation process but also ensures that your system runs smoothly for years to come.
Remember, a well-prepared installation area can prevent many potential issues later on. Thus, take the time to carefully plan and execute this stage of your project.
Stay organized and maintain an inventory of all necessary tools and parts. This will further streamline the process and make the installation of your mini split system a success.
Installing the Indoor Unit
Installing the indoor unit of your mini split system is a crucial step in ensuring optimal performance and efficiency. The process involves careful planning and execution to secure the unit properly while maintaining its functionality. Below are the essential steps to guide you through this installation.
1. Choose the Ideal Location: Before beginning the installation, select a suitable location for the indoor unit. It should be high on the wall for optimal air distribution, away from direct sunlight, and at least a few inches from the ceiling and any obstructions. Consider factors like nearby power sources and accessibility for maintenance.
2. Mount the Bracket: Using a level, mark the position for the mounting bracket on the wall. Drill holes and insert wall anchors to secure the bracket, ensuring it can support the weight of the unit. Once the bracket is firmly in place, double-check it with a level to confirm that it’s straight.
3. Prepare the Unit: Remove the indoor unit from its packaging and attach the plastic cover to the back of the unit. This helps protect the internal components during the installation process. Make sure to align the unit correctly with the mounting bracket.
4. Install the Indoor Unit: Lift the indoor unit onto the mounted bracket, ensuring it locks into place properly. You should hear a click when it is securely attached. It’s essential to confirm that the unit is level after installation.
5. Connect the Connections: Thread the refrigerant lines, the condensate drain line, and any electrical wiring through the opening created in the wall. Follow the manufacturer’s guidelines for connections to ensure everything is secure and correct.
Following these steps will help you successfully install the indoor unit of your mini split system. Remember to always refer to the manufacturer’s instructions for specific guidance related to your model.
Having a proper installation will not only enhance the efficiency of your heating and cooling system but will also contribute to a longer lifespan for the unit itself.
As you work through this process, be sure to check each step thoroughly to avoid any issues later. Patience, precision, and adherence to guidelines are the keys to a successful installation.
Connecting the Refrigerant Lines
Connecting the refrigerant lines is a critical step in the installation of your mini split system. These lines carry the refrigerant between the indoor and outdoor units, allowing for efficient heating and cooling. To ensure a proper installation, follow these essential steps:
- Identify the Correct Line Set: Most mini split systems come with a designated line set that includes both the suction and liquid lines. Ensure you select the correct size and type that matches your specific system.
- Measure and Cut: Carefully measure the distance between the indoor and outdoor units. Use a pipe cutter to cut the refrigerant lines to the required length, ensuring smooth edges to avoid any potential leaks.
- Attach the Lines: Once the lines are cut, connect them to the respective ports on both the indoor and outdoor units. It’s essential to make sure these connections are secure to prevent refrigerant leaks.
Next, wrap each refrigerant line with insulation to enhance energy efficiency and prevent condensation. Use the provided insulation sleeves and ensure they cover the entirety of the exposed lines with no gaps.
After that, it’s time to connect the lines to the service valves on the outdoor unit. Using a wrench, tighten the connections securely but avoid overtightening, which could damage the threads. Always refer to the manufacturer’s instructions for specific torque requirements.
Finally, once everything is connected, check for any visible signs of wear or damage. It’s imperative to confirm that all joints are tight and that the insulation is properly applied. This step will ensure that your mini split system performs optimally and provides you with the comfort you desire.
Testing and Troubleshooting
Once you have successfully installed your mini split system, it’s critical to ensure that it operates efficiently. Testing and troubleshooting are vital steps that can help you identify any potential issues before they escalate. This process typically involves checking the electrical connections, verifying the refrigerant levels, and ensuring that the indoor and outdoor units are functioning correctly.
The first step in testing your mini split system is to power it on and set the desired temperature. Observe whether the system reaches that temperature and maintains it without excessive noise or irregular operation. Here are some key areas to focus on:
- Electrical Connections: Inspect all connections to ensure that they are secure and correctly wired. Look for any signs of arcing or wear.
- Refrigerant Levels: Ensure that the refrigerant lines are properly charged with refrigerant. If you detect insufficient levels, consider consulting a professional.
- Airflow: Check that the indoor unit’s air filters are clean and that the airflow is unobstructed. Blocked filters can severely impact efficiency.
If your mini split system is not functioning as expected, you may need to engage in some troubleshooting methods. Start by consulting the manual for any specific error codes or indicators. Sometimes, a simple reset of the system can alleviate minor issues. If you’re still encountering problems, it might be time to contact a qualified technician who can diagnose and rectify the situation.
Frequently Asked Questions
What tools do I need to install a mini split system?
You’ll need a drill, level, measuring tape, wrenches, screwdrivers, and potentially a vacuum pump and refrigerant gauge.
How do I choose the right location for my mini split indoor unit?
Select a location that allows for optimal airflow and is away from obstacles, ideally on an interior wall, and within proximity to an electrical outlet.
What is the first step in installing a mini split system?
The first step is to read the installation manual carefully and gather all necessary tools and materials.
Can I install a mini split system without professional help?
Yes, if you’re comfortable with basic electrical and plumbing tasks, you can install it yourself, but ensure you follow the manufacturer’s guidelines.
How do I mount the outdoor condenser unit?
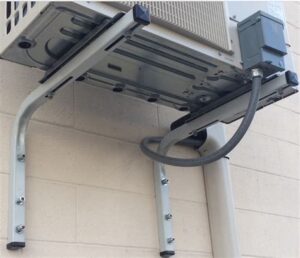
The outdoor unit should be mounted on a solid surface, elevated off the ground, and properly secured using a mounting bracket or base.
What type of electrical requirements do I need for a mini split system?
Check the manufacturer’s specifications; most systems require a dedicated circuit and specific voltage, typically around 220-240 volts.
How do I check for leaks after installation?
After charging the system, use a soap solution to check for bubbles around the fittings. You can also use a leak detector for additional assurance.


