Learn to install a mini-split system in your garage with expert tips on selection, placement, preparation, installation, and testing.Installing a mini split in your garage can transform the space into a comfortable, climate-controlled environment, perfect for projects or relaxation. Whether you’re a DIY enthusiast or simply seeking a more efficient heating and cooling solution, understanding the installation process is key. This blog post will guide you through each step, starting with how to select the right mini split for your specific needs. We’ll delve into determining the ideal placement within your garage to maximize efficiency, and discuss the necessary preparations for a smooth installation. As we progress, you’ll find a detailed step-by-step process, ensuring you have everything you need for a successful setup. Finally, we’ll cover how to test and adjust your mini split to ensure optimal performance. Let’s dive in and make your garage a more enjoyable space!
Selecting the Right Mini Split
When it comes to installing a mini split system in your garage, the first essential step is selecting the right mini split that meets your specific needs. Various factors come into play in making this decision, including the size of your garage, insulation levels, and your climate.
The key specifications to consider while choosing a mini split include:
- Cooling and Heating Capacity: Measure the square footage of your garage to determine the appropriate BTU (British Thermal Unit) ratings needed. A standard rule of thumb is about 20 BTUs per square foot.
- Energy Efficiency: Look for models with a high SEER (Seasonal Energy Efficiency Ratio) rating. Units with higher ratings are more efficient and can save you money in the long run.
- Installation Type: Decide whether you want a wall-mounted, floor-mounted, or ceiling-mounted unit. Wall-mounted units are the most common, but other options may be more suitable depending on your garage’s layout.
Additionally, you should consider the noise level of the mini split, especially if you’re working in your garage often. Models with lower decibel ratings (dB) will provide a quieter environment. Lastly, ensure the availability of professional installation services in your area, as proper installation is vital for ensuring efficiency and longevity of your mini split unit.
Determining Placement in the Garage
When it comes to installing a mini split in your garage, selecting the right placement is crucial for optimal performance and efficiency. Here are some key factors to consider:
- Airflow: Ensure that the mini split has unobstructed airflow. Avoid placing it behind large objects or equipment.
- Height: Install the indoor unit approximately 7 to 8 feet above the floor. This height optimizes circulation and heating/cooling efficiency.
- Distance from Walls: Make sure there is enough space between the unit and walls to facilitate proper airflow and maintenance.
- Proximity to Power Source: Position the mini split near an electrical outlet to minimize the need for additional wiring.
- Usage Area: Identify the primary zones in your garage where you plan to spend time and place the unit accordingly for maximum comfort.
Additionally, you might want to avoid locations that are prone to extreme temperatures, such as near uninsulated walls, as this can affect the unit’s efficiency. Choose placements that help to minimize the load on the system.
Finally, don’t forget to check local building codes or regulations, as these can influence where you can install the mini split system in your garage.
By carefully considering these factors, you can ensure that your mini split installation will provide efficient cooling and heating capabilities, enhancing the usability of your garage space.
Preparation for Installation
Before diving into the actual installation of your mini split system in the garage, adequate preparation is essential for a smooth process. Here are some key steps to consider:
- Assess the Space: Measure the area in your garage where you plan to install the mini split to ensure there is enough space for both the indoor and outdoor units.
- Check Electrical Requirements: Confirm that your garage has appropriate electrical outlets and a dedicated circuit for the mini split system, as it may require specific voltage and amperage.
- Plan the Installation Path: Decide the best route for refrigerant lines and electrical wiring, aiming for minimal obstructions and bends to ensure optimal performance.
Once you have assessed the space and gathered your materials, it’s important to prepare your tools. A complete toolbox for mini split installation should include:
| Tool | Description |
|---|---|
| Drill | For making holes in walls to run the refrigerant lines and electrical wiring. |
| Pipe Wrench | Essential for tightening and securing fittings on the refrigerant lines. |
| Level | To ensure the indoor unit is installed straight. |
Finally, make sure you have all safety gear ready, including gloves, goggles, and a mask if needed. Adequate preparation not only increases efficiency during the installation process but also ensures the lo
Step-by-Step Installation Process
Installing a mini split system in your garage can be a rewarding project, ensuring your space remains comfortable throughout the year. Follow these detailed steps to ensure proper installation.
Step 1: First, gather all necessary tools and materials. You will need a mini split unit, copper tubing, a wall bracket or mounting plate, electrical wiring, a vacuum pump, and basic hand tools like a drill and screwdriver.
Step 2: Begin by determining the ideal location for mounting the indoor unit. It should be on an interior wall that allows for optimal airflow, avoiding obstructions such as furniture or appliances.
Step 3: Next, install the wall bracket or mounting plate for the indoor unit. Use a level to ensure it is straight, and mark the drill holes. Drill holes and secure the bracket with screws.
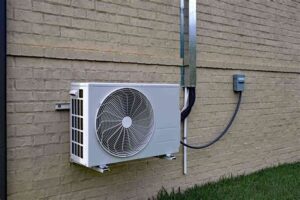
Step 4: Prepare for the outdoor unit by selecting a location outside your garage. Make sure it’s on a stable surface like a concrete pad. Follow manufacturer guidelines for distance from the wall of your garage.
Step 5: Connect the copper tubing between the indoor and outdoor units. Ensure that the connections are tight and the tubing is properly insulated to prevent energy loss.
Step 6: Now, install the electrical wiring according to local building codes. Make sure to use a disconnect switch and refer to the manufacturer’s instructions for specifics on wiring.
Step 7: Once all connections are secure, evacuate the refrigerant line using a vacuum pump for at least 30 minutes to remove moisture from the system.
Step 8: Finally, fill the system with refrigerant by opening the valves on the outdoor unit. Turn on the power supply and test the system to ensure it’s functioning correctly.
This step-by-step guide should help simplify the process of installing your mini split in the garage. Make sure to fol
Testing and Adjusting the Mini Split
After successfully installing your mini split system in the garage, the next critical step is testing and adjusting it to ensure optimal performance. This process involves checking various functionalities and making necessary adjustments to guarantee both comfort and efficiency.
Start by turning on the system and verifying that both the indoor and outdoor units are operating correctly. It’s essential to check for any leaks in the refrigerant lines, as this could significantly impact the performance of your unit. Use a manifold gauge to measure the pressures and ensure they align with the manufacturer’s specifications. If the readings are off, you may need to adjust the refrigerant levels accordingly.
Additionally, observe the airflow from the indoor unit. An efficient mini split should distribute air evenly throughout the garage. If you notice any uneven airflow, consider adjusting the angle of the air vents or making sure that there are no obstructions in the way. Lastly, utilize the thermostat to set your desired temperature and confirm that the system is reaching this temperature in a reasonable time. This entire process is vital to ensure your mini split operates at peak efficiency and prolongs its lifespan.
Frequently Asked Questions
What is a mini split system?
A mini split system is an HVAC system that allows for individual temperature control in different spaces, consisting of an outdoor compressor unit and one or more indoor air handling units.
Why should I install a mini split in my garage?
Installing a mini split in your garage can provide climate control, making the space more comfortable for work or storage, and it can also improve air quality.
What preparation is needed before installing a mini split?
Before installation, you will need to select an appropriate location for the indoor and outdoor units, ensure proper electrical supply, and assess insulation conditions in the garage.
Do I need professional help for the installation?
While some people may choose to install a mini split themselves, it’s generally recommended to hire a licensed HVAC professional to ensure correct installation and proper refrigerant handling.
How long does it take to install a mini split system?
Installation of a mini split system typically takes several hours to a day, depending on the complexity of the setup and whether any additional modifications to the garage are required.
What maintenance is required after installation?
Regular maintenance for a mini split system includes cleaning or replacing filters, inspecting the outdoor unit for debris, and scheduling yearly professional tune-ups.
Can I use a mini split in a garage year-round?
Yes, mini split systems are designed for year-round use, providing both heating and cooling capabilities which can be beneficial in both summer and winter.


