Discover the complete mini split installation process, from selecting the perfect location to testing the system for optimal performance.Installing a mini split system can be a game-changer for achieving optimal comfort in your home. These energy-efficient heating and cooling solutions are favored for their versatility and quiet operation, making them suitable for various living spaces. However, the installation process can seem daunting for those unfamiliar with HVAC systems. In this blog post, we will break down the mini split installation process into easy-to-follow steps, from selecting the ideal installation location to connecting and testing the units. Whether you’re a DIY enthusiast or considering hiring a professional, our guide will provide you with valuable insights to ensure your mini split system runs efficiently for years to come. Let’s dive into the essential steps to get started on your mini split installation journey!
Mini Split Installation Process
Installing a mini split system is a straightforward yet meticulous process that requires careful planning and execution. Here’s a step-by-step overview of the mini split installation process to ensure your system functions efficiently.
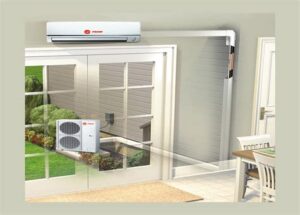
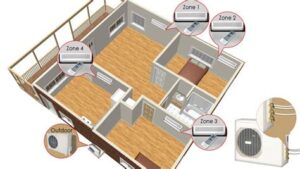
First, you need to select an ideal installation location for both the indoor and outdoor units. The indoor unit should be installed in a location that can effectively distribute air throughout the space, while the outdoor unit requires ample ventilation and protection from the elements. Avoid placing it near obstructions or in areas prone to extreme weather conditions.
Next, you should prepare the installation site. This involves clearing the area of any debris and ensuring that the surfaces are stable and can support the weight of the units. You will also need to make sure that the mounting brackets are securely fixed in place.
Once the site is prepared, it’s time to mount the indoor and outdoor units. For the indoor unit, secure it to the wall brackets, ensuring that it is level. For the outdoor unit, install the mounting pad and then place the unit onto it, fixing it in place with bolts to guard against shifting.
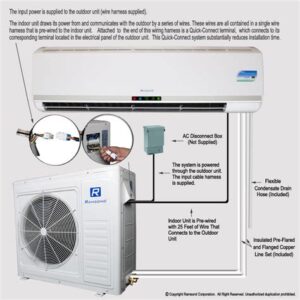
The final steps involve connecting and testing the mini split. Connect the refrigerant lines, drain line, and electrical wiring according to the manufacturer’s specifications. After connecting everything, it’s essential to test the system to ensure it is functioning properly. Check for any refrigerant leaks and ensure the airflow is optimal.
By following these steps, you can successfully complete the mini split installation process with confide
Selecting Ideal Installation Location
When it comes to mini split installation, selecting the ideal location is crucial for efficient operation and comfort. The placement of both the indoor and outdoor units will significantly affect the performance of your system. Here are some key points to consider while choosing the right installation locations:
- Indoor Unit Location: The indoor unit should be installed in a central location within the room for optimal air circulation. Avoid placing it in corners or behind furniture, as this can hinder airflow.
- Outdoor Unit Location: The outdoor unit should be placed in a shaded area, if possible, to prevent overheating. Ensure there’s enough space around the unit for air circulation and maintenance access.
- Distance Between Units: Keep in mind that the distance between the indoor and outdoor units should not exceed the manufacturer’s specifications, typically between 15 to 50 feet.
Moreover, consider the aesthetics of your space. Keeping the units discreet while ensuring effectiveness is essential. Plan your installation by evaluating both functionality and visual appeal.
Lastly, always consult the manufacturer’s guidelines before finalizing the locations, as each model may have specific recommendations based on its design and intended use. A well-thought-out installation location not only enhances the efficiency of your
Preparing the Installation Site
When it comes to installing a mini split system, the first step is to prepare the installation site adequately. Proper preparation can greatly influence the performance and efficiency of the system once it is installed. Here are the main considerations that should be taken into account:
- Selecting the Right Location: Ensure that the site allows for easy access to both indoor and outdoor units, while also providing adequate airflow.
- Building Structural Integrity: Check that the wall or surface where the indoor unit will be mounted can support the weight of the unit.
- Electrical Access: Confirm that the electrical supply is adequate and conveniently located. Installing a dedicated circuit may be necessary.
- Drainage Considerations: Plan for how condensate will be drained from the indoor unit to avoid flooding or water damage.
- Insulation Checks: Make sure that the installation site has proper insulation and that there are no gaps that could lead to heat loss or gain.
A well-prepared installation site is key to ensuring peak performance and longevity of your mini split system.
After considering all these factors, the next step is to gather all necessary tools and materials for the installation. This proactive planning can save both time and unnecessary hassle during the actual installation process.
Ultimately, taking the time to prepare your installation site properly will help
Mounting the Indoor and Outdoor Units
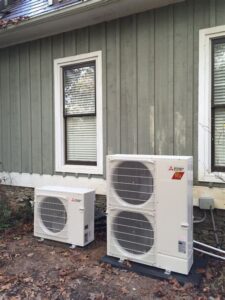
When it comes to mounting the indoor and outdoor units of a mini split system, the process requires careful planning and execution to ensure optimal performance. The indoor unit is typically mounted high on the wall for effective air distribution, while the outdoor unit needs to be situated on a stable base that allows for proper drainage and airflow.
Before proceeding with the mounting, take the following factors into consideration:
- Indoor unit location: Ensure that the unit is placed away from direct sunlight and is unobstructed by furniture or decorations to facilitate airflow.
- Outdoor unit placement: Select a shady spot away from debris, ice, or snow buildup. The base should be flat and made of a sturdy material, such as concrete or metal, to provide stability.
- Distance between units: Consider the length of refrigerant lines and electrical wiring, as they can affect the efficiency of the system.
Once the locations are determined, mount the indoor unit securely, using brackets that come with the unit or ones suitable for the wall type. After that, level the unit to avoid any potential operational issues. Next, carefully place the outdoor unit on its prepared base, ensuring it is securely positioned to withstand wind and other elements. With both units now mounted, the next step involves connecting the refrigerant lines and electrical connections for a fully functional system.
Connecting and Testing the Mini Split
Once you’ve successfully mounted both the indoor and outdoor units of your mini split system, the next step involves connecting the necessary lines and testing the entire setup for functionality. This process is crucial to ensure that your system operates efficiently and reliably.
The first step in the connection process is to link the refrigerant lines. This typically involves attaching the copper line sets from the indoor unit to the outdoor unit. It’s important to make sure that these connections are tight and free of leaks. To verify this, you can use a manifold gauge set to check the pressure within the lines. If you suspect a leak, it may be necessary to apply a soap solution to the joints; any bubbling will indicate the presence of a leak.
Once you’ve completed the refrigerant connections, the next step is to connect the electrical wiring. Most mini split systems come with a pre-wired electrical connection kit. Ensure that you follow the manufacturer’s guidelines for connecting wires, as proper polarity is essential for the system’s safe operation. After everything is connected, you can move on to the testing phase. Turn on the system and monitor its operation for at least 15 to 30 minutes to ensure that the mini split is cooling or heating properly, and listen for any unusual noises that may indicate a malfunction.
Frequently Asked Questions
What are mini splits?
Mini splits are a type of ductless heating and cooling system that allows for targeted temperature control in specific areas of a home or building.
What are the benefits of installing a mini split system?
The benefits include improved energy efficiency, individual temperature control for different zones, quiet operation, and easier installation compared to traditional HVAC systems.
What tools are required for mini split installation?
Common tools needed for installation include a drill, level, refrigerant gauges, wrenches, screwdrivers, and a vacuum pump, among others.
How long does it take to install a mini split system?
Typically, installing a mini split system can take anywhere from a few hours to a full day, depending on the complexity of the installation and the number of indoor units.
Is professional installation necessary for mini splits?
While some homeowners may choose to install mini splits themselves, it is highly recommended to hire a professional to ensure proper installation and avoid warranty issues.
What are the main steps involved in installing a mini split?
Main steps include selecting the location for the indoor and outdoor units, mounting the units, connecting refrigerant lines and electrical wiring, and testing the system for leaks.
What maintenance is required for mini split systems after installation?
Maintenance typically includes regular cleaning of filters, checking refrigerant levels, and scheduling annual professional servicing to ensure optimal performance.
