Learn how to install your air conditioning system from choosing the right location to testing and adjusting for optimal performance.Installing a Gree mini-split system can be a transformative step toward enhancing your home’s comfort and efficiency. With their ability to heat and cool specific zones in your space, these systems offer a customizable solution for temperature control. However, successful installation requires careful planning and consideration at every step. From choosing the right location for optimal airflow to preparing the installation site and following the manufacturer’s guidelines, each phase is crucial to ensure the system operates effectively. In this blog post, we will guide you through the essential steps of Gree mini-split installation, covering everything from setting the indoor unit in place to testing and adjusting the system for peak performance. Whether you’re a seasoned DIYer or a beginner, this comprehensive guide will help you navigate the installation process with confidence.
Choosing the Right Location
When it comes to Gree mini split installation, choosing the right location for your indoor unit is crucial for optimal performance and efficiency. Several factors should be considered to ensure that the system operates effectively while providing the desired comfort levels.
First, ensure that the indoor unit is positioned where airflow will not be obstructed. The unit should be installed high on a wall to facilitate effective air distribution. Ideally, it should be placed at least 7 feet above the floor and away from any obstacles such as furniture, curtains, or other decor that could impede airflow.
Additionally, consider the room’s layout and how frequently you use the space. An indoor unit located centrally in a room often yields the best results, allowing it to evenly distribute cool or warm air. Avoid placing the unit in corners or behind large furniture, as this will negatively impact the unit’s effectiveness.
Also, it’s important to account for the external unit during the design phase. Too much distance between the indoor and outdoor units could lead to a drop in efficiency, so be mindful of the overall distance during your planning stages.
| Consideration | Recommendation |
|---|---|
| Height of Installation | At least 7 feet above floor |
| Airflow Obstruction | Avoid barriers such as furniture |
| Central Location | Install close to the center of use |
Preparing the Installation Site
Preparing the installation site is a crucial step in the Gree mini split installation process. This preparation ensures that the unit will operate efficiently and effectively for years to come. Before diving into the installation, it’s vital to assess the area where the indoor and outdoor units will be placed. Here are some considerations:
- Space Requirements: Ensure adequate space around both the indoor and outdoor units. The indoor unit should have at least a few inches of clearance on all sides, and the outdoor unit should be positioned with enough space for air circulation.
- Accessibility: The site should be easily accessible for maintenance and service. Consider the access to the electrical supply and the refrigerant lines when selecting the location.
- Surface Strength: The mounting surface for the outdoor unit must be structurally sound. It is advisable to have a concrete pad or a sturdy mounting platform that can support the unit’s weight.
Additionally, clear the installation area of any debris or obstructions that could impede the installation process. This also includes ensuring that there are no overhanging branches or other potential hazards nearby that could impact the unit’s performance or longevity.
Once you’ve prepared the site with these considerations in mind, you’ll be ready to proceed with the Gree mini split installation. Remember, taking the time to properly prepare your installation site can lead to a more efficient and hassle-free installation experience.
Lastly, do not forget to check for local building codes and regulations regarding HVAC installations. This step ensures that your installation site meets all necessary safety and operational standards.
Following Manufacturer’s Guidelines
When it comes to gree mini split installation, one of the most crucial steps is following the manufacturer’s guidelines. Each model comes with specific instructions tailored to ensure optimal performance and safety. Ignoring these guidelines can lead to improper installation, which might result in inefficiency or even system damage.
Manufacturers provide detailed documentation that includes the necessary tools, installation techniques, and troubleshooting advice. Here are some essential elements typically included in the guidelines:
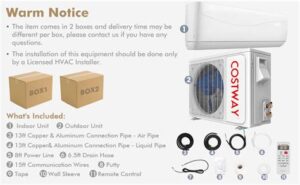
- Recommended Tools: A list of tools required for the installation process.
- Electrical Specifications: Voltage and amperage requirements that should be observed.
- Pipe Sizing: Guidelines on the appropriate sizes of refrigerant lines to ensure efficient refrigerant flow.
More than just a checklist, these guidelines often include safety warnings and tips for maintaining warranty coverage. Therefore, it is vital to read and understand these instructions thoroughly before you begin the installation, ensuring a
Installing the Indoor Unit
Installing the indoor unit of a Gree mini split system is a crucial step in ensuring optimal performance and efficiency. Proper installation will help provide comfort in your space throughout the year. Below is a guideline to assist you in successfully completing this phase of the installation process.
Step 1: Mounting the Indoor Unit
Begin by selecting a suitable location on the wall for the indoor unit. The location should be away from direct sunlight and not obstructed by furniture or curtains for optimal airflow. Use a level and mark the mounting brackets’ positions, ensuring they are secure and able to support the weight of the unit.
Step 2: Drilling and Connecting
After securely mounting the brackets, you will need to drill holes for the refrigerant lines and drain hose. Ensure these are positioned at a slight downward angle to facilitate proper drainage. Connect the refrigerant lines, ensuring there are no kinks or bends that could affect performance. Don’t forget to follow any specific manufacturer’s guidelines regarding connections and positioning.
Step 3: Sealing and Final Checks
Once the connections are made, carefully seal the area around the hole you drilled to prevent air leakage. Check all your connections for tightness and ensure everything is secure. Finally, before activating the system, verify that the indoor unit is mounted correctly, and the drainage is set up appropriately.
Following these steps will ensure that your Gree mini split indoor unit is installed correctly and functions efficiently. Always refer to the user’s manual for specific instructions and gu
Testing and Adjusting the System
After successfully installing your Gree mini split system, the next crucial step is testing and adjusting the system to ensure it operates efficiently. This process verifies that the installation has been carried out correctly and that the unit functions as intended. Proper testing can prevent future issues and help maintain optimal performance.
Begin by powering on the unit and allowing it to run for several minutes. Check the thermostat settings to ensure they are set to the desired temperature. Observe the airflow and ensure it’s strong and directed as intended. You might want to adjust the vanes or louvers for better distribution of air throughout the room. Make sure that there are no obstructions in the air intake or exhaust areas.
Next, monitor the temperature output from the indoor unit. Ideally, the temperature difference between the intake and output air should be between 15 to 20 degrees Fahrenheit. If you notice discrepancies, you may need to check the refrigerant levels or inspect for any leaks in the system. Tuning the system after installation is crucial for energy efficiency and longevity.
Frequently Asked Questions
What are the steps involved in the installation of a Gree mini split system?
The installation process generally includes selecting the location, mounting the indoor and outdoor units, connecting refrigerant lines, installing the drainage line, and finally, connecting electrical power.
What tools are required for Gree mini split installation?
Essential tools include a drill, level, pipe wrench, screwdriver, vacuum pump, refrigerant gauge, and safety gear such as gloves and goggles.
Do I need a permit for installing a Gree mini split system?
Permit requirements vary by location. It is advisable to check with local building codes or your municipality to determine if a permit is necessary.
Can I install a Gree mini split system myself, or should I hire a professional?
While skilled DIYers can install a Gree mini split, hiring a professional is recommended to ensure proper installation, compliance with local regulations, and warranty coverage.
What is the best location to install the indoor unit of a Gree mini split?
The indoor unit should be installed high on a wall, away from obstructions, and in a location that allows for optimal airflow throughout the room.
How long does the installation process take?
The installation time can vary, but on average, it takes between 4 to 8 hours, depending on the complexity of the setup and whether you are hiring professionals.
What maintenance is required after installing a Gree mini split system?
Regular maintenance includes cleaning or replacing filters, checking refrigerant levels, inspecting the outdoor unit for debris, and scheduling annual professional servicing.


