Learn to install your Mr. Cool mini split with expert tips on selection, location, installation, refrigerant connection, and troubleshooting for optimal performance.Are you ready to take control of your home’s comfort with a DIY Mr Cool Mini Split installation? This blog post will guide you through every step of the process, from selecting the right unit to successfully installing it yourself. With mini-splits gaining popularity for their energy efficiency and versatility, understanding the essentials of installation can save you time and money while enhancing your living space. We’ll start by helping you choose the best Mr Cool model for your needs, then walk you through the best locations for installation. Next, we’ll cover the key steps for installing the indoor unit, connecting the refrigerant lines, and ultimately testing and troubleshooting your new system. Roll up your sleeves, and let’s dive into making your home more comfortable and efficient!
DIY Mr Cool Mini Split Selection
When it comes to choosing the right Mr Cool Mini Split system for your home or office, understanding your specific needs is crucial. There are several factors to consider, including cooling capacity, energy efficiency, and the size of the area to be cooled. This guide will help you make an informed decision.
One of the most important aspects of your selection is the cooling capacity, which is measured in British Thermal Units (BTUs). A higher BTU rating means the unit can cool a larger space. To determine the appropriate BTUs for your area, consider the size of the room, the number of occupants, and the amount of sunlight it receives. Here’s a quick reference Table for BTU requirements:
| Room Size (sq ft) | Recommended BTUs |
|---|---|
| 200 – 300 | 7,000 |
| 300 – 400 | 9,000 |
| 400 – 600 | 12,000 |
| 600 – 1,000 | 18,000 |
Another factor to consider is the energy efficiency of the unit. Look for models with a higher SEER (Seasonal Energy Efficiency Ratio) rating, as these will consume less energy while providing more effective cooling. This not only benefits the environment but also reduces your electricity bills over time.
Lastly, think about the location for installation. Ensure that you choose a space that allows for optimal air flow and accessibility for maintenance. The well-thought-out location will enhance the performance of your Mr Cool Mini Split system and extend its lifespan.
Choosing the Right Location for Installation
Choosing the right location for your DIY Mr Cool Mini Split installation is crucial for ensuring optimal performance and efficiency. Here are some key factors to consider when selecting the ideal spot for your mini split system:
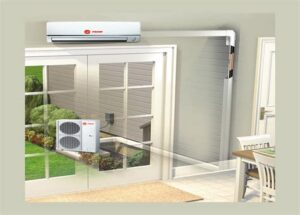
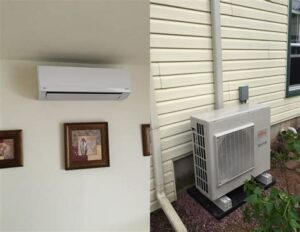
- Indoor Unit Placement: Ideally, the indoor unit should be placed high up on a wall to promote proper airflow. Avoid placing it near heat sources, such as appliances, or in direct sunlight, as this can affect the system’s efficiency.
- Distance from Outdoor Unit: The distance between the indoor and outdoor units should be kept as short as possible to minimize pressure loss in refrigerant lines. Refer to the manufacturer’s guidelines for the maximum allowable distance.
- Accessibility: Ensure that both the indoor and outdoor units are easily accessible for maintenance and repairs. Sufficient clearance around the units is necessary for air circulation and troubleshooting.
- Avoid Obstructions: Make sure there are no obstructions like furniture, curtains, or walls that could block the airflow from the indoor unit.
Moreover, consider the room layout and how occupants will use the space. A well-placed indoor unit can contribute significantly to comfort levels by evenly distributing air throughout the room.
Remember that the ideal installation location will also depend on the type of space you are cooling or heating. For example, living rooms may require a different approach compared to bedrooms or large open areas.
Ultimately, investing a little time in selecting the right location for your Mr Cool Mini Split installation can lead to dramatic improvements in comfort and energy efficiency
Installing the Indoor Unit
Installing the indoor unit is a crucial step in the DIY Mr Cool Mini Split installation process. It requires careful planning and execution to ensure optimal performance and efficiency. In this section, we will outline the essential steps and tips for installing the indoor unit, ensuring you achieve a successful installation.
First, it’s important to select the right location for your indoor unit. Ideally, this should be an area that allows for even air distribution and is free from obstructions. Pay attention to wall space, ceiling height, and potential noise interference. The unit should be placed at least 6-8 inches away from the ceiling and other furniture to allow for proper airflow.
Once you’ve chosen the perfect location, it’s time to mount the unit on the wall. Follow these steps:
- Secure the mounting bracket: Align the bracket level with a stud finder or level tool, and secure it to the wall using screws.
- Drill the hole for refrigerant lines: Drill a hole through the wall to accommodate the refrigerant lines and drainage. The hole should slope slightly downward toward the outside to facilitate drainage.
- Connect the indoor unit: Carefully lift the indoor unit onto the mounting bracket and secure it. Ensure all connections are tight to prevent leaks.
After securing the indoor unit, check for any leaks along the connections. Tighten all fittings and use leak detection solution as necessary. This process is critical for a smooth and
Connecting the Refrigerant Lines
Connecting the refrigerant lines in your Mr Cool Mini Split system is a crucial step that affects the efficiency and functionality of your cooling system. It’s essential to do this part properly to ensure optimal performance and prevent any potential leaks. Let’s take a look at how to connect these lines effectively.
Before beginning the connection process, gather the necessary tools and materials. You will need the following:
- Refrigerant lines (installed during the DIY project)
- Insulation material
- Flare nut wrench
- Torque wrench
- Refrigerant gauge set
To connect the refrigerant lines, follow these steps:
- Locate the indoor and outdoor units of your Mr Cool Mini Split.
- Ensure that the flare fittings on the refrigerant lines are clean and free of debris.
- Align the refrigerant lines and connect them to their corresponding ports on the indoor and outdoor units.
- Use a flare nut wrench to tighten the flare nuts securely, ensuring that you don’t over-tighten, which can cause damage.
- Wrap the lines with insulation to prevent thermal loss and protect against condensation.
Once the lines are connected, it’s essential to test the system for leaks. You can do this using the refrigerant gauge set. Attach the high and low-pressure gauges and check for appropriate pressure readings. If you find any discrepancies, double-check your connections for tightness and leaks.
Testing and Troubleshooting the System
Once you have installed your DIY Mr Cool mini split system, it’s crucial to ensure that it operates efficiently and effectively. Testing and troubleshooting your system is an integral part of the installation process, allowing you to identify any potential issues that might hinder its performance.
Begin by performing a visual inspection of all connections, including the refrigerant lines and electrical connections. Look for any signs of leaks or loose connections. You can utilize a soapy water solution on the connections to check for bubbles, which is a clear indication of a refrigerant leak.
Next, power on the system and check the air flow at the vents. Make sure the indoor unit is blowing air at the correct temperature and volume. If you notice any irregularities, refer to your owner’s manual for troubleshooting tips. Additionally, using a temperature gauge can help you verify that the system is cooling or heating as expected.
In case of any operational issues, consider the following troubleshooting tips:
- Check your thermostat settings to ensure they’re correct.
- Inspect the filters and replace or clean them if necessary.
- Review the installation instructions to ensure all steps were followed correctly.
By systematically testing and troubleshooting your Mr Cool mini split system, you can ensure that it remains in optimal working condition, providing both comfort and efficiency in your space.
Frequently Asked Questions
What is a mini split system?
A mini split system is a type of heating and cooling system that consists of an indoor unit and an outdoor unit, allowing for zone control and energy efficiency.
What tools do I need for a DIY Mr. Cool mini split installation?
Common tools needed include a drill, wrenches, screwdrivers, a level, and a vacuum pump to ensure proper installation.
How should I choose the location for the indoor and outdoor units?
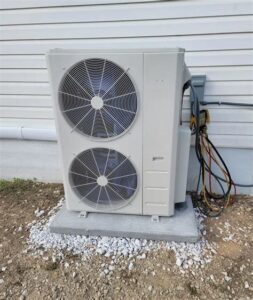
The indoor unit should be placed in a location where air can circulate freely, while the outdoor unit should be installed in a well-ventilated area away from direct sunlight and debris.
Is it necessary to have professional help when installing a mini split?
While many people can successfully install a mini split themselves, if you’re unsure about electrical work or the refrigerant line setup, it’s advisable to consult a professional.
How long does the installation of a Mr. Cool mini split usually take?
Depending on your experience level, a DIY installation can take anywhere from a few hours to a full day.
What maintenance is required for a Mr. Cool mini split after installation?
Routine maintenance includes cleaning or replacing air filters, checking the refrigerant levels, and ensuring that outdoor units are free of debris.
Are there any warranties or guarantees offered with Mr. Cool mini split systems?
Yes, Mr. Cool typically offers a warranty on their mini split systems, which may vary by model, so it’s essential to review the warranty terms when purchasing.
