Learn how to choose the right location and unit size, prepare the installation area, ensure proper wiring, and discover the benefits of professional installation.When it comes to maintaining comfort in your home, a Daikin mini split system is an excellent choice for efficient heating and cooling. However, the key to maximizing its performance lies in proper installation. This blog post will guide you through essential steps to ensure your Daikin mini split operates optimally. We’ll cover important considerations such as choosing the right location for your unit, selecting the best size to suit your space, and preparing the installation area for a seamless setup. Additionally, we’ll discuss crucial aspects like ensuring proper electrical wiring and highlight the benefits of professional installation. Whether you’re a DIY enthusiast or seeking expert help, this comprehensive guide will equip you with the knowledge you need for a successful Daikin mini split installation. Let’s dive in!
Choosing the Right Location
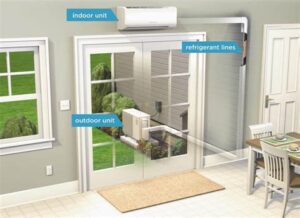
When it comes to Daikin mini split installation, one of the most critical decisions you’ll make is the location of both the indoor and outdoor units. A properly selected location can maximize efficiency and enhance performance, while suboptimal placement may lead to inadequate heating or cooling.
Here are some factors to consider when choosing the right location for your mini split system:
- Indoor Unit: Select a location that allows for even air distribution. Placing the unit near the center of the room ensures that the conditioned air can flow freely without obstructions.
- Outdoor Unit: Choose a spot that minimizes noise and takes advantage of natural airflow. It’s best to install the outdoor unit in a shaded area to protect it from direct sunlight, which can reduce its efficiency.
- Accessibility: Ensure that both units are easily accessible for maintenance and repairs. This consideration can save you time and costs in the long run.
In addition, it’s advisable to consult the installation manual provided by Daikin, as it contains specific recommendations for optimal placement. Following these guidelines can significantly improve the effectiveness of your HVAC system.
Selecting the Best Unit Size
When it comes to Daikin mini split installation, one of the most crucial factors to consider is selecting the right unit size. An improperly sized unit can lead to inadequate heating or cooling, increased energy costs, and a shortened lifespan for your system.
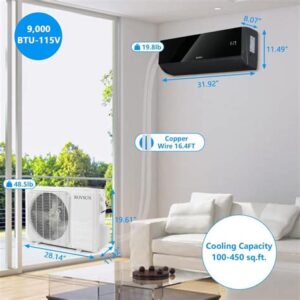
To determine the optimal size for your mini split system, you need to consider several parameters, including the total square footage of the space you want to condition, its insulation quality, the number of windows, and even the local climate. Here’s a basic guideline to help you select the best unit size:
| Room Size (sq. ft.) | BTU Requirement |
|---|---|
| 100-300 | 9,000 |
| 300-500 | 12,000 |
| 500-800 | 18,000 |
| 800-1,200 | 24,000 |
It’s recommended to consult with a professional or utilize a load calculation to accurately assess your specific needs, taking into account factors such as ceiling height and the amount of direct sunlight the room gets. An expert will ensure you select a model that not only fits your space but also operates efficiently.
Investing time in determining the right size for your Daikin mini split system can save you significant costs in the long term, ensuring optimal performance and comfort in your living space.
Preparing the Installation Area
When it comes to Daikin mini split installation, one of the most critical steps is preparing the installation area. This preparation ensures that the system will function efficiently and effectively, providing you with the comfort you expect. Let’s take a closer look at some of the essential aspects to consider before installation.
Firstly, assess the space where you plan to install the indoor and outdoor units. Ensure there is ample clearance around both units to facilitate proper airflow and maintenance. A good rule of thumb is to maintain at least 12 inches of space on all sides of the indoor unit and at least 24 inches for the outdoor unit. This helps in optimal performance and longevity of your mini split system.
Next, consider the wall structure for the indoor unit. Make sure the wall can support the weight of the indoor unit. If it is a drywall or plaster wall, it’s essential to locate and mount the unit on studs for added support. Additionally, think about the location of drainage lines and where the electrical connections will be made to avoid any complications during or after installation, ensuring a seamless operation of your Daikin mini split system.
Proper Electrical Wiring
When it comes to the installation of your Daikin mini split system, ensuring that proper electrical wiring is in place is crucial. The unit requires specific electrical configurations to operate efficiently and safely. Missing or incorrect wiring can lead to several problems, including reduced efficiency, unexpected shutdowns, and even potential safety hazards.
Before proceeding with the installation, it’s important to consult the manufacturer’s manual, as it contains essential information regarding voltage, amperage, and circuit requirements. Usually, a dedicated circuit is recommended for your mini split system to ensure it operates smoothly without overloading other appliances. You may also want to consider the following wiring guidelines:
- Ensure a dedicated circuit with the appropriate amp rating.
- Use the correct gauge wiring to handle the load.
- Verify that the circuit breaker is rated for the unit.
Additionally, it’s wise to hire a licensed electrician if you are unsure about the wiring process. A professional can guarantee that the electrical setup adheres to local codes and safety standards, providing both peace of mind and ensuring the longevity of your Daikin mini split installation.
Professional Installation Benefits
When it comes to installing a Daikin mini split system, hiring professionals can make a significant difference in the overall performance and longevity of your HVAC system. There are several key benefits of opting for professional installation over a DIY approach.
One of the primary advantages of professional installation is the expertise that trained technicians bring to the table. They possess in-depth knowledge not only about Daikin mini split units but also about the best practices for installation. This experience ensures that the system is fitted correctly, minimizing the chances of future issues.
Additionally, professional installers typically provide warranties on their work, giving you peace of mind. If any problems arise post-installation, you can rest assured that they will be handled without additional costs. Furthermore, professionals can navigate local building codes and regulations, ensuring your installation is compliant and safe.
| Benefits of Professional Installation | Description |
|---|---|
| Expertise | Trained technicians with specialized knowledge of Daikin mini split systems. |
| Compliance | Adhere to local building codes and safety regulations. |
| Warranty | Work typically backed by a warranty for added peace of mind. |
| Efficiency | Ensure optimal performance and energy efficiency of the unit. |
In summary, the benefits of professional installation extend beyond simply having a functioning Daikin mini split. From expertise and compliance with regulations to warranties and energy efficiency, having your system i
Frequently Asked Questions
What is a Daikin mini split system?
A Daikin mini split system is a type of heating and cooling system that consists of an outdoor unit and one or more indoor units, providing flexible temperature control for residential and commercial spaces.
What tools are needed for the installation of a Daikin mini split?
The installation of a Daikin mini split typically requires tools such as a drill, wrenches, screwdrivers, a level, a vacuum pump, and tubing cutters.
Can I install a Daikin mini split system myself?
While it is possible to install a Daikin mini split system yourself, it is recommended to hire a professional to ensure proper installation, especially for electrical and refrigerant connections.
How long does it take to install a Daikin mini split system?
The installation of a Daikin mini split system usually takes between 4 to 8 hours, depending on the complexity of the setup and the number of indoor units being installed.
What are the benefits of using a mini split system?
The benefits of using a mini split system include energy efficiency, zoned heating and cooling, easier installation compared to traditional HVAC systems, and less noise due to the outdoor unit.
Where should I install the indoor unit of a mini split?
The indoor unit should be installed in a location that allows for optimal airflow, avoiding areas blocked by furniture or curtains. It’s best placed high on a wall, away from direct sunlight.
Is professional installation necessary for warranty purposes?
Yes, many manufacturers, including Daikin, require that a mini split system be installed by a licensed professional in order to maintain the warranty.


