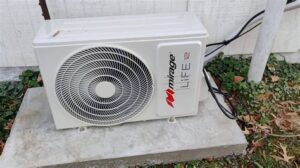
Learn how to install your air conditioning unit with expert tips on location, size, installation preparation, refrigerant line connection, and troubleshooting.Installing a Cooper and Hunter mini-split system can transform your home into a comfortable oasis, regardless of the season. With their compact design and energy efficiency, mini-splits are an excellent option for maintaining ideal temperatures without overhauling your existing HVAC system. However, the success of your installation largely depends on a few critical factors, such as selecting the right location for the indoor and outdoor units, choosing the appropriate size for your space, and preparing the installation area thoroughly. From connecting refrigerant lines to testing the system for optimal performance, each step is essential to ensure your mini-split operates effectively. In this blog post, we’ll guide you through the installation process, providing valuable tips and insights to help you achieve a seamless setup. Let’s dive into the essential steps to get your Cooper and Hunter mini-split system up and running!
Selecting the Right Location
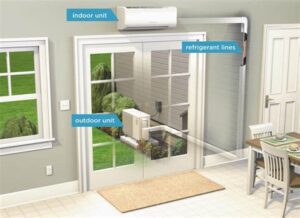
When it’s time to install a Cooper and Hunter mini split system, one of the most critical steps is selecting the right location. The optimal spot can greatly influence the system’s efficiency and effectiveness. Here are some key factors to consider:
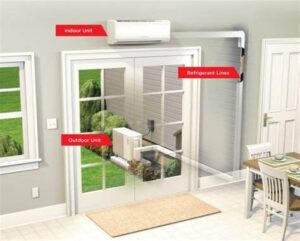
- Indoor Unit Position: The indoor unit should be mounted high on a wall where air can flow freely throughout the room. Avoid niches or corners that restrict airflow.
- Outdoors Constraints: The outdoor unit requires adequate clearance on all sides for airflow. Typically, a minimum of 12 inches is recommended from walls or foliage.
- Access to Draining: Ensure that there’s an appropriate path for condensate drainage from the indoor unit. The designated area should prevent water from pooling.
- Electrical Access: Choose a location with easy access to electrical connections to avoid complications during installation.
- Noise Considerations: Place the outdoor unit in a location where the noise will be least disruptive for you and your neighbors.
Each of these factors plays a significant role in the performance and durability of your heating and cooling system. Thoughtful location selection will enhance the efficiency of your mini split installation and also prolong its lifespan.
Before making a final decision, it may be beneficial to consult with a professional installer. They can provide valuable insight tailored to your specific home layout and ensure that the chosen location complies with local codes.
In summary, when selecting the perfect spot for your Cooper and Hunter mini split system, consider air flow, accessibility, and convenience to ensure optimal performance.
Choosing the Appropriate Size
When it comes to installing a Cooper and Hunter mini split system, selecting the appropriate size is crucial for achieving optimal performance and efficiency. The right size ensures that the unit can effectively heat or cool your space without wasting energy or failing to provide adequate temperature control.
Mini split systems are measured in BTUs (British Thermal Units). To determine the ideal BTU rating for your space, you need to consider several factors:
- Room Size: Measure the length and width of the room to calculate the square footage. A general rule of thumb is that you’ll need about 20 BTUs per square foot.
- Ceiling Height: High ceilings require additional BTUs. If your room has an 8-foot ceiling, stick with the standard calculations. For ceilings taller than 8 feet, add approximately 10% more BTUs for every foot.
- Insulation Quality: Poorly insulated spaces will lose heat or cool air more quickly, necessitating a higher BTU output. Consider adding extra BTUs if your insulation isn’t up to par.
- Sunlight Exposure: Rooms with large windows or significant sunlight exposure may need extra capacity. Accounts for 10% more BTUs for rooms with lots of exposure.
- Number of Occupants: Each additional person in the room can add around 600 BTUs. If it’s a frequently occupied space, factor this into your calculations.
To illustrate how to calculate the necessary BTUs for your space, here’s a simple table:
| Room Size (sq. ft.) | Recommended BTU |
|---|---|
| 150 – 250 | 9,000 |
| 250 – 300 | 12,000 |
| 300 – 400 | 15,000 |
| 400 – 450 | 18,000 |
By carefully evaluating these factors, you can confidently choose the right size for your Cooper and Hunter mini split installation. A properly sized system will ensure maximum comfort and energy savings.
Preparing the Installation Area
When it comes to cooper and hunter mini split installation, the first and foremost step is to ensure that you have properly prepared the installation area. This stage is crucial as it helps in achieving an efficient and effective installation. Here are some key considerations for preparing the installation area:
- Clear the Space: Start by removing any furniture, decorations, or obstructions in the area where the mini split unit will be installed.
- Ensure Accessibility: Make sure that the installation area is easily accessible to facilitate the installation process. This reduces delays and allows for easier maneuvering of equipment.
- Check Wall Integrity: Verify that the wall where the indoor unit will be mounted can support the weight of the unit. Use a stud finder to locate studs for secure mounting.
- Electrical Access: Ensure that there is an appropriate electrical outlet in the vicinity or plan to install one as part of the setup.
Additionally, it is critical to maintain an adequate distance from any heat sources, moisture, or direct sunlight to improve the performance of your cooper and hunter mini split. Positioning the unit for optimal airflow is also essential.
Once the area has been thoroughly prepared, take a moment to double-check local building codes and regulations. This can save you from potential issues with compliance and ensure a smooth installation process.
Proper preparation of the installation area not only enhances the efficiency and longevity of your mini split system but also simplifies the installation process, leading to a successful outcome.
Connecting the Refrigerant Lines
Connecting the refrigerant lines is a crucial step in the installation of a Cooper and Hunter mini-split system. Properly connecting these lines ensures that the refrigerant can circulate efficiently, allowing your HVAC system to operate correctly and provide optimal comfort in your space. Here’s how to effectively connect the refrigerant lines.
Before you begin, ensure you have the necessary tools: a tubing cutter, adjustable wrenches, flare-nut wrenches, and a vacuum pump. The refrigerant lines themselves typically come in two sizes: the liquid line and the suction line. It is essential to differentiate between these two to ensure correct installation. The table below outlines the key specifications:
| Line Type | Size | Purpose |
|---|---|---|
| Liquid Line | 3/8 inches | Transports refrigerant from the indoor unit to the outdoor unit |
| Suction Line | 5/8 inches | Returns refrigerant to the outdoor unit |
To connect the refrigerant lines, follow these steps:
- Cut the tubes using a tubing cutter to ensure clean ends.
- Attach flare fittings to the ends of the lines.
- Ensure the refrigerant lines are correctly aligned, then tighten the flare nuts using the flare-nut wrench to prevent leaks.
- Insulate the suction line to improve energy efficiency.
Important: Once everything is connected, check for leaks using a leak detector or soapy water solution. If you find a leak, make sure to fix it before proceeding to vacuum the lines. Proper connection and sealing of the refrigerant lines will ultimately lead to a more efficient mini-split system, ensuring your space is comfortable.
Testing and Troubleshooting
After installing your Cooper and Hunter mini split system, it is crucial to perform thorough testing and troubleshooting to ensure that everything is functioning correctly. The first step in this process is to check the unit’s power supply, ensuring that all electrical connections are secure and properly connected. A system that does not power on could simply be the result of a blown fuse or tripped circuit breaker.
Next, you should verify the refrigerant line connections. Leaks can occur, and it is essential to inspect for any signs of refrigerant leakage, which can hinder performance and cause damage to the system. Utilize a leak detector or soapy water to check for bubbles, indicating a leak, and repair any faulty connections. This step is critical for optimal cooling and heating efficiency.
Finally, run the system at both cooling and heating settings to evaluate its performance. Monitor the air temperature and make adjustments to the thermostat settings as needed. If the temperature does not reach the set point or fluctuates excessively, it may indicate a larger issue that requires troubleshooting. Always refer to the user manual for specific diagnostics and consult a
Frequently Asked Questions
What are the key steps in a Cooper and Hunter mini split installation?
The key steps include selecting the installation location, mounting the indoor and outdoor units, connecting the refrigerant lines, electrical wiring, and performing a system check.
Do I need professional help for installing a Cooper and Hunter mini split?
While some homeowners may opt for DIY installation, it’s recommended to seek professional help to ensure proper setup, safety, and warranty validity.
What tools are required for the installation of a mini split system?
Essential tools include a drill, level, wrenches, screwdrivers, and possibly a vacuum pump to remove air from the refrigerant lines.
How long does it take to install a Cooper and Hunter mini split system?
The installation process typically takes 4 to 8 hours, depending on the complexity of the setup and experience level of the installer.
What size mini split do I need for my space?
To determine the right size, you need to calculate the BTU (British Thermal Units) requirement based on the square footage of the room, insulation, and local climate.
What maintenance is required after installing a mini split system?
Regular maintenance includes cleaning or replacing filters, checking refrigerant levels, and ensuring the outdoor unit is clear of debris to optimize performance.
Can a mini split system be used for both heating and cooling?
Yes, many Cooper and Hunter mini split systems are designed to provide both heating and cooling, offering versatility for year-round climate control.
