Learn how to choose the right location and install your indoor unit, connect refrigerant lines, and effectively test and commission your HVAC system.Installing a mini split inverter system can greatly enhance your home’s comfort by providing efficient heating and cooling. Whether you’re looking to control the temperature in a single room or an entire house, understanding the installation process is crucial. This blog post will guide you through the essential steps to successfully install a mini split inverter system. We’ll cover everything from choosing the right location for optimal performance to preparing the installation area, as well as detailed instructions on setting up the indoor unit and connecting refrigerant lines. Finally, we’ll walk you through testing and commissioning the system to ensure it operates at peak efficiency. With the right approach, you can tackle this project confidently and enjoy the benefits of modern climate control. Let’s dive in!
Choosing the Right Location
When it comes to installing a mini split inverter, the first and one of the most critical steps is choosing the right location for the indoor unit. This decision can significantly affect the efficiency and performance of your air conditioning system.
Here are some key factors to consider when selecting the optimal placement:
- Proximity to Power Source: Ensure that the unit is near an electrical outlet to minimize the length of wiring needed.
- Airflow: Keep the unit away from obstructions such as walls, furniture, or curtains that could block airflow.
- Distance from Windows: Avoid placing the indoor unit near windows to reduce the impact of direct sunlight on its performance.
- Height: Ideally, mount the indoor unit at a height of 7 to 8 feet from the floor for optimal air circulation.
Additionally, it’s essential to consider the room layout and usage. A centrally located mini split unit will effectively cool or heat the entire area. Proper placement not only enhances comfort but also maximizes energy efficiency, reducing long-term operational costs.
Preparing the Installation Area
Before embarking on the journey to install a mini split inverter, it’s crucial to prepare the installation area meticulously. This step not only ensures safety but also maximizes the efficiency and longevity of your HVAC system. Let’s break down the essential steps to get your installation area ready.
First, you need to assess the location where the indoor unit will be mounted. Ensure that it is away from direct sunlight and any heat sources, as this could affect its performance. A common recommendation is to install it on an interior wall to optimize cooling and heating efficiency.
Next, clear the area of any obstacles, furniture, or items that could hinder the installation process. It’s also advisable to have a clean workspace to avoid any complications as you work. Additionally, check for any electrical outlets nearby and ensure they meet the required voltage specifications for the mini split inverter.
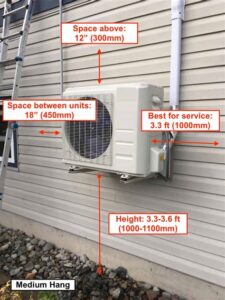
Lastly, consider the outdoor unit’s placement as well. It should be situated on a stable surface and far enough from trees or bushes to avoid blockages in airflow. Keeping these factors in mind while preparing your installation area will ensure a smooth and efficient installation.
Installing the Indoor Unit
Installing the indoor unit of a mini split inverter system is a crucial step in ensuring optimal performance and efficiency. Proper installation not only enhances the lifespan of the unit but also improves the overall comfort of your indoor environment. Below are the essential steps to follow when installing the indoor unit.
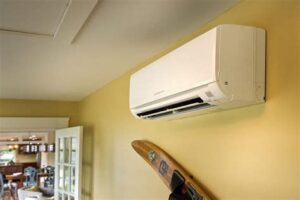
Before starting the installation, it is important to choose the appropriate location for your indoor unit. Ideally, the unit should be placed in a central location within the room to enable even distribution of air. Avoid areas with excessive sunlight or direct airflow from doors and windows. The following criteria should be considered:
- Height: Mount the unit at least 7 feet off the ground for proper air circulation.
- Clearance: Ensure a minimum clearance of 4 inches from the ceiling and 8 inches from the walls.
- Space: Allow enough space for maintenance access.
Once the location is determined, it’s time to install the indoor unit. Start by using a level to mark the mounting bracket’s position on the wall. Drill the necessary holes, insert wall anchors, and then screw the mounting bracket securely to the wall. After the bracket is mounted, you can lift the indoor unit and slide it onto the bracket. Ensure it is stable and leveled before proceeding.
Lastly, connect the refrigerant lines and the electrical cables to the indoor unit. Follow the manufacturer’s instructions carefully for these connections to prevent any damages. Once everything is secured, you are ready to test and commission the system. Proper testing will confirm that the unit is functioning efficie
Connecting the Refrigerant Lines
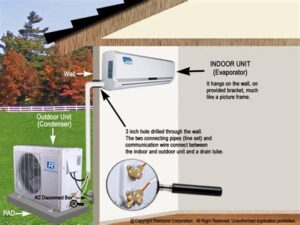
Connecting the refrigerant lines is a crucial step in the process of installing a mini split inverter system. This involves linking the indoor and outdoor units, allowing the refrigerant to flow and facilitate heat exchange. Before beginning, ensure you have all necessary tools and materials, such as copper tubing, flare fittings, and the correct refrigerant for your system.
Start by measuring and cutting the copper tubing to the required lengths. It’s important to ensure that the lines are cut accurately to prevent any leaks. Once cut, use a tubing bender to shape the lines, making sure they can easily fit between the indoor and outdoor units without any sharp angles.
When connecting the lines, always ensure that the fittings are properly flared. Use a flare tool to create a perfect seal on each of the ends before attaching them to the units. After securely connecting the lines, perform a pressure test to check for leaks. This is a vital step as any leaks in the refrigerant lines can lead to system inefficiency or failure. Always refer to the manufacturer’s guidelines for specifications and safety measures during the installation process.
Testing and Commissioning the System
After successfully installing your mini split inverter system, the next crucial step is testing and commissioning the system. This phase ensures that everything functions as intended and meets the necessary performance standards. Proper testing and commissioning help to identify any potential issues before they become significant problems.
Begin by checking the electrical connections to ensure they are secure and correctly wired. Keep an eye out for any unusual sounds or vibrations that might indicate a problem. Then proceed to test the system’s operation by following these steps:
- Power Up: Switch on the unit and set it to the desired temperature.
- Check Refrigerant Levels: Verify that refrigerant levels are within the recommended range.
- Airflow Tests: Measure the airflow at the vents to ensure it’s consistent with specifications.
- Temperature Differential: Measure the temperature difference between the intake and output air to confirm efficiency.
Once initial tests are complete, perform a detailed inspection of the system’s components. Listen for any errors and check for leaks. It’s essential to thoroughly document the performance metrics for future reference and troubleshooting. With these steps completed, your mini split inverter system will be set up for optimal efficiency and comfort!
Frequently Asked Questions
What is a mini split inverter system?
A mini split inverter system is a type of ductless heating and cooling system that allows for controlled climate comfort in a specific area or room. It uses an outdoor compressor and one or more indoor air-handling units.
What tools do I need to install a mini split inverter?
To install a mini split inverter, you will typically need screwdrivers, a drill, a level, a refrigerant gauge, a pipe cutter, and wrenches.
Can I install a mini split inverter system myself?
While it is possible for a skilled DIYer to install a mini split inverter system, it is recommended to hire a professional to ensure proper installation and to comply with local codes and regulations.
What is the first step in the installation process?
The first step in the installation process is to choose the appropriate location for the indoor and outdoor units, taking into account factors such as airflow, accessibility, and distance.
How do I connect the indoor and outdoor units?
To connect the indoor and outdoor units, you will need to run refrigerant lines along with electrical wiring between the two units, ensuring that all fittings are secure and leak-free.
What should I do after installation is complete?
After installation, check for leaks, test the system to ensure it operates correctly, and follow the manufacturer’s instructions for setting up the thermostat and any remote control features.
Are there maintenance tasks I need to perform on my mini split inverter?
Yes, regular maintenance tasks include cleaning or replacing filters, checking for refrigerant leaks, and scheduling professional inspections to ensure optimal performance.
