Learn how to select the best location and unit size, plan your installation, and ensure proper testing for optimal HVAC system performance.Installing a Bosch mini split system can be a game-changer for your home’s heating and cooling needs, offering efficiency and comfort while saving you money on energy bills. However, a successful installation requires careful planning and execution. From selecting the right location to choosing the appropriate unit size, each step plays a crucial role in ensuring optimal performance. This blog post will guide you through the essential phases of Bosch mini split installation, including critical pre-installation inspections and the intricacies of electrical and refrigerant line setup. Finally, we’ll cover the importance of testing and commissioning the system to guarantee it operates at peak efficiency. Whether you’re a DIY enthusiast or hiring professionals, understanding these key elements will help you achieve an effective and reliable mini split installation.
Choosing the Right Location
When it comes to the efficient operation of a Bosch mini split, selecting the right location for installation is crucial. The positioning of your unit not only affects its performance but also the comfort of your living space. Consider both the indoor and outdoor components carefully before making a decision.
Here are several factors you should keep in mind:
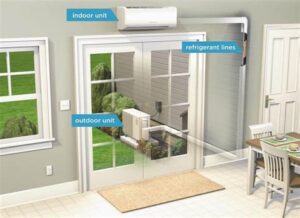
- Proximity to External Walls: Place the indoor unit near an exterior wall for easier installation of the refrigerant lines and drainage.
- Airflow Consideration: Ensure that nothing obstructs the airflow around the unit. This includes furniture, curtains, and other obstructions.
- Height from Ground: The indoor unit should ideally be installed about 7 to 8 feet from the ground to optimize air circulation and comfort.
- Accessibility: Choose a location that provides easy access for maintenance and cleaning. This will save time and effort in the long run.
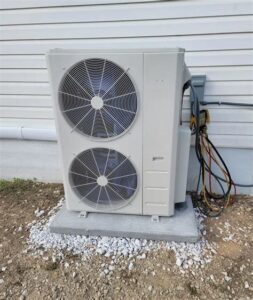
Furthermore, ensure that the outdoor unit is positioned in a shady spot to avoid overheating and is elevated off the ground to prevent water pooling around it. A solid, level surface will help reduce vibrations and noise as well.
By taking these important factors into account, you can ensure an efficient installation of your Bosch mini split system, leading to enhanced performance and comfort in your home.
Selecting the Proper Unit Size
When it comes to the installation of a Bosch mini split system, selecting the proper unit size is essential to ensure optimal performance and efficiency. An undersized unit may struggle to cool or heat your space, while an oversized unit can lead to higher energy bills and inadequate humidity control.
To determine the right size, it’s important to conduct a load calculation. This involves assessing the insulation levels, square footage, and the number of windows in your area. Here are some key factors to consider:
- Room Size: Measure the length and width of the room to calculate the total square footage.
- Ceiling Height: Higher ceilings may require additional capacity for effective air distribution.
- Sun Exposure: Rooms with large windows or those that receive direct sunlight may need a larger unit.
- Occupancy: More occupants generate more heat, so consider this when sizing your unit.
Once you have the necessary data, you can refer to the manufacturer’s sizing guidelines, typically expressed in BTUs (British Thermal Units). For instance, a common rule of thumb is that you need roughly 20 BTUs for each square foot of living space. However, this can vary according to the factors mentioned above.
In conclusion, selecting the right size for your Bosch mini split is more than just a numbers game. It requires a detailed analysis of your living space’s unique characteristics to ensure comfort, efficiency, and cost-effectiveness in your home. Consider consulting with a professional for the most accurate assessment.
Pre-Installation Inspection and Planning
Before proceeding with the installation of a Bosch mini split system, conducting a thorough pre-installation inspection and planning is essential for a successful setup. This initial phase helps to identify potential challenges and ensures that the system will operate efficiently once installed.
During the inspection phase, consider the following key points:
- Room Assessment: Evaluate the space where the mini split will be installed. Identify any obstructions that may affect airflow and ensure adequate insulation to maximize cooling or heating efficiency.
- Electrical Requirements: Check the existing electrical system to confirm it meets the requirements for the Bosch mini split. A dedicated circuit may be necessary, so consult a licensed electrician to verify compatibility.
- Refrigerant Line Path: Plan the route for the refrigerant lines carefully. This includes identifying the shortest and most efficient path between the indoor and outdoor units to minimize loss in efficiency.
Creating a detailed installation plan can help avoid common pitfalls later in the process. Make sure to incorporate measurements of wall space, ceiling height, and potential drainage issues into your planning. This foresight is crucial for ensuring that your Bosch mini split system operates effectively and lasts for many years.
Electrical and Refrigerant Line Installation
When it comes to Bosch mini split installation, one of the most critical steps is the proper installation of electrical and refrigerant lines. These components are essential for the efficient functioning of your mini-split system. A thorough installation not only ensures optimal performance but also prolongs the life of the unit.
Before installing the electrical and refrigerant lines, it’s vital to plan according to the manufacturer’s specifications. Ensure that you have all the necessary materials on hand, including copper tubing, insulation, and appropriate electrical wiring. An organized approach here can prevent complications later in the installation process.
Additionally, it is important to follow safety guidelines during installation. This includes verifying the electrical connections with a multimeter before powering up the system and ensuring that the refrigerant lines are properly insulated to prevent leaks. Following these steps diligently will ensure a successful installation of your Bosch mini split system.
Here’s a quick checklist for your electrical and refrigerant line installation:
- Plan the layout of the electrical and refrigerant lines.
- Gather all necessary materials and tools.
- Ensure proper insulation on refrigerant lines.
- Double-check electrical connections.
- Follow safety protocols throughout the process.
Testing and Commissioning the System
Testing and commissioning are crucial steps in the installation process of a Bosch mini split system. These procedures ensure that the system operates efficiently and reliably. During this phase, several tests are conducted to verify that all components are functioning as intended.
First, it’s essential to check for any leaks in the refrigerant lines. A simple pressure test can be performed to confirm their integrity. If any leaks are detected, they must be repaired before proceeding further. This step ensures that the system will maintain its efficiency and prevent compressor failure caused by insufficient refrigerant levels.
Following the leak test, the system is then powered on, and a performance evaluation is conducted. This includes checking the temperature differentials between the indoor and outdoor units to ensure they meet the manufacturer’s specifications. Additionally, the airflow rate, sound levels, and overall system responsiveness are assessed to verify proper installation.
Once all tests and evaluations are completed and the system is confirmed to be fully operational, a final inspection is conducted. This may include reviewing the installation site to ensure that all electrical connections are secure and that the system meets local building codes and regulations.
In conclusion, testing and commissioning are vital for the successful operation of your Bosch mini split system. By thoroughly checking for leaks, monitoring performance, and ensuring compliance with safety standards, you can enjoy a reliable and efficient heating and cooling solution for years to come.
Frequently Asked Questions
What is a Bosch mini split system?
A Bosch mini split system is a type of air conditioning and heating system that consists of an outdoor compressor unit and one or more indoor air handling units, allowing for efficient climate control in individual rooms.
What are the benefits of installing a Bosch mini split?
Benefits include energy efficiency, flexibility in temperature control for different rooms, reduced noise levels compared to traditional systems, and ease of installation without ductwork.
What tools do I need for Bosch mini split installation?
Essential tools typically include a drill, level, screwdrivers, wrenches, a refrigerant gauge set, electric meter, and a vacuum pump for the refrigerant lines.
Can I install a Bosch mini split myself?
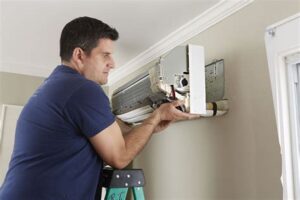
While it is possible to install a Bosch mini split yourself, it is recommended to hire a professional to ensure proper installation, especially for handling refrigeration lines and electrical connections.
How long does the installation process take?
Typically, the installation of a Bosch mini split system can take anywhere from a few hours to a full day, depending on the complexity of the setup and the number of indoor units being installed.
What should I consider before installation?
Consider the size of the space, the BTU capacity required, the layout of your home, insulation, the location of outdoor units, and local building codes.
How can I maintain my Bosch mini split system after installation?
Regular maintenance includes cleaning the filters, checking the refrigerant levels, ensuring the outdoor unit is clear of debris, and scheduling annual professional check-ups to ensure optimal performance.
