Discover the essentials of mini splits including installation steps, required tools, and the advantages of hiring professionals for optimal performance.When it comes to heating and cooling solutions, mini splits have gained popularity for their efficiency and flexibility. However, many homeowners ponder the crucial question: Are mini splits easy to install? This blog post aims to demystify the installation process of mini split systems, offering an overview of how they work and what to expect during installation. We’ll delve into the necessary tools and materials, providing a step-by-step guide for those who prefer a DIY approach. While some may find the installation straightforward, we will also explore the benefits of opting for professional installation to ensure optimal performance and peace of mind. Whether you’re considering a mini split for your home or simply curious about the process, this post has you covered!
Mini Splits: Overview
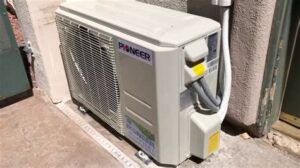
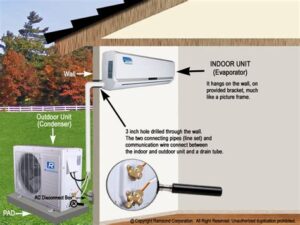
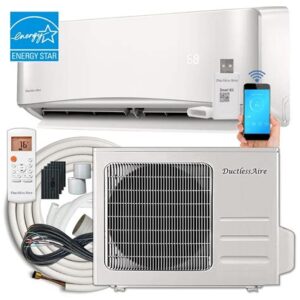
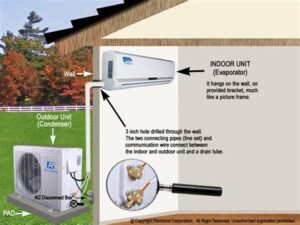
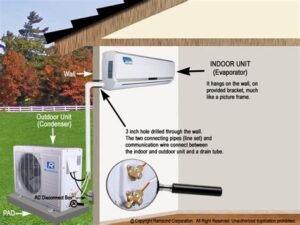
Mini splits are an efficient and versatile solution for heating and cooling various spaces without the need for extensive ductwork. They consist of an outdoor compressor unit and one or more indoor air handling units, providing room-by-room temperature control. This makes them particularly popular in homes lacking a traditional HVAC system or in areas that require extra cooling or heating.
The primary component of a mini split system is the inverter-driven compressor, which allows for more precise temperature regulation and energy efficiency. These systems can be wall-mounted, ceiling-mounted, or even floor-mounted, depending on the layout of the space and the specific needs of the user. Mini splits are available in various sizes and capacities, making them suitable for both small and large areas.
One of the key advantages of mini splits is their ability to operate quietly, significantly reducing the noise levels typically associated with traditional HVAC systems. Moreover, due to their energy-efficient operation, they can lead to substantial savings on utility bills, making them a financially smart choice for many homeowners.
Installation Process
Installing mini splits can be a rewarding project for any DIY enthusiast, but it’s important to approach the task with careful planning and consideration. The installation process involves several key steps that ensure the system operates efficiently and effectively. Below are the main steps involved in installing mini splits.
1. Gather Necessary Tools and Materials
Before beginning the installation, it’s essential to have all the required tools and materials on hand. Here’s a list of what you will typically need:
- Drill and drill bits
- Wrenches and screwdrivers
- PVC piping
- Electrical wire
- Refrigerant line set
- Mounting bracket
- Level
- Vacuum pump
- Safety gear (gloves, goggles)
2. Choose the Right Location
Selecting an appropriate location for both the indoor and outdoor units is crucial. Ensure that the indoor unit is free from obstructions and is placed where it can efficiently circulate air. The outdoor unit should also be installed in a location that allows for proper ventilation and is easily accessible for maintenance.
3. Install the Mounting Bracket
After determining the location, the first physical step is to install the mounting bracket for the indoor unit. Use a level to ensure that it is straight and secure it to the wall with anchors and screws.
4. Create the Hole for the Lines
Next, you will need to drill a hole through the wall to accommodate the refrigerant lines, electrical wires, and condensate drain. This hole should be slightly angled downward to ensure proper drainage.
5. Connect the Indoor Unit
With the hole ready, you can now install the indoor unit by connecting the refrigerant lines, electrical wiring, and drain hose according to the manufacturer’s instructions. Make sure all connections are tight to avoid leaks.
6. Install the Outdoor Unit
Once the indoor unit is connected, position the outdoor unit on a stable platform, ensuring there is enough clearance for airflow. Connect the refrigerant lines and electrical wiring from the indoor unit to the outdoor unit.
7. Finalizing the Installation
After all connections are made, it’s time to vacuum the lines using a vacuum pump to remove any air and moisture. Finally, create a weather-tight seal around all openings and turn on the system.
While this overview provides a comprehensive guide to installing mini splits, it’s highly recommended to consult the installation manual for your specific unit. This ensures that all guidelines are properly followed, optimizing both performance and warranty compliance.
If you’re not confident in your ability to complete the installation process, consider hiring a professional. Proper installation is crucial for maximizing the efficiency and lifespan of your mini split system.
Tools and Materials Needed
When it comes to installing mini splits, having the right tools and materials is crucial for a successful setup. Below is a comprehensive list of the essential items you’ll need for the installation process.
Essential Tools
- Drill: A power drill will be necessary for making holes for the mounting brackets and for the refrigerant lines.
- Level: This tool ensures that your indoor and outdoor units are mounted straight.
- Wrench Set: A set of wrenches is needed for tightening connections and fittings.
- Vacuum Pump: This is vital for removing moisture and air from the refrigerant lines before charging.
- Manifold Gauge Set: Used for checking and adjusting refrigerant levels.
Materials Required
- Mini Split Unit: Make sure to choose a unit that fits the size of the space you need to cool or heat.
- Mounting Bracket: Necessary for securely fastening the indoor unit to the wall.
- Refrigerant Line Set: This includes the suction line and liquid line essential for heat exchange.
- PVC or ABS Condensate Drain Line: Required for draining condensation away from the indoor unit.
- Electrical Wire: This connects the indoor unit to the outdoor condensing unit and powers the system.
Ensure you have all the tools and materials listed above to streamline the installation process of your mini split system. Gathering everything beforehand will save you time and reduce interruptions during the task.
Additionally, it’s wise to double-check your local building codes. Some regions may have specific requirements for materials and installation practices when it comes to mini splits.
Proper preparation is key to a successful installation, so make sure to equip yourself with the right tools and materials before diving into your project.
Step-by-Step Guide
Installing a mini split system can seem daunting at first, but with the right approach, it can be a straightforward process. Below is a step-by-step guide to help you through the installation of a mini split system.
Step 1: Gather Tools and Materials
Before starting the installation, ensure you have the necessary tools and materials. Here’s a list of what you’ll need:
- Drill
- Hole saw
- Refrigerant lines
- Electrical connections
- Mounting brackets
- Insulation tape
Step 2: Position the Indoor Unit
Select an appropriate location for the indoor unit. Make sure it’s away from direct sunlight, heat sources, and obstructions. Use a level to mark the mounting holes and install the bracket securely.
Step 3: Drill a Hole for the Lines
Using the hole saw, drill a hole through the wall to allow the refrigerant lines and electrical connections to pass through. Ensure the hole is slightly sloped downward toward the outside for proper drainage.
Step 4: Connect the Refrigerant Lines
Carefully connect the refrigerant lines from the indoor unit to the outdoor unit. Make sure to follow the manufacturer’s instructions for this step to avoid leaks.
Step 5: Connect Electrical Wiring
Next, connect the electrical wiring from the indoor unit to the outdoor unit. Always ensure the power is off before performing any electrical work.
Step 6: Test the System
Finally, once everything is connected, turn on the power and test the mini split system. Check for proper operation and inspect for any refrigerant leaks.
This step-by-step guide serves as a basic outline of the installation process for mini splits. Remember that while some homeowners may feel comfortable taking on this project themselves, enlisting the help of a professional can ensure ever
Benefits of Professional Installation
When considering mini splits, one question often arises: are they easy to install? While some DIY enthusiasts may attempt to take on this task themselves, there are significant benefits to opting for professional installation. Here are several reasons why you should consider hiring a qualified technician for your mini split installation.
Firstly, professionals bring extensive experience and technical knowledge to the table. They are well-versed in the complexities of HVAC systems and understand the specific requirements of mini splits. This expertise ensures that the installation adheres to local codes and regulations, leading to a safer and more efficient setup.
Secondly, a proper installation minimizes the risk of potential problems down the line. Mistakes during the installation process can lead to issues such as refrigerant leaks, poor air circulation, and decreased energy efficiency. When a professional handles your mini split, you can rest assured knowing that the job is done correctly, maximizing the lifespan and performance of the unit.
Finally, hiring a professional can save you time and stress. The installation of a mini split involves various steps, including calculating load requirements, mounting the outdoor unit, and connecting refrigerant lines. A technician can complete these tasks swiftly, allowing you to enjoy the bene
Frequently Asked Questions
What are mini-splits?
Mini-splits are compact heating and cooling systems that consist of an outdoor compressor unit and one or more indoor air-handling units.
What are the advantages of using mini-splits?
Mini-splits offer energy efficiency, individualized temperature control for different rooms, and easier installation compared to traditional HVAC systems.
Is the installation of mini-splits a DIY project?
While some aspects of mini-split installation can be done by handy homeowners, it is typically recommended to hire a professional for optimal performance and safety.
What tools are needed for installing mini-splits?
Tools generally needed for mini-split installation include a drill, screwdriver, level, refrigerant gauges, and a vacuum pump.
How long does it take to install a mini-split system?
Professional installation usually takes about 4 to 8 hours, depending on the complexity and number of indoor units.
Are there any common mistakes to avoid during mini-split installation?
Common mistakes include improper sizing of the unit, incorrect placement of indoor units, and failure to properly seal refrigerant lines.
What kind of maintenance do mini-splits require?
Mini-splits require regular cleaning of filters, periodic inspections by a professional, and checking refrigerant levels to ensure efficient operation.
